Tool Chest – Saws
I am moving along with the inside of the chest and planning where to place my various tools. The saw till needs to hold two handsaws, a tenon saw and a dovetail saw. I have a couple of other saws, but I will keep them in the other saw till I have been building along with this project. (Think reading two books at the same time is difficult? I actually have three projects underway in the garage!) The two handsaws are fairly simple since they are approximately the same size, the tenon saw is much shorter, but has a deep saw plate so as long as I can support the saw in two places it should work well. The dovetail saw is a problem unto itself. It’s short length and shallow saw plate may require a totally different solution.
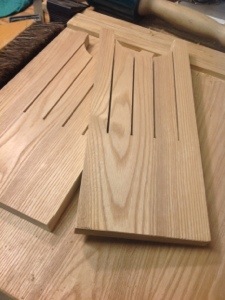
 Using the dimensions in the Anarchist Tool Chest I cut two boards to the same width and height. Since the ash I was using is prone to chip along the saw cut I used a technique from Paul Sellers and used my marking knife to make two parallel lines roughly the width of the saw kerf. Cutting between the lines I was able to get very clean, chip free edges.
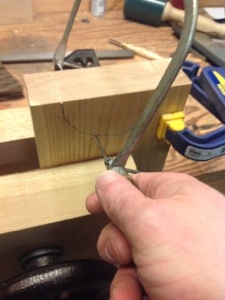
I then marked the semi circle on the pieces using a compass, clamped them together and cut the curve with a coping saw. Next time I will make sure I have spare blades handy. I placed sandpaper around a piece of pipe and used it to sand the curves smooth. I used the table saw to cut the grooves for the saws. Carefully cutting a groove on one side, turning the piece over to get a matching groove on the opposite edge, then repeating on the second piece. Once all four grooves were cut I cleaned them up with a hand saw.

Next I cut a piece of poplar to fit the length of the chest and four pieces of oak to attach the till to the sides. Using my # 4 Stanley Plane I quickly smoothed all of the boards cleaned up the corners and stared blankly into the chest.
I needed to step back and carefully plan the position of the till pieces to optimize the use of space, support the saws and hopefully identify a spot for my dovetail saw. Supporting the hand saws and the Large Tennon saw demands that the till pieces be spaced no further apart than 11″.


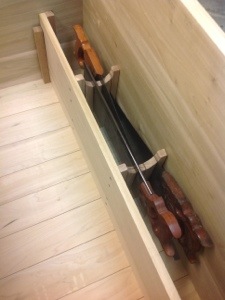
 I drilled holes for four 1 1/2″ screws in each of the till supports. I have not used a power drill since I picked up my Millers Falls Drill. The ability to carefully control the drill speed and position makes it very accurate and less likely to chip the wood at the exit of the hole. It also looks cool and only cost $7 with bits included! I screwed the supports to the board and placed it into the chest. I plan on using some polyurethane on the till pieces and on the guides used on the board. It should make a nice contrast.
I can see a place for my dovetail saw on one side of the saws and will make a support to hold it. Next step… finishing the drawers and drawer slides. Hopefully it’ll be warmer next weekend.

Thanks for showing this trick. I’ll be putting this to use in my Dutch tool chest. Yippee! Something I don’t have to figure out.