The BIG Glue Up
Glue-ups can be stressful! Many hours of work cutting and planing boards, making and fitting joints come down a final glue up. Almost everything up top this point can be adjusted planed or replaced. Once the glue up begins it is almost a one way street.
I have been thinking about the coffee table glue-up for a couple of weeks. Realizing that it was going to be time consuming and complex I determined that I could glue up a couple of sub assemblies to make things easier.
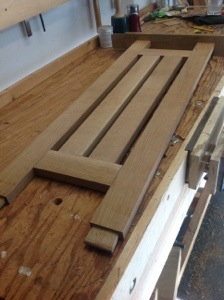 The center section of the undershelf was the first part that I glued together. I test fitted it, made several adjustments to the joints, tested again and then clamped it together. Once cleaned up and planed I was able to glue the two rails onto the outside with little problems.
Gluing sub-assemblies certainly relieves the stress at the end of a project and gives plenty of time for small adjustments. After this was complete I began looking at the coffee table as a whole and considering methods to glue up the rest. Questions such as what comes first the ends or the sides, where will I place the clamps. Do I need help or can I do this alone, danced through my head.
After lots of muttering and mumbling I decided I could not plan anymore and began laying out everything I need to glue the pieces together. I dampened a couple of paper towels, laid out all of the clamps opened to the approximate size and got my son to help. The actual glue up took about 1/2 an hour and was fairly eventful. With 4 eyes looking we were able to avoid many mistakes and slowly get all of the pieces glued and in place. Clamps fit well and I checked across the diagonal to make sure everything was square. We then checked each joint, cleaned up any squeeze out and stepped back to look at our work.

Looking good I left the table to dry overnight glad to have this step behind me and looking forward to scraping the table top. This morning I removed the clamps and as I took off the last one I heard a crack. looking around I did not see anything amiss until I looked on the other side of the table and realized one of the joints had opened up.
Good time to step back and think. First, the joint was not glued with a gap – good thing, there appeared to be no wood damage- good thing, The gap was small and I didn’t see how to get glue into it – bad thing.

I realized that if anything could be done I needed to open the gap so I could get glue into it. I placed a clamp on the bottom of the legs and tightened it enough to open the gap on this leg without affecting anything else. Then I carefully forced glue down into the joint and clamped it back together.
Not sure how strong it will be, but it was my only option. If this does not work I will need to consider pinning the joints. I’m sure that would work, but then it follows with: do I pin all of them to have the same look on each leg? We’ll see how this first attempt works before I go too far down that route.
Thinking about why the joint opened up, the only answer I have is that I did not get enough glue onto the tenon. I did have one joint that was looser than the others and this may be it. Not to worry about it now. We’ll figure it out.
Over-all it was a relatively smooth glue up with little problems. Planning makes a big difference.


You might consider wedging the tenons on through tenon joints. It probably wasn’t the look you were going for but it keeps joints from opening up. The table looks fantastic and I hope that joint doesn’t give you any more trouble.