Archive
Walnut Coffee Table, Chamfer and Finish
Finishing is certainly not my strong point and not my favorite part of a project, however it’s the final step to seeing it all complete. I have been struggling with chip out on the edges of the table top and finally decided to chamfer them to remove the damage and prevent any more from occurring. Not sure if this is a Walnut normalcy, but I have not had this problem with other lumber.

The finish for the table is shellac, polyurethane and wax. Simple, and allows the wood to speak for itself.
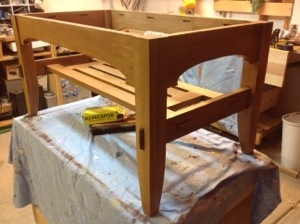
The final step is attaching the tabletop to the base. Fortunately when I was cutting the side rails I remembered to cut slots for the

It’s Finished!!
 With the finish on the table and the wax complete I can attach the tabletop to the base. This is an exciting time for this project, it seems like it has taken a long time to reach this point and I look at the table and see the many lessons that I have learned. I spent a few minutes making some turn buttons then used some screws to attach the table top to the base. I tried out a new countersink that my father in law picked up and it work brilliantly.
As I stood there and looked at the finished product I am very pleased. It turned out well, but that’s not really what makes me happy, it’s the hours of careful hand work, the lessons in patience and challenge of a mistake. I’m also very happy and thankful for all of you that have posted comments, made suggestions and come along for the ride. It’s been a lot of fun.

Coffee Table Finish
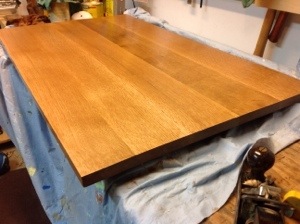
 Fortunately I have planed, scraped and sanded all of the parts during assembly so all I have to do is touch up a couple of spots and remove a pencil mark or two and apply finish. Over the last couple of weeks I have thought about the best way to finish off the coffee table. Initially I apply a coat of clear de-waxed shellac to seal the sanded surface. Next I applied two coats of a mahogany gel stain . The red color of the stain will find the grain of the oak and add little bit of color without moving too far away from its natural color. On the lower portion of the table I finish with 3 more coats of shellac. sanding in between. Then I use steel wool and wax to provide a very smooth protective finish. Since I applied the de-waxed shellac I am able to use water based stain and a water based polyurethane for the top. I realize that as a coffee table it will receive quite a bit of abuse so I want to protect it as best I can. You can see the slightly darker board in the picture of the top. At this point I think it adds character and does not detract from the table. two more coats of Poly and I’m done.
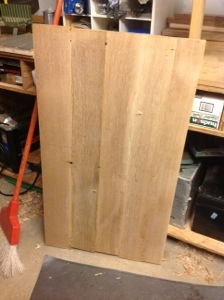
What was I thinking? Coffee table top.
There is a certain amount of skill required to produce a high quality mistake. Over several years I have continue to practice these skills and have developed a healthy resume:
Shelf installed upside down, mortise hole in wrong place, cut board on wrong line , marked line on wrong board, cut wrong board, installed table top upside down, there are more mistakes too numerous to mention. There are also the mistakes that only I can see…you know the ones that you have to point out to people and they always say, “I would have never known”. Finally after years of research there is a new mistake that I can add to my resume:
Glue the wrong board into the table top! In the photograph the second board is much darker than the rest (photo does not do it justice at all.) This is really not the type of mistake you should try at home, please leave it to the professional mistake makers….the board that was supposed to go here is still sitting on the bench ready to go………now where’s that saw!
1 hour later…..On second thought that board doesn’t look so bad
2 hours later…. Maybe if I begin to plane it I’ll get a better look at it.
4 hours later… Now that I have all this time into it, why cut it up?
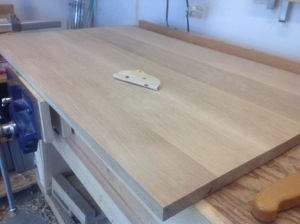
Smoothing the table top was really fairly easy. Most of the work was done with my Stanley # 4. Once I had isolated some of the problem areas on the board I grabbed my cabinet scraper and card scraper and cleaned up all of the areas of funky grain and areas that I had tear out. The cabinet scraper that I used came from Veritas and once I figured out how to effectively sharpen the blade and turn an edge, I had some beautiful shavings. In fact when I completed planing and scraping, sanding was done with the one piece of paper shown in the picture.
I sawed the top to size and then grabbed a hand plane to smooth the edges. With a very sharp blade it always amazes me how well a hand plane cuts across the grain on the edges of the board.


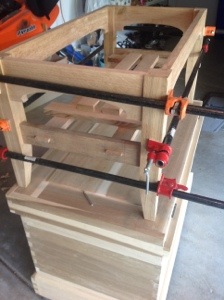
The BIG Glue Up
Glue-ups can be stressful! Many hours of work cutting and planing boards, making and fitting joints come down a final glue up. Almost everything up top this point can be adjusted planed or replaced. Once the glue up begins it is almost a one way street.
I have been thinking about the coffee table glue-up for a couple of weeks. Realizing that it was going to be time consuming and complex I determined that I could glue up a couple of sub assemblies to make things easier.
 The center section of the undershelf was the first part that I glued together. I test fitted it, made several adjustments to the joints, tested again and then clamped it together. Once cleaned up and planed I was able to glue the two rails onto the outside with little problems.
Gluing sub-assemblies certainly relieves the stress at the end of a project and gives plenty of time for small adjustments. After this was complete I began looking at the coffee table as a whole and considering methods to glue up the rest. Questions such as what comes first the ends or the sides, where will I place the clamps. Do I need help or can I do this alone, danced through my head.
After lots of muttering and mumbling I decided I could not plan anymore and began laying out everything I need to glue the pieces together. I dampened a couple of paper towels, laid out all of the clamps opened to the approximate size and got my son to help. The actual glue up took about 1/2 an hour and was fairly eventful. With 4 eyes looking we were able to avoid many mistakes and slowly get all of the pieces glued and in place. Clamps fit well and I checked across the diagonal to make sure everything was square. We then checked each joint, cleaned up any squeeze out and stepped back to look at our work.

Looking good I left the table to dry overnight glad to have this step behind me and looking forward to scraping the table top. This morning I removed the clamps and as I took off the last one I heard a crack. looking around I did not see anything amiss until I looked on the other side of the table and realized one of the joints had opened up.
Good time to step back and think. First, the joint was not glued with a gap – good thing, there appeared to be no wood damage- good thing, The gap was small and I didn’t see how to get glue into it – bad thing.

I realized that if anything could be done I needed to open the gap so I could get glue into it. I placed a clamp on the bottom of the legs and tightened it enough to open the gap on this leg without affecting anything else. Then I carefully forced glue down into the joint and clamped it back together.
Not sure how strong it will be, but it was my only option. If this does not work I will need to consider pinning the joints. I’m sure that would work, but then it follows with: do I pin all of them to have the same look on each leg? We’ll see how this first attempt works before I go too far down that route.
Thinking about why the joint opened up, the only answer I have is that I did not get enough glue onto the tenon. I did have one joint that was looser than the others and this may be it. Not to worry about it now. We’ll figure it out.
Over-all it was a relatively smooth glue up with little problems. Planning makes a big difference.

Pre-fit and adjust
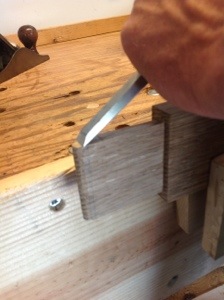
There are many joints in this project and with that many opportunities for mistakes and misfit parts. Before I begin glueing up I want to closely look at each tenon and the fit with it’s mortise. Next I want to assemble the coffee table and clamp it together to look at how the piece as a whole fits together. Joints that fit well individually, may not fit when they are pieced together with other parts. It is also a perfect time to sand all of the pieces and plane the aris of each piece.

I quickly realize that there are a couple of through mortises that I have forgotten to trim the edges. I clamp them in the vice and then taking a chisel pop the corners off to refine the look. I notice a couple of joints are not closing up tightly and upon inspection remove a small amount of material from the tenon. Any pencil marks that remain are removed with and eraser. Next I hand sand each piece with 220 grit paper. This should be all of the sanding that is required. This process requires me to clamp and un-clamp the parts several times as I make the adjustments.

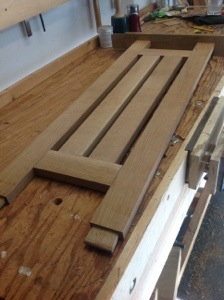
Under-shelf Complete
Time has slipped away quickly and the coffee table sits in the garage partially assembled. A week of extremely hot weather, a busy work schedule and some work around the house and I’ve not finished the coffee table yet.
Today I’ve set out to compete the Under-shelf. Nothing particularly about it except some care to get the measurements correct and a series of mortise and tenon joints. Initially laying out the joints in pencil gave me the opportunity to view the layout prior to any permanent marks. I then marked the mortises with a knife and chopped them out with a chisel. Each one took a out 10 minutes. The tenons are 3/4 inch long and I marked them using a mortise gage. Funny thing but I found out one of them was significantly less than 7/8 inch and I had to cut a new piece. Where that piece of stock came from I have no idea!.


Fitting the tenons required some quick work with a chisel and router plane. The great thing about the router plane is the ability to trim equal amounts from each side maintaining the tenon in the center of the piece. I had a little trouble fitting one of the pieces until I realized that it was not quite square. A little work with a plane and everything fits.
I’m begining to think about the glue up of this piece and it’s looking to be very complex. The under shelf is made up of this component and two rails on the sides. It appears that I need to glue up this component before I complete the mortises in the rails. That should insure a good fit and one less part to glue up at the end.
Coffee Table Undershelf
 Grabbing my measurement and marking tools I began laying out the mortises for the undershelf. after all what good is a coffee table if you have no where to stash the games and magazines when the neighbors come over.
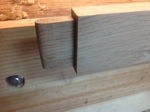
The plans call for through mortises on the sides of the shelf although as I look at it I think I may not cut them through. Seems that it may be too much joinery and instead of adding to the piece draw the eye away for the whole. All of the final pieces are placed on the shelf long rails and I sat and stared contemplating the effect of the exposed joints.
While I was day dreaming (contemplating) my design adviser stopped by and affirmed that the piece did not require any more through joints. Why i even contemplated it I will never know the answer was so clear!

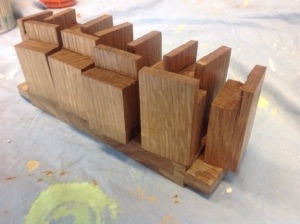
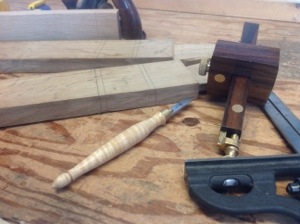
Rounding the Tenons
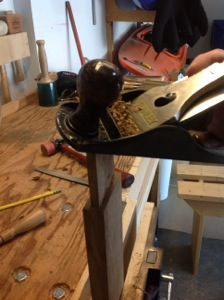
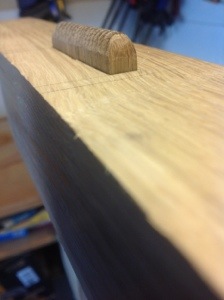
Until 3 months ago I had no idea about making through tenons, let alone that rounding them could be done with a hand plane, chisel and if needed a file.
Coffee Table Rails
Through Tenons are a new joint for me. I have made a total of two and now I’m looking ahead to making 8 more. Using a saw to cut the tenons I stayed away from the marks and used a router plane to close in on the correct thickness.

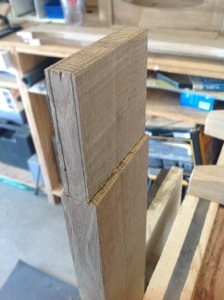
 Using my router plane was very relaxing and provided a lot of control as I trimmed the Tenons. I managed to get the first four Tenons looking fairly good and it is clear that as my confidence grows I can cut closer to the lines. I’ll shape the exposed mortises tomorrow and then on to the under shelf.

