Home
> Small Tool Chest, Techniques, Tools and Schools, Woodworking Master Class > A tense moment Small Tool Chest
A tense moment Small Tool Chest
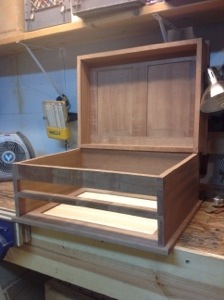
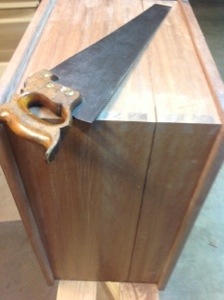
Before I attached the lid of the tool chest I marked the cut line for the lid. I’m now physically prepared to make the cut. Notice I say physically, the chest is positioned, saw is sharp, cut lines marked……mentally however I’m a little concerned.
Sawing a straight line all the way around the carcass looks to be a little tricky so I clamp a guide to help me get started. Then using a panel saw I progress one edge at a time around the chest. Changing my hand hold on the saw gave me more control as I attempted to stay between the marks. Finally the cut is complete. I’ll need to take some time with a plane to clean up the edges, find some hinges, then I can begin the drawers.


Beautiful work and well done. Must admit I’m wishing I had a hand tool project like yours in the works. As it is I have several orders for boxes from the Etsy store so rather than use a skill set like you are I’m separating lid and box with a tablesaw!
Wow, that’s looking really good. That must have indeed been a tense moment!