Archive
Woodworking Withdrawl
Note to self; when moving and storing woodworking tools for an extended period of time keep a few nearby to sharpen, hold in your hand and polish.
It’s been several weeks since the tools were packed away. They are now in storage and may be there for several months. I’ve read many blogs, articles and comments that reflect on the curious need to touch and look at your tools. Clearly I have a touch of tool..itis, wood..itis and design..itis and I have no idea how to pass the time until the tools are again in their rightful place. Some of the more obvious symptoms:
Sharpening – A desire to sharpen tools. This is a very strangle affliction, sharpening is a necessity not a desire.
All Fine Woodworking Articles look like excellent projects – Any magazine must appeal to a wide audience and Fine Woodworking is no exception. Typically I look through and one article grabs my eye, currently I want to build every project.
Lee Valley Website – Admittedly Lee Valley is a favorite source of tools, however I don’t typically scroll through it endlessly looking at the tools I already own.
The infamous unfinished bed – I’m considering finishing the bed I made 20+ years ago. Why now?
Workbench Confessions
A couple of confessions – My workbench is ugly; I’m envious of all those beautiful benches out there!
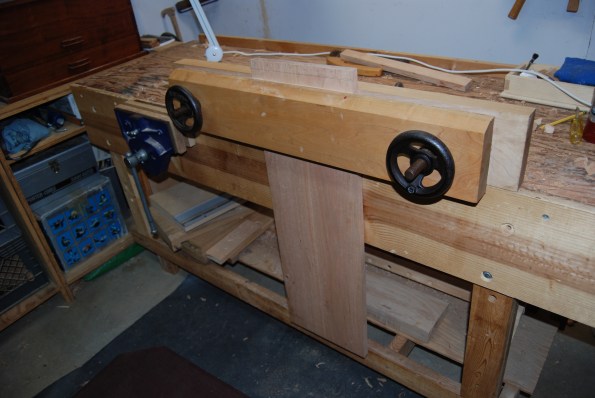
Not quite what you go to the confessional to admit, but for a woodworker it was tough. It’s been hidden away in my photos so let me introduce you. The bench is made up of one sheet of plywood cut in half and glued together creating a 24″ wide, 8′ long bench. The length is awesome although a few more inches of width would be nice. Given a makeover I would go to thirty or thirty two inches including a tray at the back.
A few years ago as I increased hand tool use, I began using a front vise and had to make several modifications. A 10″ wide board was added to the front along with doubling the leg width. Some cross bracing on the sides and the bench became very solid. My old vise stays on the side holding the strop for easy access. I made this bench as a teenager working with my father. It is a design from an old friend of his and has served well. Starting out, I certainly wouldn’t shy away from this bench. It’s cheap and works well.


But all of those other benches they sure have the looks!
Not necessary
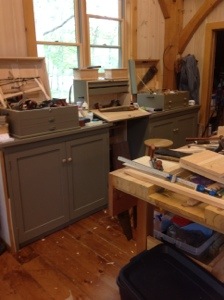
The Hanging Tool Cabinet project prompted a review of my shop space. Review may not be the correct term, in fact, let’s say a moment of panic when seeking empty wall space. Look at the picture, do you see an area about 40″x 30″?
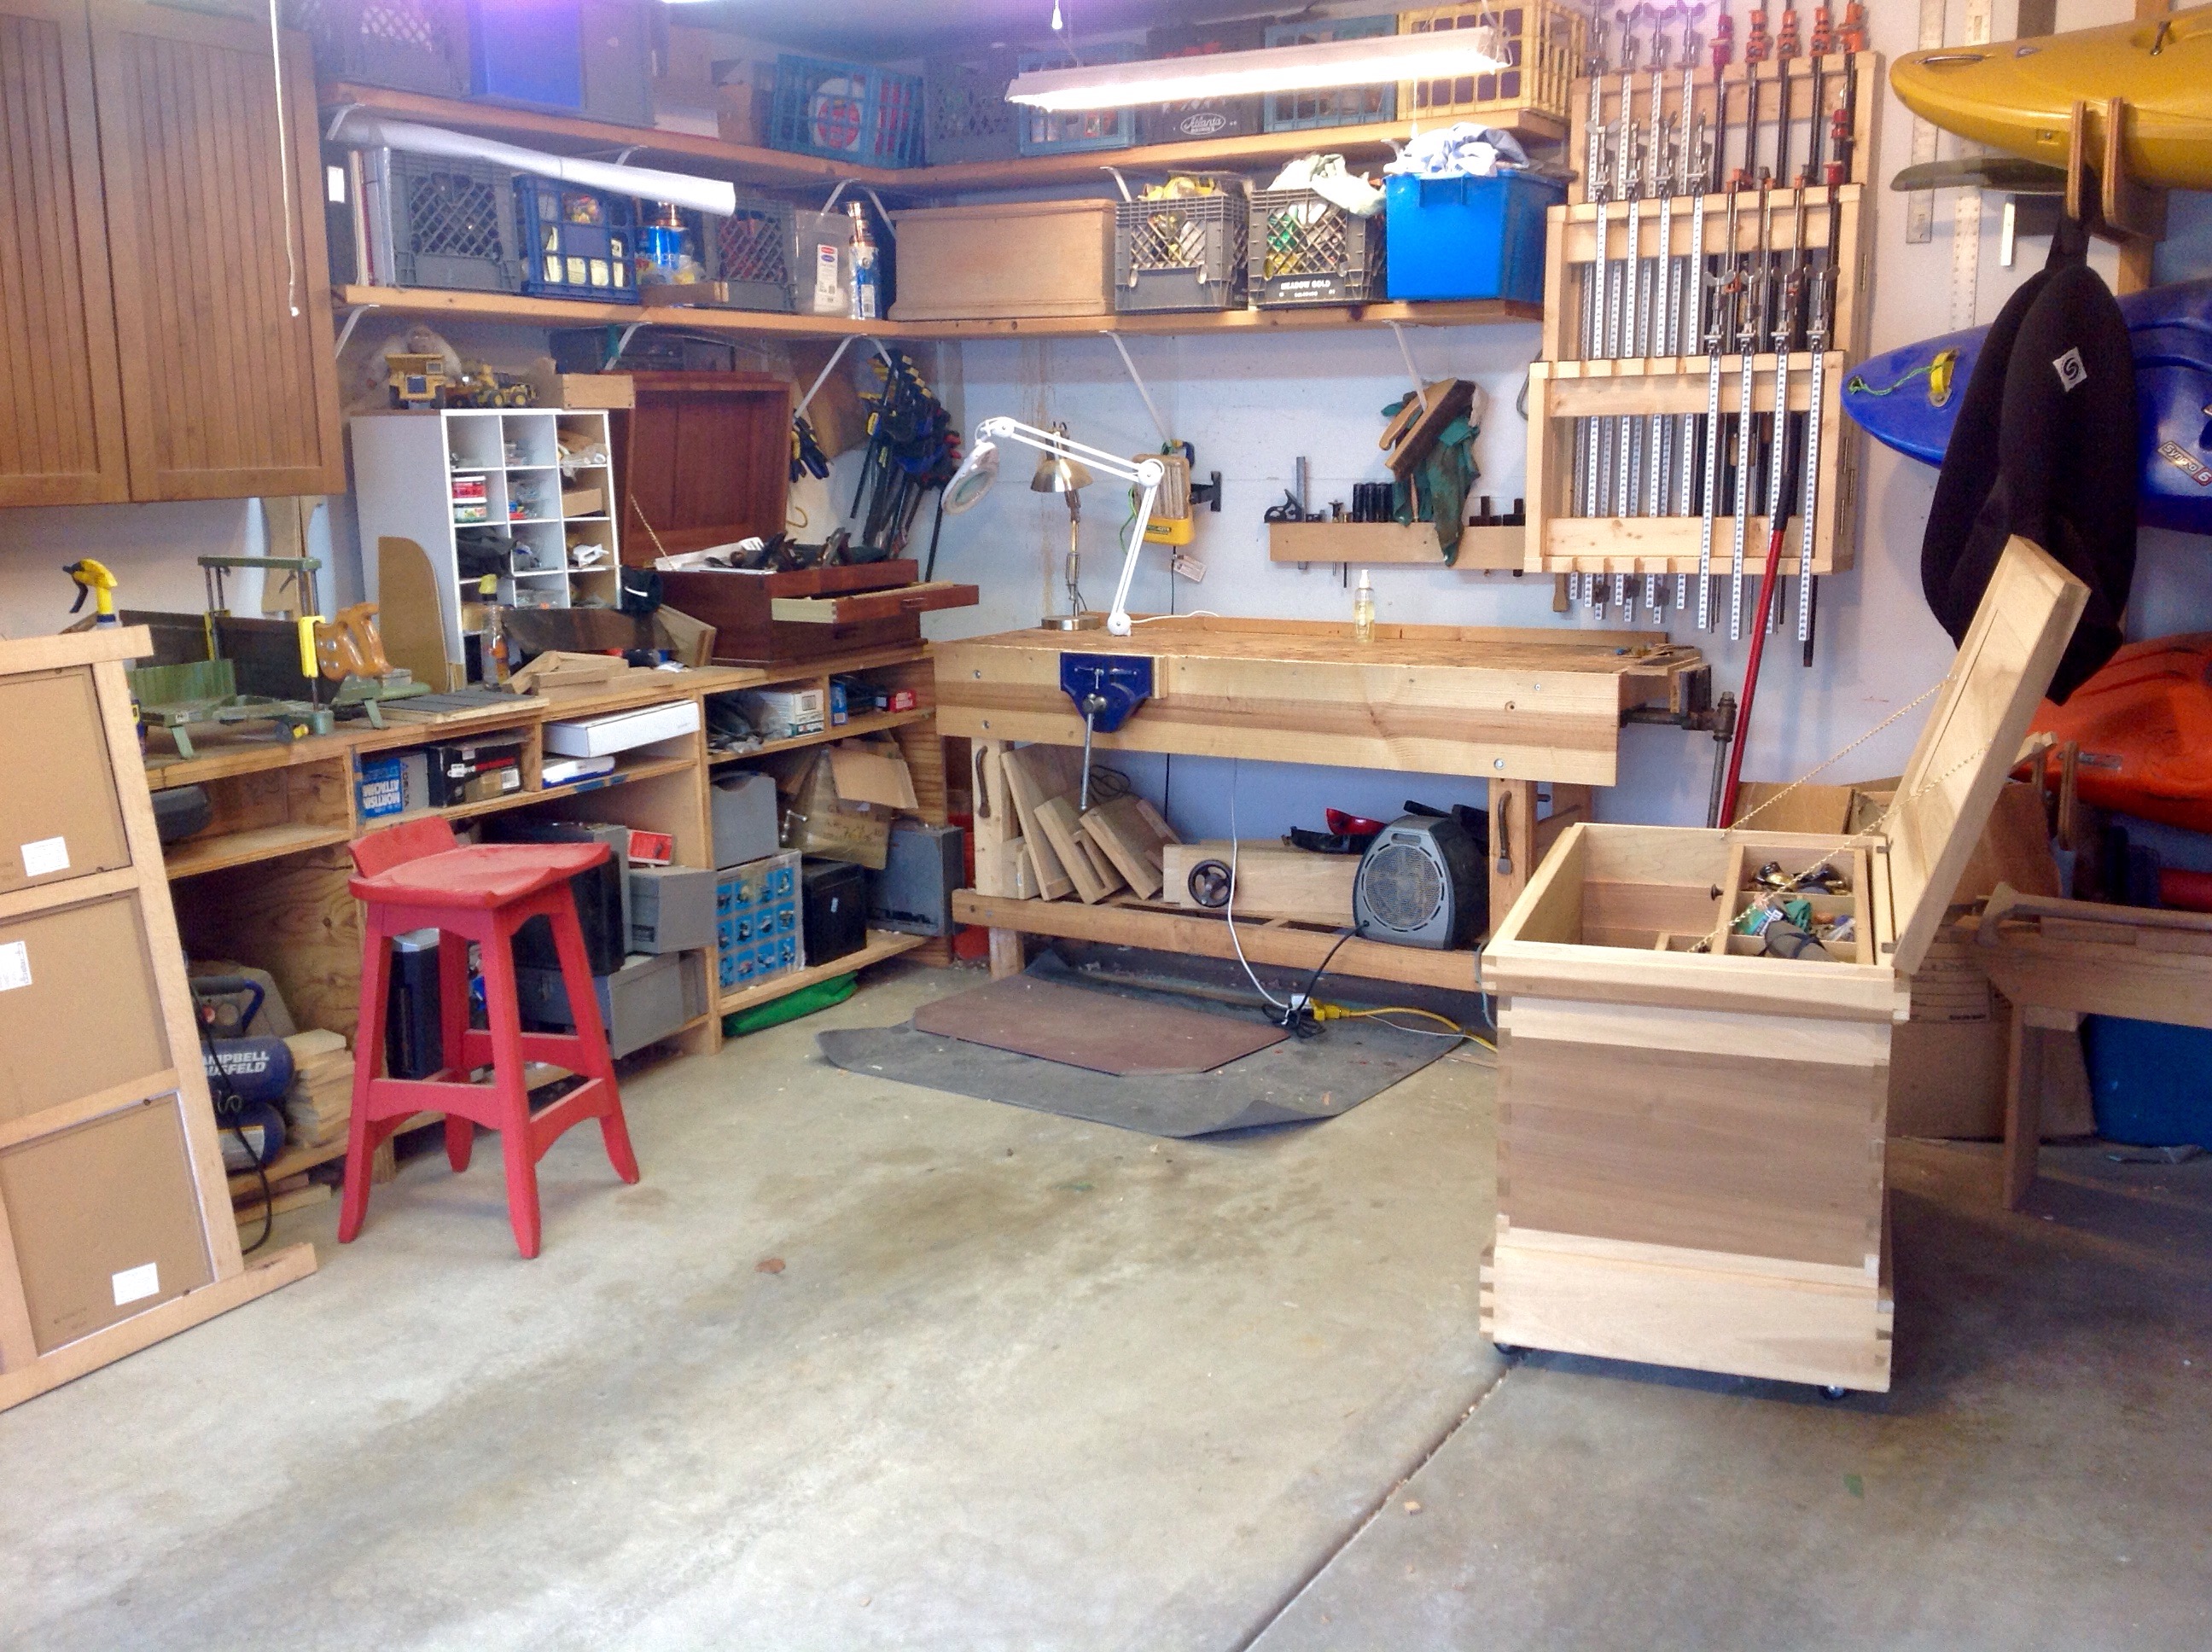 Looking into all of the boxes on the shelf it became apparent that some progress could be made by robust cleaning and consolidation. Simply, get rid of the junk!
Feeling good about the purge, I began handling tools and jigs that I had not used for many years. Changing most of my work to hand tools, has made some of these items obsolete. Why shouldn’t I move these items along as well. 6″ Delta Jointer used once in 2015 made me mad because I took more time getting the rust of then using it, for sale. 14″ Jet bandsaw, new tires used a dozen times in a dozen years, for sale, Leigh dovetail jig ( used a good bit 6 years ago and not since) eBay. Mortising attachment for drill press out the door. Etc. etc. hopefully I can get a little money, help out fellow woodworkers and simplify my space.
Next I began looking at where my saw till was placed. Too far from the bench! Reshuffling the quiver of kayaks, it’s now by the bench. Old cabinet that I don’t like? Splinters and recycle lumber. After a couple of days I have plenty of room for my new cabinet (just have to get it built) and a lot less junk to get in the way.


Flea Market Wanderings
 Over the last couple of weeks I’ve done little woodworking. Spent most of my time running and working. This weekend I’ve been a little under the weather so spent a couple of hours wandering the local flea market.
Noticed this workbench which didn’t appear to be more then 28″ tall but extremely well made. Had bolts so it could be disassembled. My first thought was a child’s work bench but looking at the top it had a lot of use. I kept looking for moulding planes, but had little luck. I came across many rabbit planes some bench planes and even threw out a number on a saw vise. but no one seemed to be in the mood to haggle and prices were high.
The market did get my mind churning as I looked at antiques and new pieces. The latest trend seems to be reclaimed lumber table tops and chests. Some well built, many assembled with nails. I also saw many pieces of stained glass that had been framed. It would seem that with the weight of some of these pieces a mortise and tenon joint or pegged saddle joint would have been more appropriate.
The best part was that I began to plan my next project….An organizer for my daughter. She showed me a picture in a magazine that she liked and I began plotting out the joints and pieces. If I am luck I can get it done for Christmas.
Catapults and Chisels
 I started the weekend with the goal to complete the saw vise that I began several weeks ago. It wasn’t long before I was putting the vise aside and learning how to make a crossbow. One of my goals for using hand tools was to make my work area more inviting for my family. The only thing better than listening to my children chatter about their day while sitting on my tool chest is helping them build a project.
It seems to be working……
The plan for today was to build and install a trigger system on a homemade crossbow. Interestingly my son had already built the frame from a design he found on the internet. He also had researched a trigger system and had made most of the components. What had him stuck was the need for a through mortise. I took a couple of minutes and explained chisel safety demonstrated how to cut a mortise and watched him chop out a very nice place for the trigger. The hardest part..giving him room to grow.
.
It seems to be working.
Another Chair Repair
A couple of times in the last year I have been able to help friends and neighbors repair damaged furniture. I consider this part of being a good neighbor and expect nothing in return. It’s also fun to have them stare in awe at what you consider to be a quick simple repair. Several weeks ago a friend brought me part of a rocking chair and asked if I could repair it. Finally I managed to get to the part this weekend and spent an hour making a new piece.
I milled the piece to size and drilled the holes for the bolts. Then chiseled out the slot. Nothing very difficult about the process with the exception that the bolt holes did not line up, the mortise was slightly askew and the edges not square (and that was on the original and thus had to be done on the replacement..


Spring Comeback
Between very cold weather, and a nasty cold/virus/plague there has been almost no woodworking for a few weeks. However, I have been plotting and planning a comeback.
Saw Vise Planning Underway
Learning to sharpen saws last year has been a tremendous advantage. It was almost an epiphany when a freshly sharpened saw was placed into my hand by Paul Seller’s. The accuracy and speed of cut was only surpassed by the feeling of excitement when I finally understood the joy of sawing with sharp teeth. I have successfully sharpened my saws many times since; however over this winter, in a garage without natural light my sharpening accuracy has dulled. My vise until this point has been two scraps of wood holding the saw plate in the vise.
This has worked well and I encourage anyone to work this way, however I have decided that bringing the saw closer to my eyes and the light, should improve my sharpening accuracy. Currently I am considering two vise plans; The first a saw vise that was picked up by Paul Sellers and shown in his image below. The second is a vise I first saw on Peter Follansbee’s blog. The links should take you to the pages where I saw the vise images.
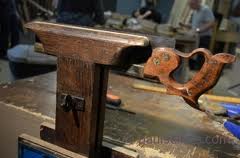 I like the simplicity of the Vise shown by Paul and it looks like a fun project that includes some mortise and tenon joints and cutting a hinge. I imagine I will end up building both.
Shop Stool
Placing a couple of stools in my shop has become a priority. I am content to sit on my saw bench, however I enjoy the chatter when my wife or children join me in the shop and want to make it more welcoming. Several weeks ago I began milling lumber for the stools using the plans in Woodworking Masterclasses. When the weather breaks this will be project number 2.
Minor Bench Top Repair
As the blog for the Small Tool Chest Handles came together I noticed in one of the pictures an indent in my bench top. Going out to take a look, I realize that the plywood top must have a cavity and it was caving in one spot. After briefly considering building a new bench, I decided a quick fix was in order.
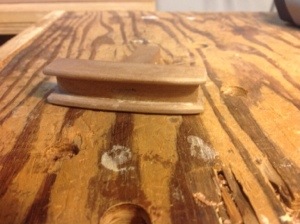
Cutting away the area surrounding the cavity with a chisel was simple. I found a scrap of poplar in the bin and cut it to rough size then placed it over the cavity and marked the edges with a knife. Cutting along the marks I fitted the replacement piece and glued it into place.
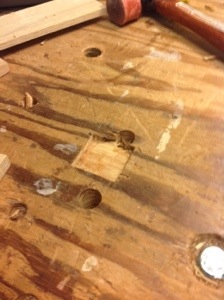

A minute with a plane and it’s ready to go. Now on to a new project!

The World of Woodworking is closer than you expect!
One of the best parts of my blog is the group of followers that read and comment. They provide laughter, criticism, advice and links to projects yet to be built. I have a group of bloggers that I interact with regularly, and may others that stop in occasionally. I’m not sure how many followers I have, but I am much more aware of the many countries they come from. Finally after a year of watching I have reached South America with someone from Chile and Columbia reading. As I look at the countries around the world I often wonder about the wood that these readers are using, the different styles they encounter and tools and techniques they use. Sadly many of the readers from countries outside of the United States have not “Followed my Blog” so I am unable to see if they have a blog of their own.
A couple of days ago an email notified me of a new follower to my blog. Looking at the email I could see they had a blog of their own and although it was in German I took a look. Pictures of stacks of lumber, beautiful hand made planes and cabinets danced across my screen. The year of German that I struggled through in school was of no use and I wistfully looked at the page seeking to understand what was written. Then it suddenly dawned on me that I could grab the words and using Google Translate read what the blogger had written. A few clicks and suddenly German became English and I was thrilled. I immediately showed the blog to my 12 year old daughter and how Google Translate worked. She smiled pointed to her Ipad and said “yeah, works great, I’ve had it for a while.”
Here’s to my latest follower slowwood.wordpress.com. Volker has a great blog with wonderful pictures and a great writing style. I hope you will take the time to follow along.
For myself and all of the other woodworking bloggers, if you are reading a blog and have one of your own, please Follow or send a Like. I would love to see what is going on in woodworking around the world, and if it’s not in English don’t worry, I’ll take the time to read it in Google Translate.
What’s Next?
The end of every project is a great time to take a look around the bench and spend some time cleaning, sharpening and reflecting. since I am not earning a living from woodworking I have the luxury of time. Sweeping up, it’s amazing where all of the shavings and dust accumulate. I have three projects in mind and they follow from the coffee table just completed.
 The tool box is the next project in Paul Sellers Masterclass series. It sits upon the cabinet in the photo. It includes panel construction, dovetails and as in all of Pauls’s projects, great skill building. I work out of a tool chest based upon The Anarchist Tool Chest and I love it. The design works well for storage and accessibility.
However, I want to make more of an effort to get tools off of my bench as I work. When I was at woodworking class we had benches with a tool tray in the center. This was brilliant and it kept tools below the table top and within easy reach. If I ever build a new bench there will be a center tool tray. Many people have criticized the use of a tool tray as a collector of dust. It is a great safety feature that allowed me to keep tools at hand, but below working level where I could accidentally catch a sharp edge. The bench I am currently using is adequate and until I have a shop worthy of a new bench, I will not have a tool tray.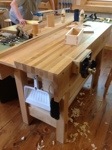
Since there will be no tool tray in the near future I’m also remembering a small apron on the bench that allowed us to keep the tools off to the side. I really liked this and was teased by my fellow classmates for how clean it was kept. (Yes gentlemen, I have not forgotten) If they had really been paying attention, it would be clear that I was storing tools in use in the center tray
 and upon completion of a part, sharpening and returning tools to the side tray. The tray worked well in the classroom, however I would like to utilize the small tool chest to keep tools accessible. I think setting it adjacent to my bench will serve as tool tray. Paul Seller’s Tool Chest definitely in the future!
Clamp Storage is a topic that comes up for all woodworkers. There are many articles in the magazines and blogs that throw out many great plans. Clamps have always been stored under the shelves above my bench. This has been effective. There are a couple of problems…..sometimes I end up pulling out all of the clamps to get to the one on the bottom which is usually the one I want. My fingers are tired of being pinched between the many clamps jumbled up. With the additional clamps I purchased for the coffee table project I need a new system. Anyone have thoughts on what works well or what to avoid?
The last project that I have in mind is a matching side table to the coffee table. There are many lessons that I learned during the project and I would like to put them to good use. I think a smaller table that is square and matches the coffee table would look nice.
As if these three are not enough there is a blanket chest to be made, another desk and so forth. No I’m not ignoring these at all, I think in my skill development the tool chest will give me the panel skills that these projects require.
