Archive
Improved Bar Clamps
Yesterday I tackled a project I have meant to do for a couple of years. Glueing small pieces of wood to my clamps, I now have made glue ups a little easier. Every time I have a big glue up with multiple clamps and many pieces of wood used to protect the project surface I think how great it would be to have the wood attached. A stumbled across a piece of quarter inch plywood when cleaning up and before I forgot again, cut pieces to size and glued them to the clamps.

Transition Planes
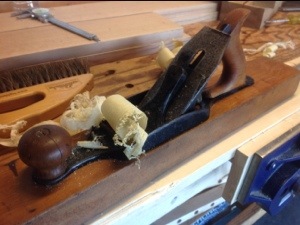
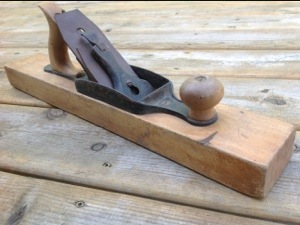
Several people have spoken about the qualities of wood planes. Until several months ago I had little knowledge of transition planes and even then it was a passing comment about their feel as they glide across a board. A few weeks ago I was handed a box of old planes; I was a little surprised, but many of us have been given tools from friends, relatives and people down the street.

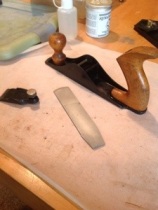
As a struggled to put words onto the computer screen last week my eyes strolled over to the cardboard box that rested on my bench. Reaching in I sorted through the planes until my hand fell upon the metal of this transition plane. The wood was dry, the blade blunt and rusty and the tote loose. Deciding that at the least a little linseed oil was needed, I spent several minutes wiping the dirt and grime from the wood and metal.
The linseed oil soaked into the wood rapidly and several coats later the beauty of the plane began to shine through. I cleaned and added wax to the japanning on the metal and the plane really began to catch my eye. Leaving the plane to dry, I continued working on several other projects intending to place the plane in my tool box to be worked on at another time. It caught my eye several more times and I continued to add Linseed oil until the wood could hold no more.
 After the last coat of oil I began placing the blade into the plane, but at the last minute decided to oil it up to prevent further rust. An hour later I had forced the blade and chip breaker apart (force is a polite term) removed rust and sharpened the blade and begun cleaning the frog. I had not realized that these planes have the adjustment of a stanley plane. This is one of the factors that had prevented me from acquiring wood planes in the past. I like the fine control of the mechanical adjustment. At this point there is a certain excitement about trying a wooden plane with the fine adjustment of a Stanley #4.
I grabbed a scrap piece of poplar and clamped it into my vise. Adjusting the plane I eased it onto the wood and felt the blade bite, a little too deep. I spun the adjustment wheel and placed the plane back on the board. Swisch…..


Back to the begining of the board, I push forward again, Swisch….clearly the plane did not say Swish…there was a definite c in the spelling. The wooden sole glided across the board and the blade sliced through the wood. I began easing the plane back and forth across the board feeling it work and hearing the sound as it removed slice after slice. Wow!!!!!!!
John Patrick, your cardboard box of planes has revealed the soul of a wooden plane and put a smile on a woodworker’s face. What a wonderful gift!!! Keep well my friend and know the planes are in great hands.
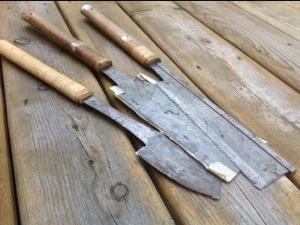
New Planes. And Japanese Saws
Photographs fill my ipad, wood chips dance across my bench and words hang on my tongue. Many things to blog about but for some reason the words will not drop onto the screen. A friend of my father in law handed me a box full of planes. Digging through them, I spot this transition plan in fair shape. I have heard how these feel across the wood and am excited to try it out.
There are also three Japanese planes which my Father in Law handed to me. Never having maintained or used one I’ll have to do a little research.
Panel Saw Mystery
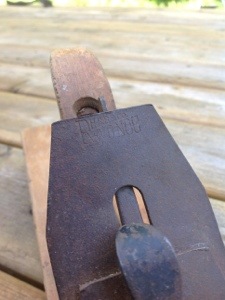
A very kind gift has placed several new handsaws on my bench. Amongst them is a beautiful panel saw. It is in good condition with the usual dirt and slight rust and saws straight before sharpening. I noted a minor crack in the handle so I disassembled the saw so I can place some glue in the crack and what do I find? A little mystery to share.
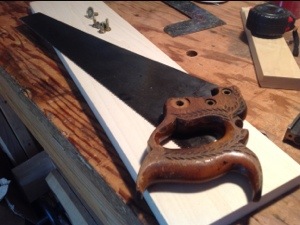
The saw plate has 10 stamped in the lower corner indicating 10TPI which is correct. The handle appears to be or is very similar to those made by Disston the saw nut is an eagle and states warranted superior. All of this may add up to a Disston saw or other brand made by Disston. There is a mark on the plate which may say Disston, but it is almost gone and I fear that I may be imagining the letters.


The mystery has little to do with the manufacturer, but rather what was revealed when I removed the handle. If you look closely at the photograph you will notice that there is half a hole in the end of the plate and the number 5 stamped at the top of the plate. What does this mean?

People have often taken old saw plates and cut them down for smaller saws, however I would not expect to see an additional stamped TPI for the home rebuild. Is it possible that the factory made a mistake and cut down the saw plate to use in a panel saw? Maybe this was during the War when steel was in short supply or maybe standard practice.
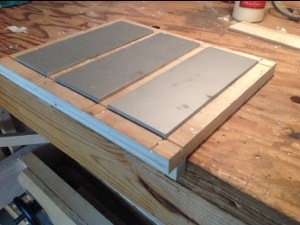
Sharpening Board
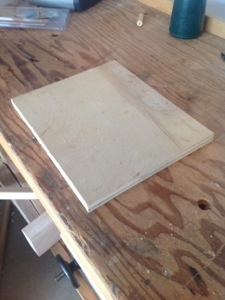
I took a little time today to create a board to hold my diamond plates. Over the last two years I have been using water stones for all of my sharpening and had good success. There are two complaints from these stones, the first is the time it takes to sharpen a chisel and the second, stone, water and freezing temperatures don’t mix. Solving the time issue is really a matter of stone selection and moving towards hand sharpening. By using a coarser stone I could greatly decrease time. Getting rid of the jigs and time to set them up by hand sharpening would decrease the time even more.
The temperature problems occur because I work in an unheated garage in the winter. I bring my sharpening equipment indoors in the winter so that the stones don’t freeze and crack. This means that I have to come inside, march to the basement, sharpen and then go back out. The result is delayed sharpening, lost time and a tendency not to go back out when I’m in.
Purchasing diamond plates was made easier after using them at the foundations class. They were fast and effective, right next to the bench and will not freeze in the winter. They arrived last week and I spent an hour making a board to secure them. You can find a link with the dimensions here.


Stanley # 3 Shows Up

The runners are glued into the chest. Clamping the drawers into my vice I reached for for my Stanley #4 Plane to begin fitting them. After a couple of passes across the dovetail pins I realized that the plane in my hand was in fact a #3. I acquired this plane several months ago and after flattening the sole and sharpening the blade it sat in my tool box.
As the plane glides across the ends and sides, I test its weight and balance. The tote fits securely in my hand and as I begin and end a pass it lifts with my hands. The balance is extraordinary and I appreciate the slightly smaller size on the ends of the drawers.
Admittedly I enjoy cleaning and working with different tools and I am fortunate to have a number of planes to use. Although differences can be subtle and planes can be used for a range of work, it is enjoyable when you find one that fits a task perfectly.
After finishing and fitting the first drawer I continue to work on the nex t two, until they glide across the runners. I still have to insert plugs in the bottom grooves , but I will do this at a later time.
I expect there to be more movement in the tool chest after I return it to the garage and will have to make some adjustments as the humidity rises in the summer.
Small Light – Big Help
When the weather is nice outside I open the door to my garage and soak in the natural light. During the winter I have to keep the doors closed to keep what little heat is available. This has the inevitable result of lower light conditions and shadows. A couple of years ago I received a Joby light as a gift. It has several great features:

Adjustable light allows you to add as much light as you want into your work area.
Legs that can be wrapped around an object or made into a tripod. This allows you to position the light exactly where you want it. Remember when you were under the sink fixing a pipe with your little helper holding the light. My Dad does, the light was shining everywhere except where he wanted it. Now your helper can hold the towel for the inevitable rush of water instead of the light.
Magnets located in the bottom of each leg. If you happen to be able to attach the Joby to a magnetic surface it will hold its position exactly where you place it. This is great for auto repairs or attaching to your power equipment.
Pink Planes
If you haven’t looked around the blogs lately you may have missed some pictures and articles about children in wood working. The Literary Woodworker posted a wonderful picture of his crew helping him on a project, Paul Sellers is offering to take some of his time at The WoodWorking Shows to teach children and now A Pink Plane!
When Grandpa came for Christmas he brought along a couple of special gifts. A gentleman’s saw, block plane and this very unique and highly prized pink block plane. If you want one like it, you’ll have to make your own, but for now enjoy the picture of the one that resides in my daughters hand.

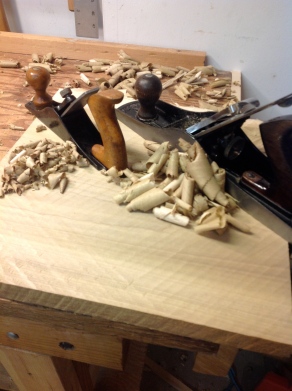
Different Plane – Different Shavings
If you haven’t noticed I take a lot of pleasure in watching the shavings curl up from a plane. There is something magical about moving a piece of iron across a board, watching shavings curl up past your hand and seeing a groove or rabbit appear behind. This is something that I missed when I was using power tools exclusively. As I reflect back over the last year I am also realizing that unless you are performing a repetitive task using the hand planes is not much slower. Let me introduce you to a few of the planes in my tool box (soon to be tool chest).

Plow plane – This has to be my favorite specialty plane. I use a Veritas Small Plow Plane available from Lee Valley Tools. A couple of months ago I really extended the usefulness of this plane by adding on the conversion kit which adds on an additional skate and allows you to use wider blades and most importantly cut tongue and groove joints. The second addition to this plane is the fence attached to the side. Veritas manufacturers the plane with holes for this attachment and I strongly urge you to add it soon after purchase. It greatly enhances the planes stability and therefore accuracy.

Skew Rabbit Plane – Moving Fillister or Rebate Plane. Lots of different words for this plane and yes they do have meaning. I have two rabbit planes a Stanley #78 and the Veritas Skew Rabbit Plane (pictured). Both of these planes are very capable of producing rabbits of varying widths. I find the Stanley #78 to be finicky and I have trouble maintaining the setting (mostly my fault, not the plane’s). When I first purchased the Veritas skew plane I had difficult leveling the blade for a 90 degree rabbit. I have since fixed this by paying more attention to the set up and adding a fence just like I did on the plow plane. What makes this plane a moving fillister is the addition of the spur which scores the work prior to cutting. This makes for a very clean crosscut. The skew blade pulls the plane tight against the face and cuts easily through the wood and the shavings are super cool…..
I have a fairly complete arsenal of planes, the vast majority of them used Stanley’s and I would have it no other way. Bringing a plane manufactured in the late 1800’s back to life and producing the same shavings as was made by a proud owner 200 plus years ago is a special feeling. I found that when buying used planes on Ebay or at tool meets, the standard planes are reasonably priced and readily available it easy to tell the condition of the planes and parts are available. The planes above were tougher to find and priced much higher (if you are on the East Coast you may have better luck). When putting together the Stanley #78 I had to go to two separate places for the fence and cutter. When you add in the shipping and parts there was not a lot of difference in price. The planes above are obviously new and were purchased after looking for their equivalent used counterparts. I decided that due to the complexity of these planes, difficulty in determining condition of the used planes and availability of parts that I would buy new. That was my personal decision and If you are looking for used planes there are many sources on the web, a great one is Hperkitten.com. If you haven’t found Patricks Blood and Gore you need to look. The other source is my father in law who does an excellent job of finding gems, but I’m not sharing that contact.
Scrub Plane vs Fore Plane
It’s cold today with fresh snow on the ground making it brighter and more cheerful outside. I’m struggling with a cold of my own so instead of heading out to the garage I have been sharpening and cleaning tools. I have been using a Stanley #6 for rough work. It is hefty and feels good in my hands and it quickly brings a delinquent board under control. The blade is cambered to an 8″ radius and it does not get sharpened very often, but today the blade sparkles with a new edge.
 I cleaned and sharpened one of the planes that my Father in Law dropped off, a Stanley #40. It is in great shape and I particularly like the beech handles, the color stands out boldly against the black Japanning.
I was surprised when he handed me the plane because it is quite small and quite the opposite of the hefty #6. The blade has a camber that must be closer to 3″ and is in excellent condition. I sharpened both it and my fore plane because I wanted to understand where each tool would fit into my work and the best way I know to do that is to put them to work.
Digging through my scrap box I came a cross a piece of poplar that would serve my purpose and dogged it down on the bench. The scrub plane took bold cuts diagonally across the board leaving gouges that are typical of the heavily cambered blade. I worked about 1/3 of the way across the board and into an area that I new was cupped. The plane kept moving material across the board with no hesitation. Next picking up the fore plane I finished taking cuts across the board. It wasn’t long until I noticed that the cup in the middle of the board was deep enough for the longer plane to bridge across and only shave the two edges of the board.
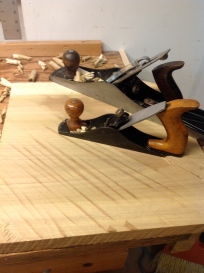
If you look in the picture below you can see the change in color of the wood where I stopped using the scrub plane and switched to the fore plane. So I sat down on the old 5 gallon bucket to think. If you have read my blog you’ll notice that I use the bucket quite a bit, one day when I find the right plans I will be sitting down on a stool, but for now the 5 gallon bucket will have to do. The planes have done exactly what you would expect. The longer bed of the fore plane allows it to bridge across the undulations of the wood and work to flatten the entire board. The shorter scrub plane only bridges a very short distance,so in the case of this board it has done a fabulous job of shaving the thickness of the board but as for flattening, i’m not so sure. Adjusting the blade depth would certainly make a difference, as would changing the camber of the blade.
The heavier fore plane is a beast when it comes to “hogging’ waste and once moving it is difficult to stop, exactly what I want when trying to level and thickness a board, but I think for narrower boards and smaller work the scrub plane has a place. I’ll keep trying it in different situations and refining its place in my tool box. In the mean time enjoy the photo of the different shavings and certainly the color of the tote gives it a striking appearance. If you have thoughts on these planes please comment there’s a lot to learn.