Archive
Bandsaw gone!
Today started out a little rough…too much work to think about. As the temperature in the shop began to warm I found myself cleaning the rust inhibitor off the band saw table, in hopes that I would be able to sell it today. Since posting my desire to sell I’ve had a few inquiries for more information, details etc., and a couple of serious conversations about location. Also had the one guy (you know the one) that came in at half my asking price and kept trying to come up in $25 increments. Needless to say that one guy did not get the saw.
Right on time my potential buyer showed up. He obviously had done his homework, asked great questions checked the saw out and had even looked into what needed to be disassembled to safely move it (along with his own tools!). We decided on a fair price some paper changed hands and we loaded it up. I don’t regret selling the saw, it was not used and I feel that it will have a much better home now. What was really great was the passion of the buyer! It’s fun seeing the excitement in someones eyes and since he brought his wife along, her support of his hobby. I was also asked some great questions about my hand tool work, how do I sharpen, what do I do if I need to re-saw (without the bandsaw) what’s my favorite project. The one question that struck me most was what forums do I go to……..not sure I provided a good answer. If forced to give an answer it would be WoodTalk, but I really don’t spend time there unless I have a specific question. So where do I go for help, support, fellowship? The Hand Tool School, Unplugged shop, your blogs, and Instagram. Seems that I have built up quite a network of people that I interact with on a regular basis that are always willing to offer a hand, show their successes and mistakes and throw in a picture of their dog or last walk.
Hopefully Daniel will read this post, I’d love to introduce him to all the great people out there. Oh and if I want to build a frame saw for re-sawing, who’s got the best kits? What blade size do you recommend?
NEW Shooting Board
As I mentioned previously the complexities of Left Handed vs Right Handed Shooting boards has forced me to build a new board. After considering the design for a few days I’ve decided to revert back to a flat board. The inclined board I have will continue to work well, however there are a couple of reasons for an inclined board, the first is to wear the plane blade over its entire width and decrease the initial force required for the cut by presenting a smaller portion of the blade. The Veritas plane blade is angled, unlike the Stanley I was using, so as long as I am willing to put up with wear in one area of the blade I don’t need the incline.
 Experience with the prior shooting board helped me understand that a guide to maintain the plane’s distance from the item being planed would be helpful.The Veritas plane seems to be even more reliant on this since it has only one handle in the rear and limited places to grip the plane in the front.With those considerations I did something unusual; I purchased the Veritas Shooting board track. I had an old gift card and Lee Valley had free shipping. Although it seems a little pricey I’m very pleased. The instructions were clear the track well made and the adjustments simple.
Scrounging pieces of 3/4″ and 1/2″ a couple of pieces of hardwood and some screws, I had a shooting board in an hour. With the temperature in the garage at 27 degrees and a frozen glue bottle I screwed everything in place. The low friction tape works great and the plane glides effortlessly and precisely along the track. After some use I’ll give an opinion on the plane. Seems like I made a good decision…


Shooting Board
The first couple of projects that I made for the Hand Tool School are used in most projects. One of these is a shooting board. Not satisfied with the flat board, mine has an incline and works well. There is just one thing about my shooting board. Most of you know Shannon Rogers is left handed, I’m very definately right handed. Look at the picture – it’s a left handed shooting board! When I was gluing up the board I obviously followed Shannon’s directions to a fault. I’ve worked with this board for a few years with no problems until now….
 My christmas gift is a Veritas shooting plane, very exciting. It’s something I have put off buying for seveal years because they are expensive, but I’m now a proud owner. Even better it is right handed! Now you can see the problem, right handed plane – left handed shooting board. Two more blogs coming up…Veritas Shooting Plane and Building a new Shooting board.
Feel free to laugh, I’ve been chuckling about it all week!
Saws Come Home
It’s hard to explain to your non-woodworking friends that you miss your saws. They can’t understand the empty feeling when you stare at that blank space in the tool chest. The back up saws are good, but not the same, they feel different in your hand, they sound different to your ear, they don’t cut the same! Driving to the post office early so that I could be first person in line, I fidgeted in excitement. Carrying the box I felt like the proud kid holding his favorite bear.
A few weeks ago I sent Mark Harrell at Bad Axe tools, three back saws, the two R. Groves I picked up a couple of years ago and my Bad Axe dovetail saw. The Bad Axe needed to be sharpened and since I was shipping the other two I added it to the box. The other saws needed to be retoothed. Taking them out of the box I lovingly held each one. The wood felt comfortable and familiar and as they sliced through a piece of oak they whispered in my ear. There was no one around to see my smile…but I know you understand!


Hanging Tool Cabinet
With space in the shop for the new tool cabinet, I can get on with the build. This is a Paul Sellers’ project from Woodworking Masterclasses. It came along at the right time, because I have another project in mind that has doors. A little help from Paul is always valuable and he includes so many small lessons in his projects that they are a great learning experience.
Most projects begin with a quick trip to the lumber yard and fortunately this one was made better when my daughter agreed to come with me (full disclosure, I did offer breakfast as an incentive). Almost as good, it was the annual cherry sale! 40% off. I selected and loaded up with the boards I need and a few spares then spent a few minutes looking at various species and tools with my daughter. I think she enjoyed the trip?

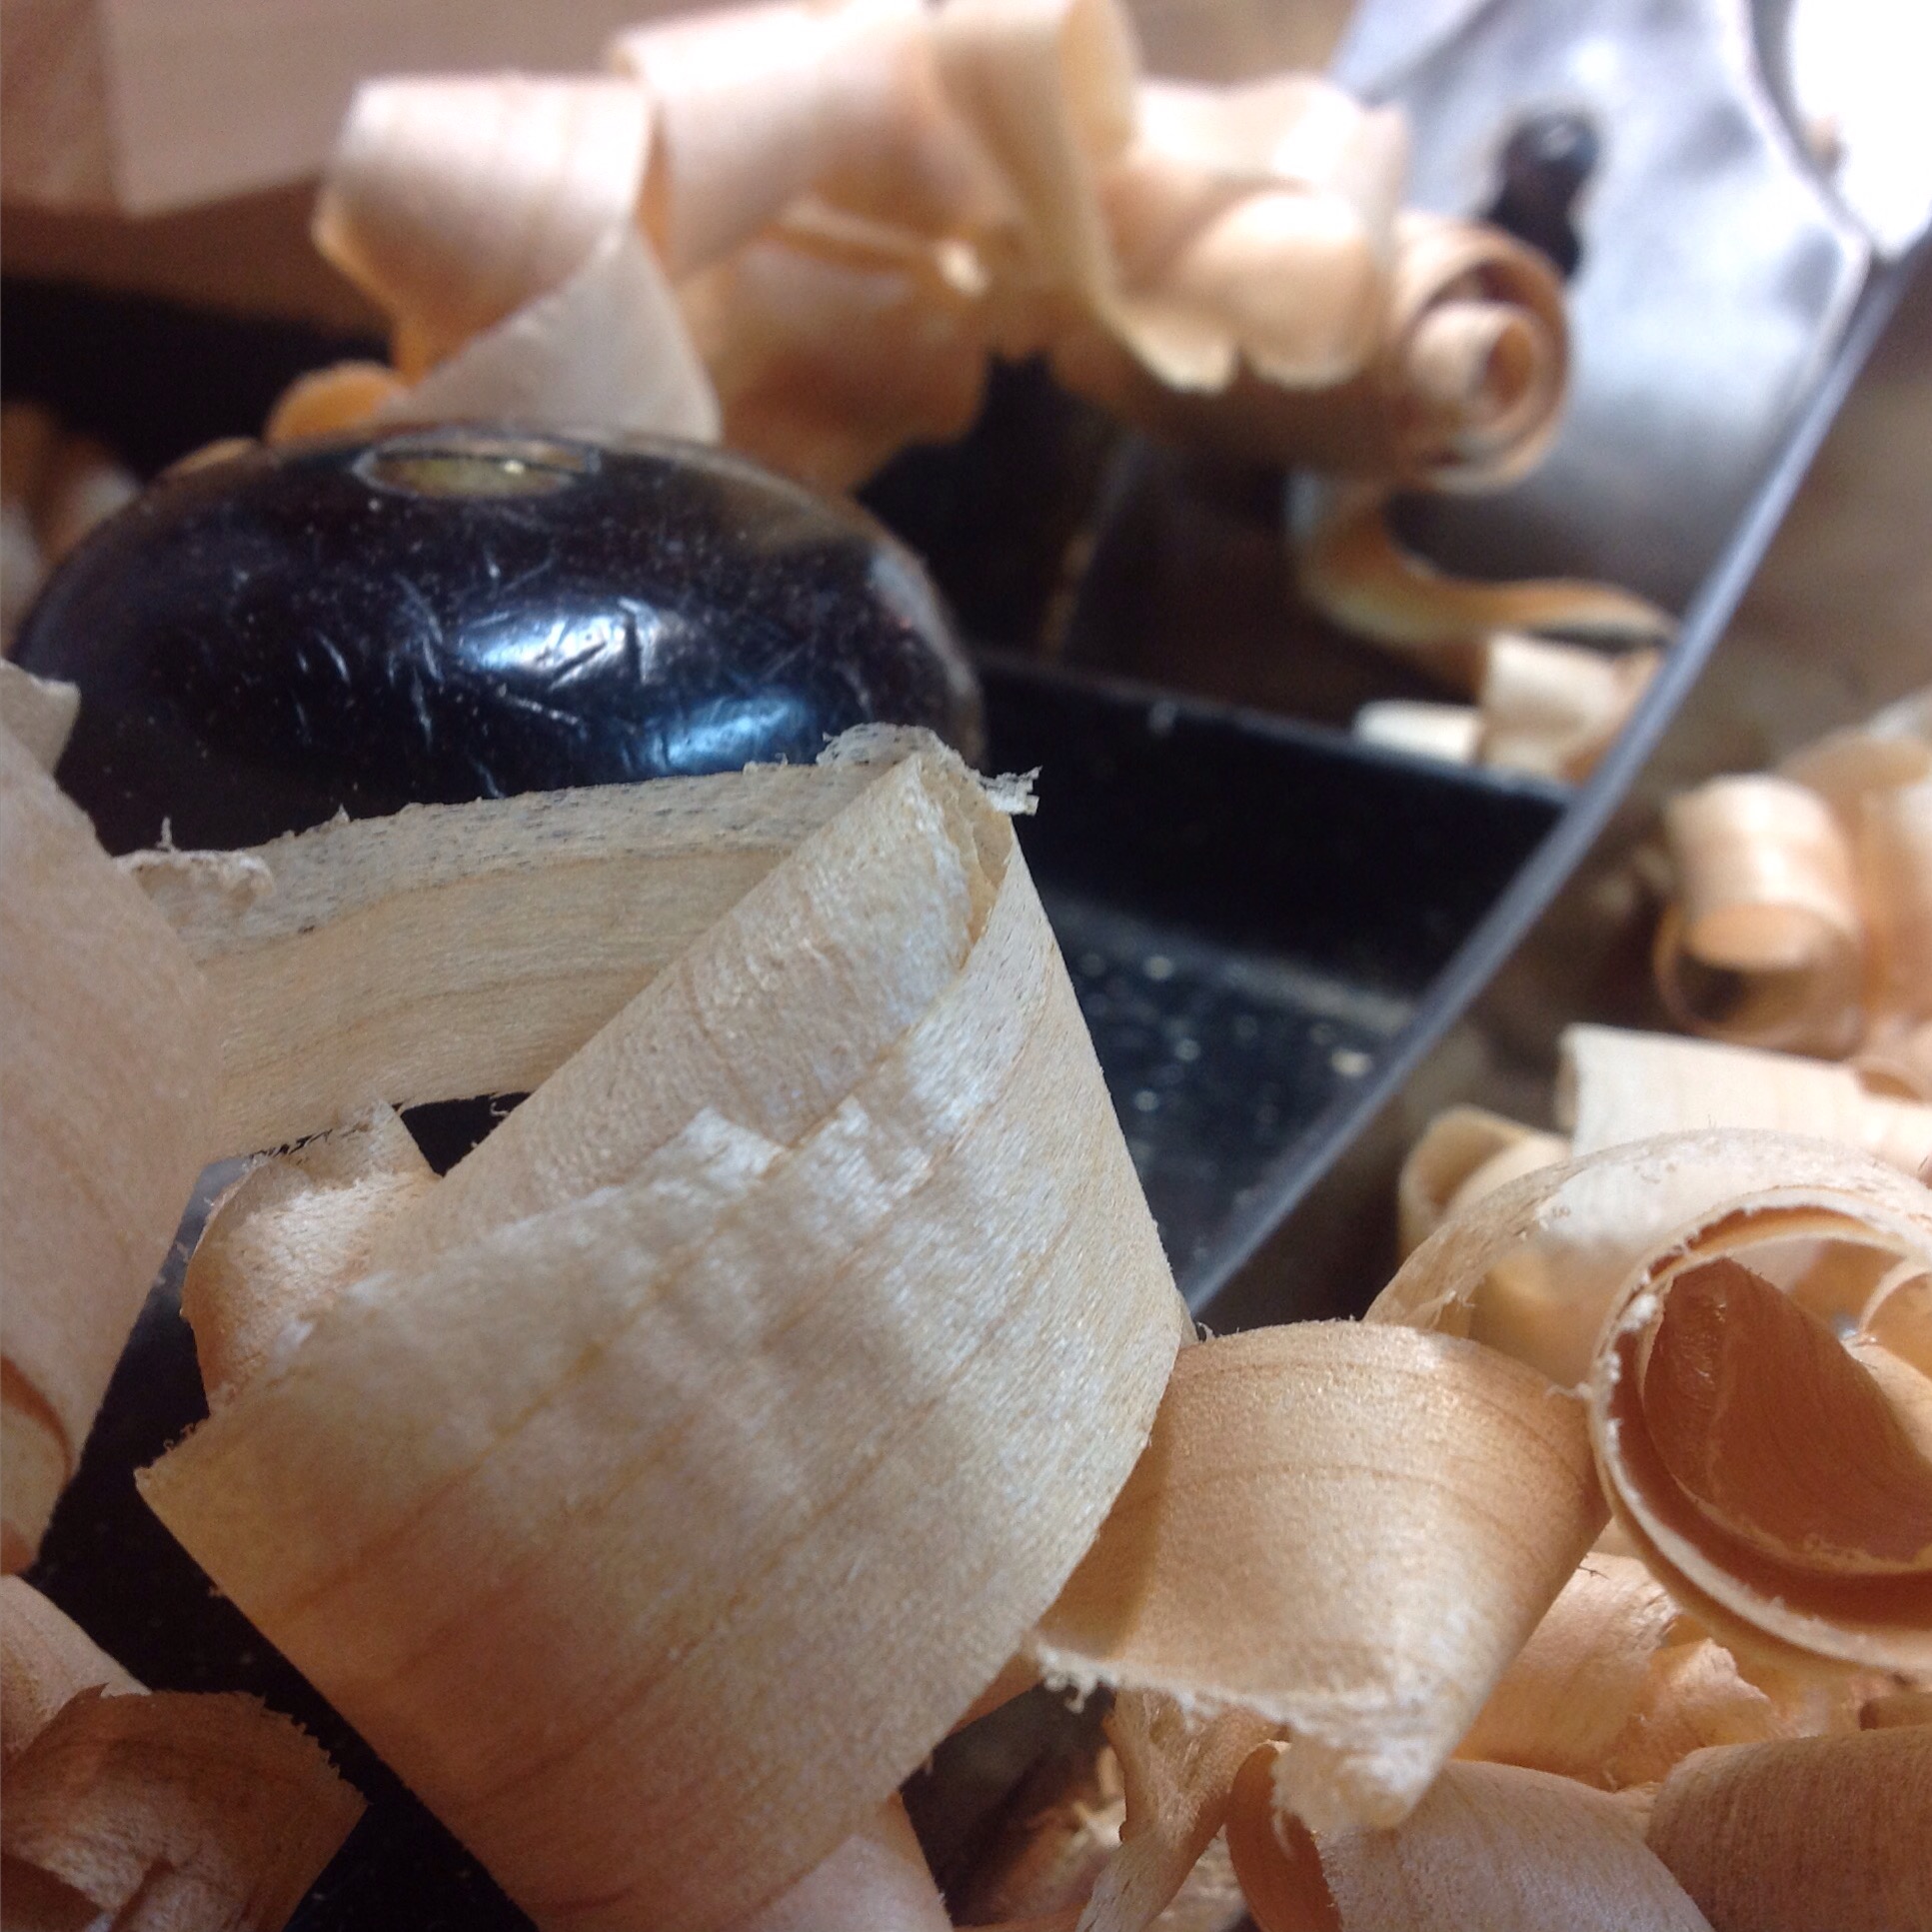
Selecting boards for the sides I dimensioned and planed to my hearts content. Three techniques,three planes. Love the difference in the shavings.


Do I really need a power jointer?
After cleaning up my shop I spent some time staring at two tools, Delta 6″ jointer and 14″ Jet Bandsaw. I mentioned that they were going out the door in my last post but have gone back and forth on what to do. Both have been with me for a while ,but the last few years I’ve done nothing but remove rust and wax their surfaces. Perhaps it’s time they had a new owner? The final deciding factor was this picture, if I can joint a board and end up with beautiful shavings, no noise and no dust what’s stopping me. You can find them for sale on craig’s list.
Not necessary
The Hanging Tool Cabinet project prompted a review of my shop space. Review may not be the correct term, in fact, let’s say a moment of panic when seeking empty wall space. Look at the picture, do you see an area about 40″x 30″?
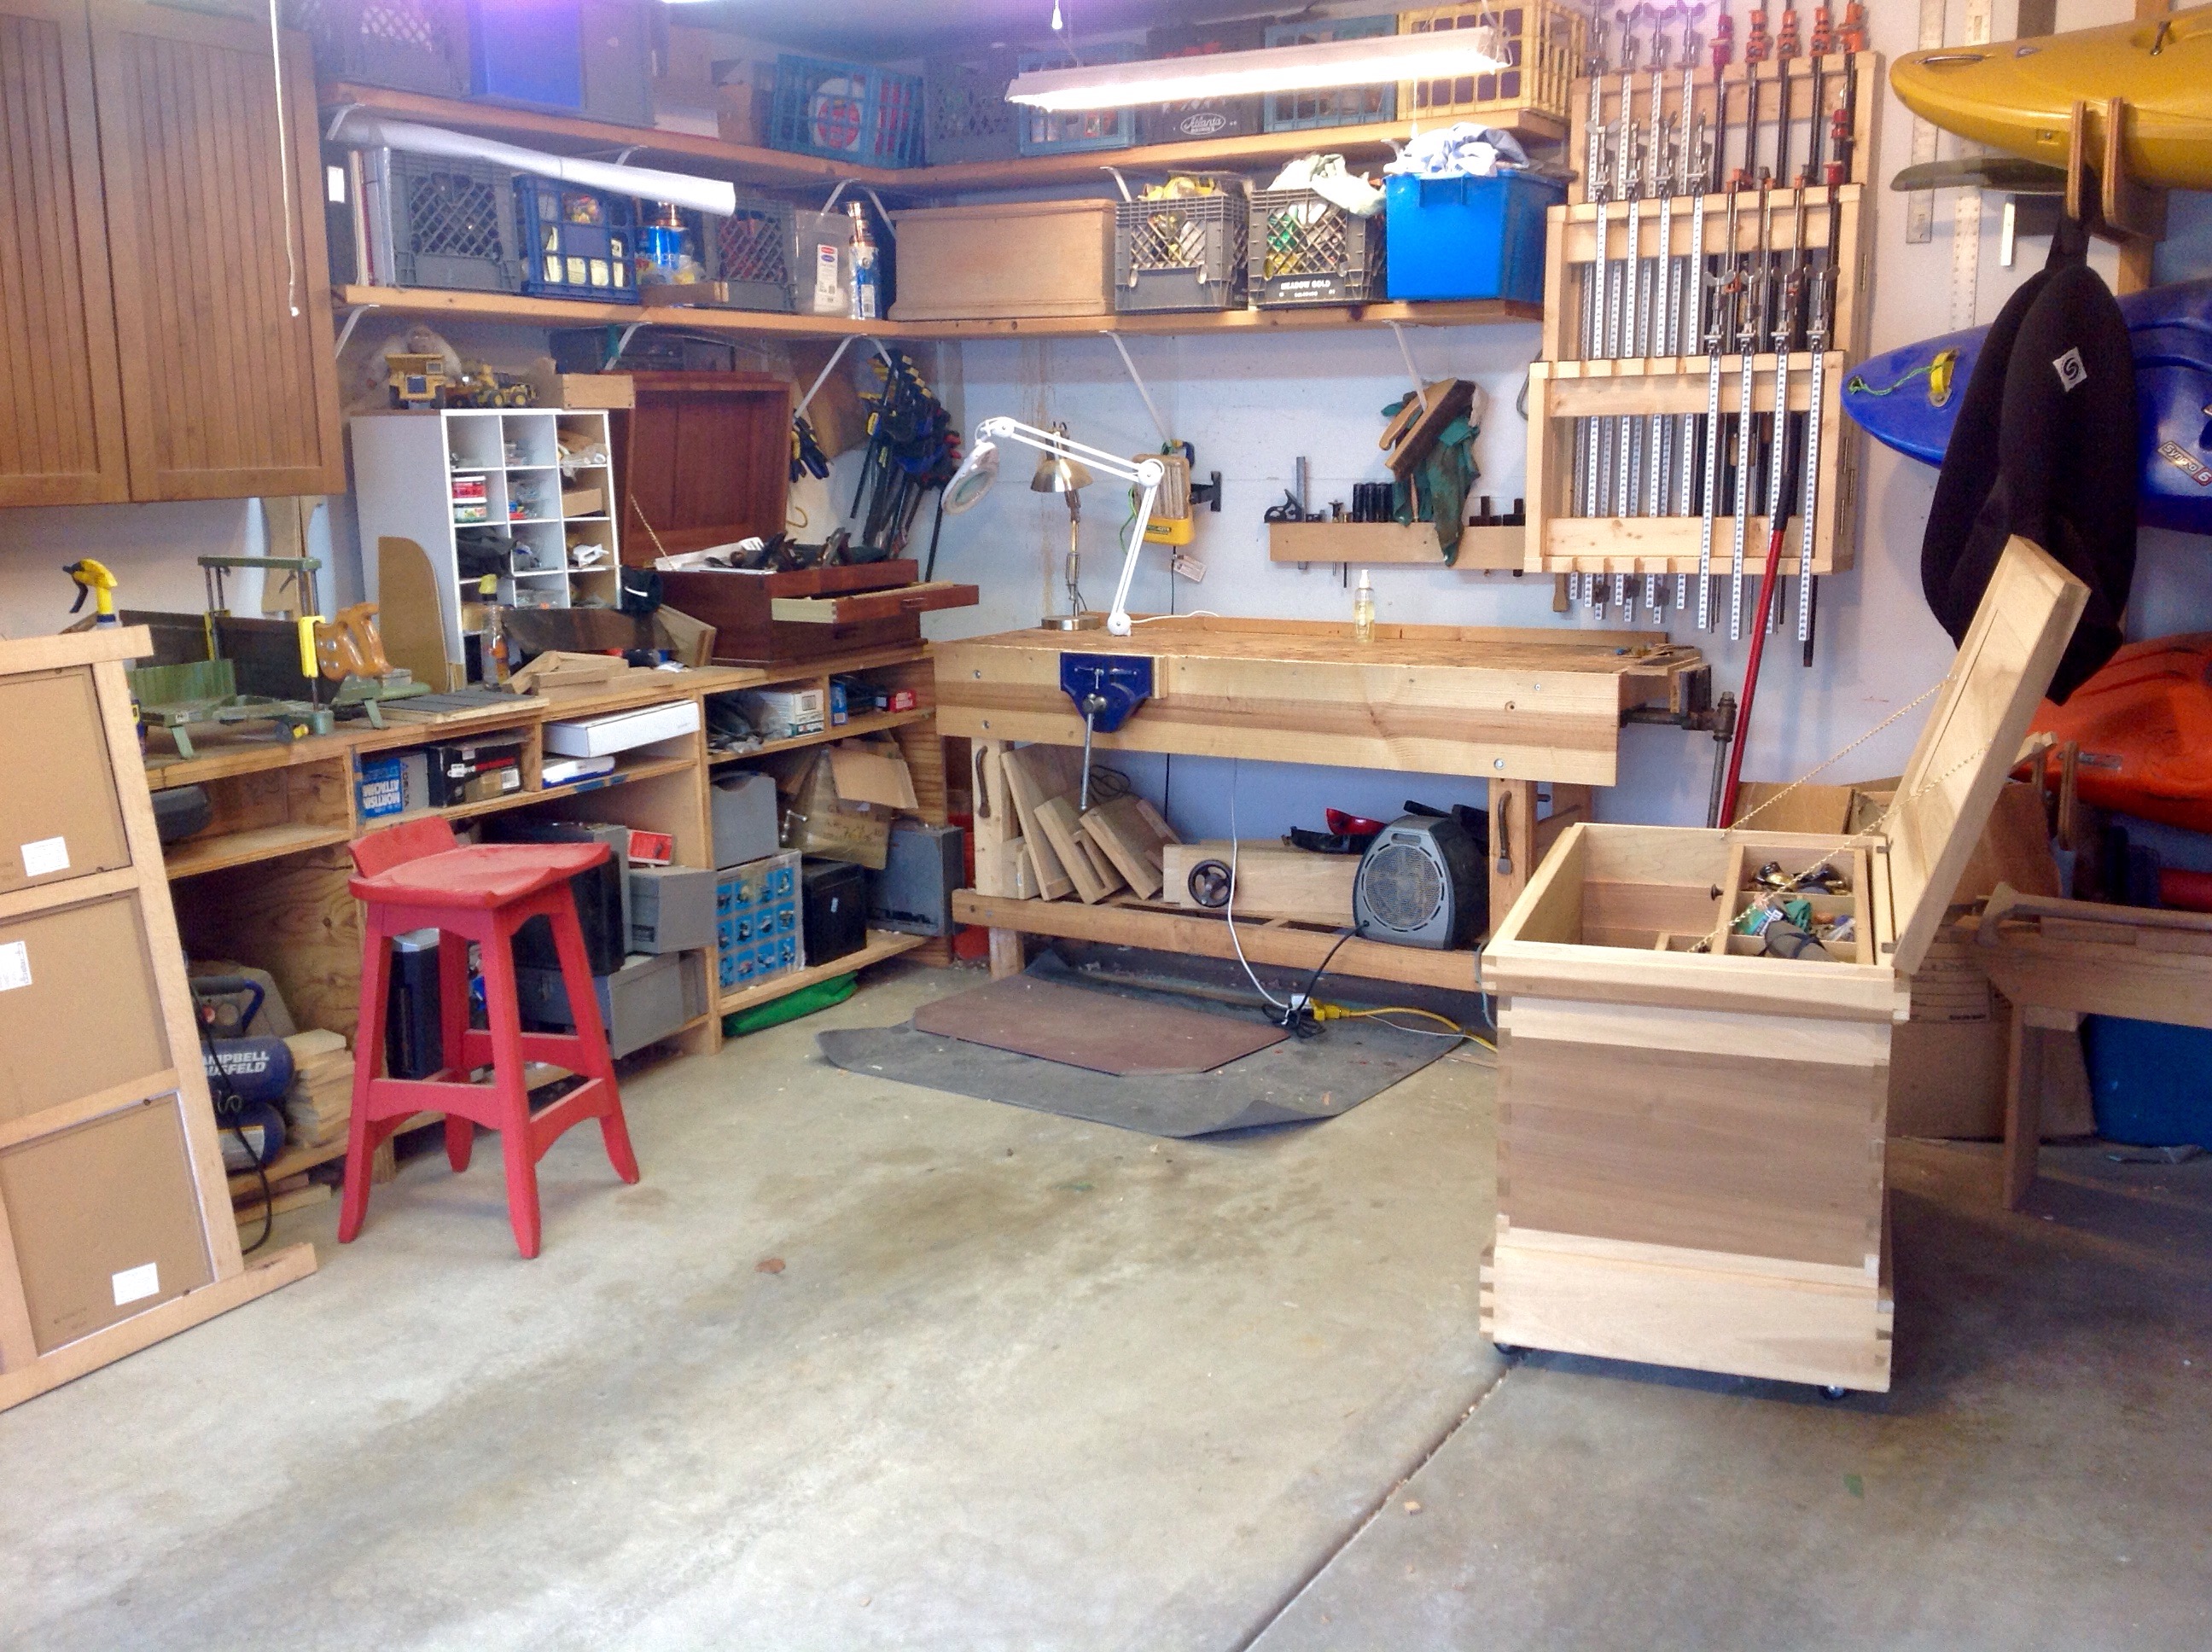 Looking into all of the boxes on the shelf it became apparent that some progress could be made by robust cleaning and consolidation. Simply, get rid of the junk!
Feeling good about the purge, I began handling tools and jigs that I had not used for many years. Changing most of my work to hand tools, has made some of these items obsolete. Why shouldn’t I move these items along as well. 6″ Delta Jointer used once in 2015 made me mad because I took more time getting the rust of then using it, for sale. 14″ Jet bandsaw, new tires used a dozen times in a dozen years, for sale, Leigh dovetail jig ( used a good bit 6 years ago and not since) eBay. Mortising attachment for drill press out the door. Etc. etc. hopefully I can get a little money, help out fellow woodworkers and simplify my space.
Next I began looking at where my saw till was placed. Too far from the bench! Reshuffling the quiver of kayaks, it’s now by the bench. Old cabinet that I don’t like? Splinters and recycle lumber. After a couple of days I have plenty of room for my new cabinet (just have to get it built) and a lot less junk to get in the way.


Paul Sellers’ new book coming soon!
Reposted from Paul Seller’s blog. As you know I’m a big fan and spending time in a class with Paul was truly a great experience. Here’s the news ….from Paul
It’s the close of the year and many of you have faithfully asked about my new book Essential Woodworking Hand Tools. In these closing weeks I did what I do in finishing off my furniture pieces just before delivery. I leave the piece to stand a day or a week (depending on the piece) and then make…
Here’s to Woodworking Web Friends
My posts on WordPress have been few over the last several months, like many of you, the number of blogs ebb and flow based upon outside forces. Changes in careers, seasonal changes, project ideas, family all have an impact on what we build, how much we blog and the quality of the writing. Let me give you a few examples, Jeff at Jeff Branch Woodworking made a career change that slowed his blogs for a few months until recently, when they have become more frequent and consistent, Marilyn whom we all follow, at She Works Wood decided to remodel a kitchen (looks great by the way) and she slowed her writing temporarily although she never stopped commenting and supporting others. Greg Merritt at hillbillydaiku moved into a new home and took a month before he became a blogging machine.
As I finish up the year I have found multiple incomplete blog entries. Some just a title, others almost complete. I’ll try to get them out in the next few days. Also wanted to mention that you can find more posts on instagram under the orepass name. Sometimes it’s quicker than a full post and you are more likely to find pictures of dogs and kayaks along with the usual woodworking. Most importantly I wanted to thank all my followers, the bloggers I follow and a couple of people I actually met in person (Marilyn and Jason of TX heritage Woodworks. You are a great inspiration and wonderful support. I’ll try to be a better blogger in 2016!


Drafting Table – Adjustments
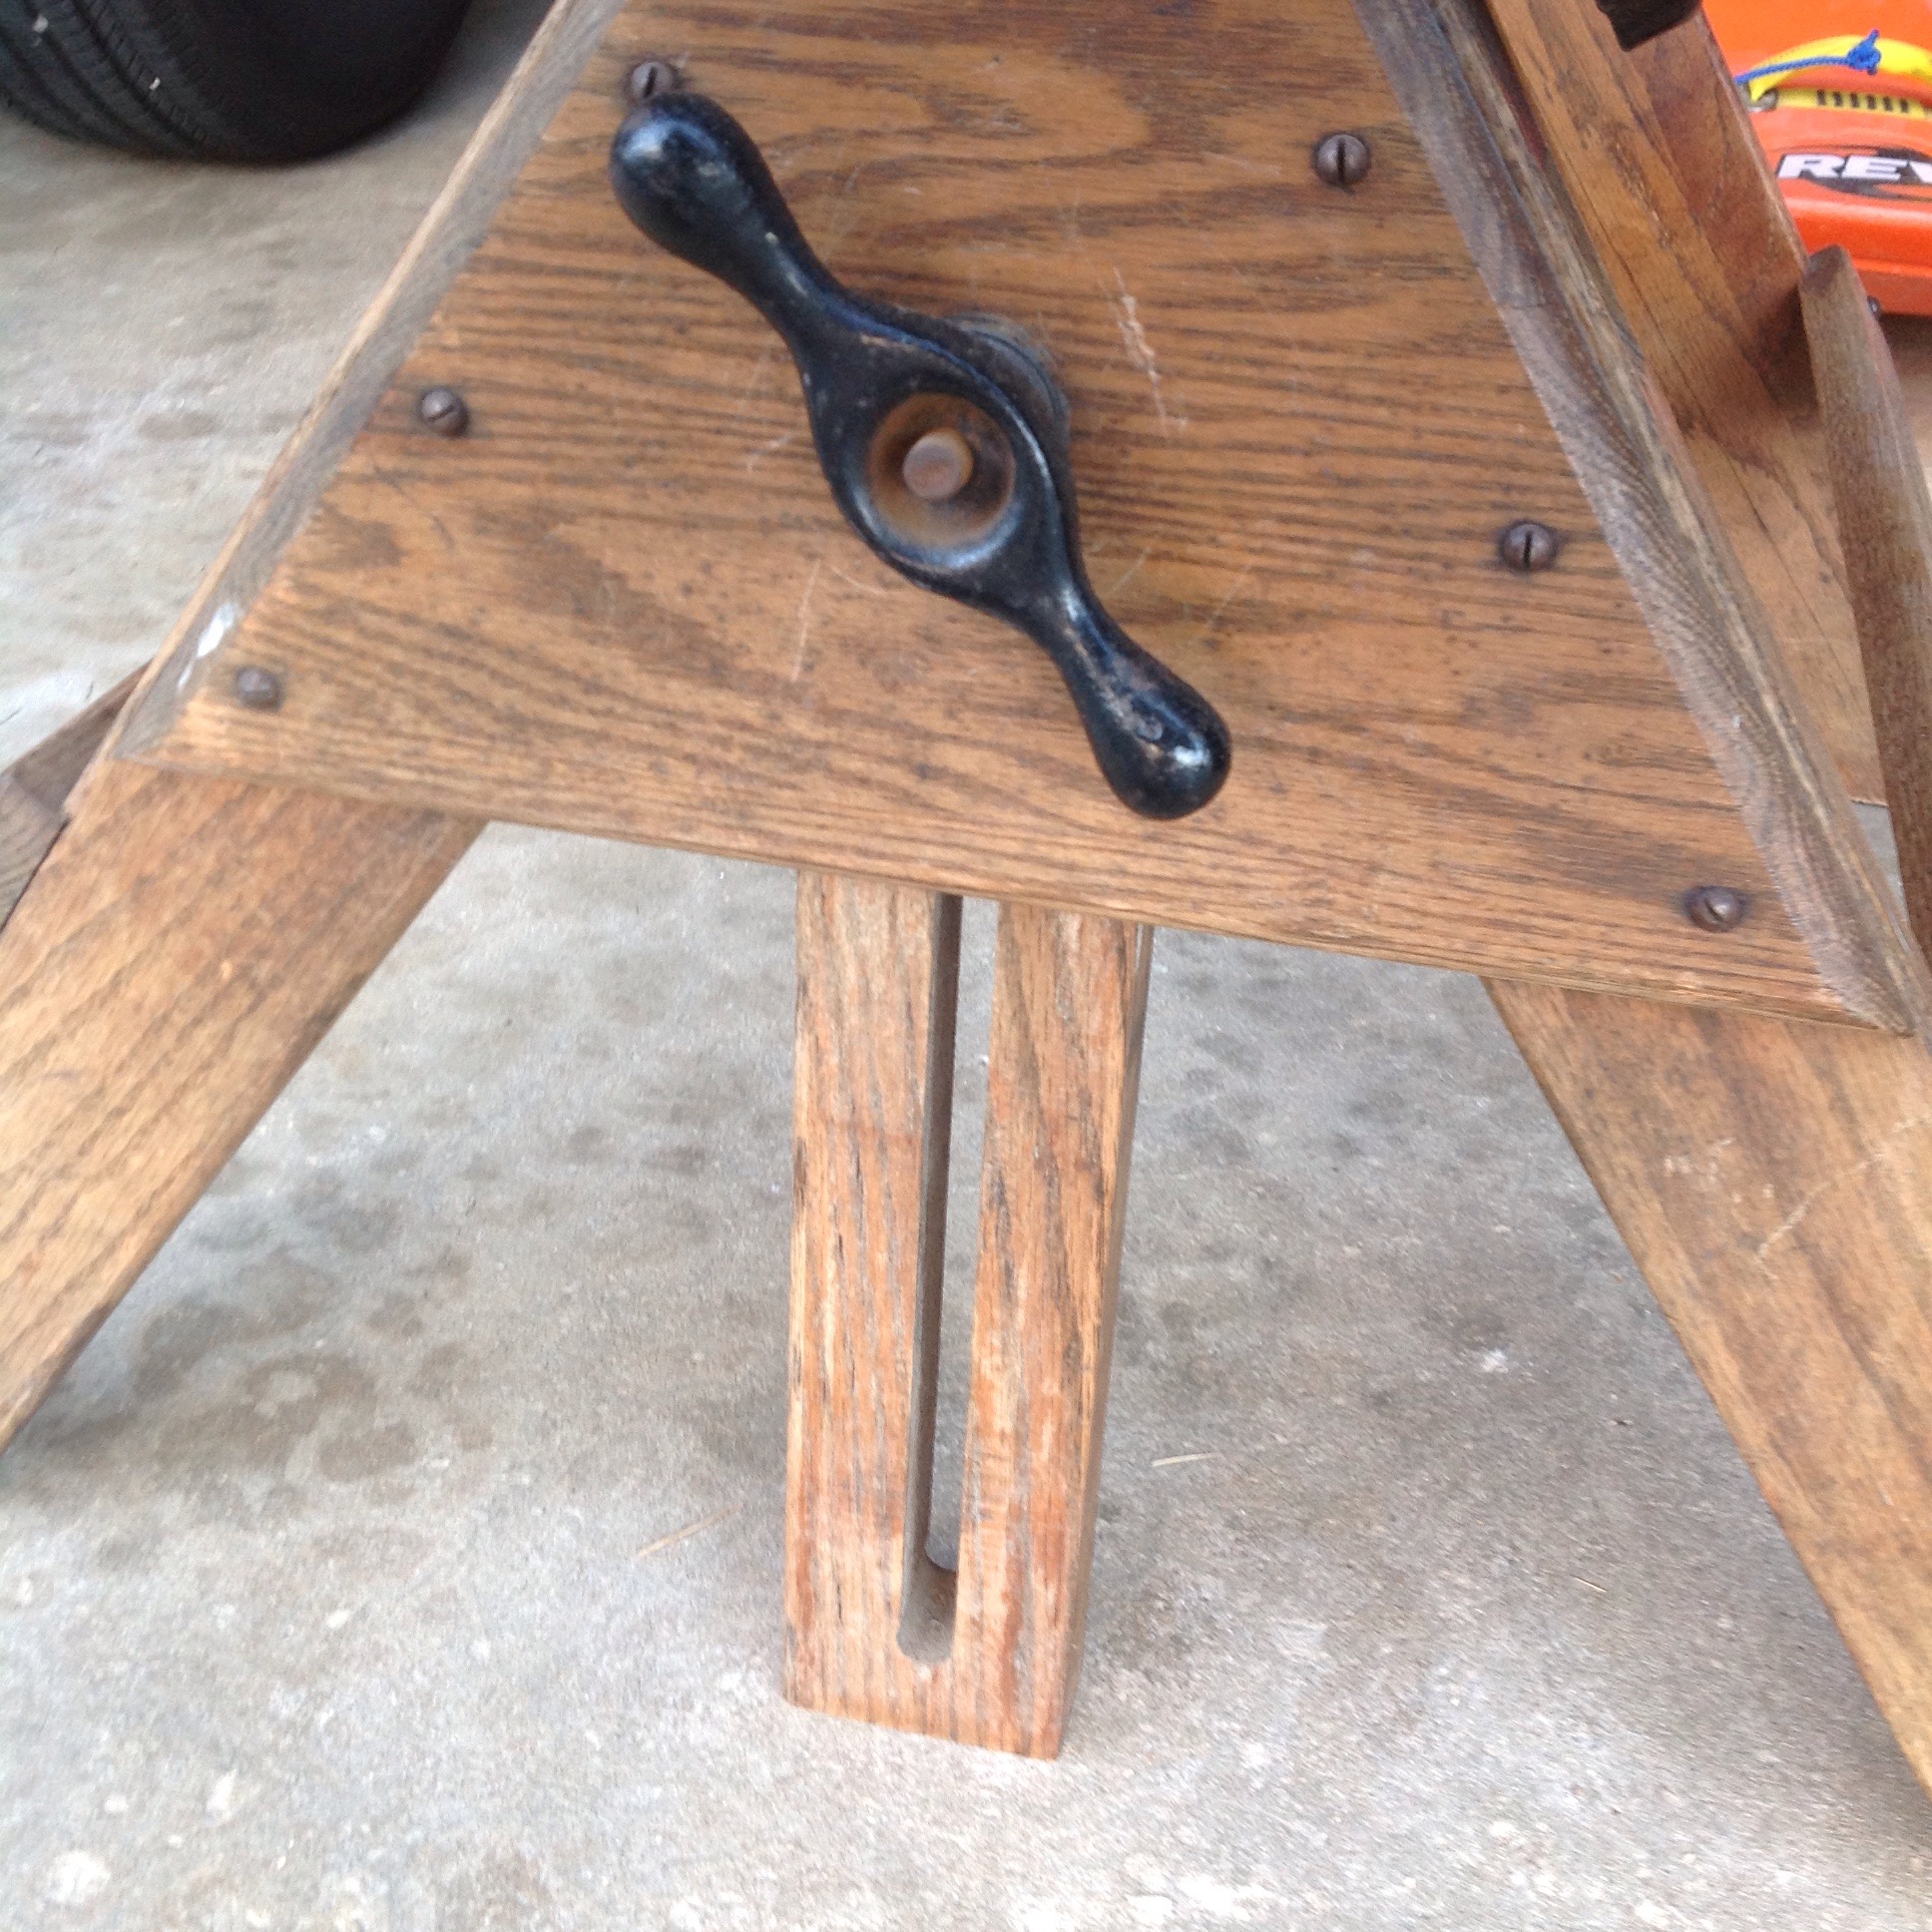
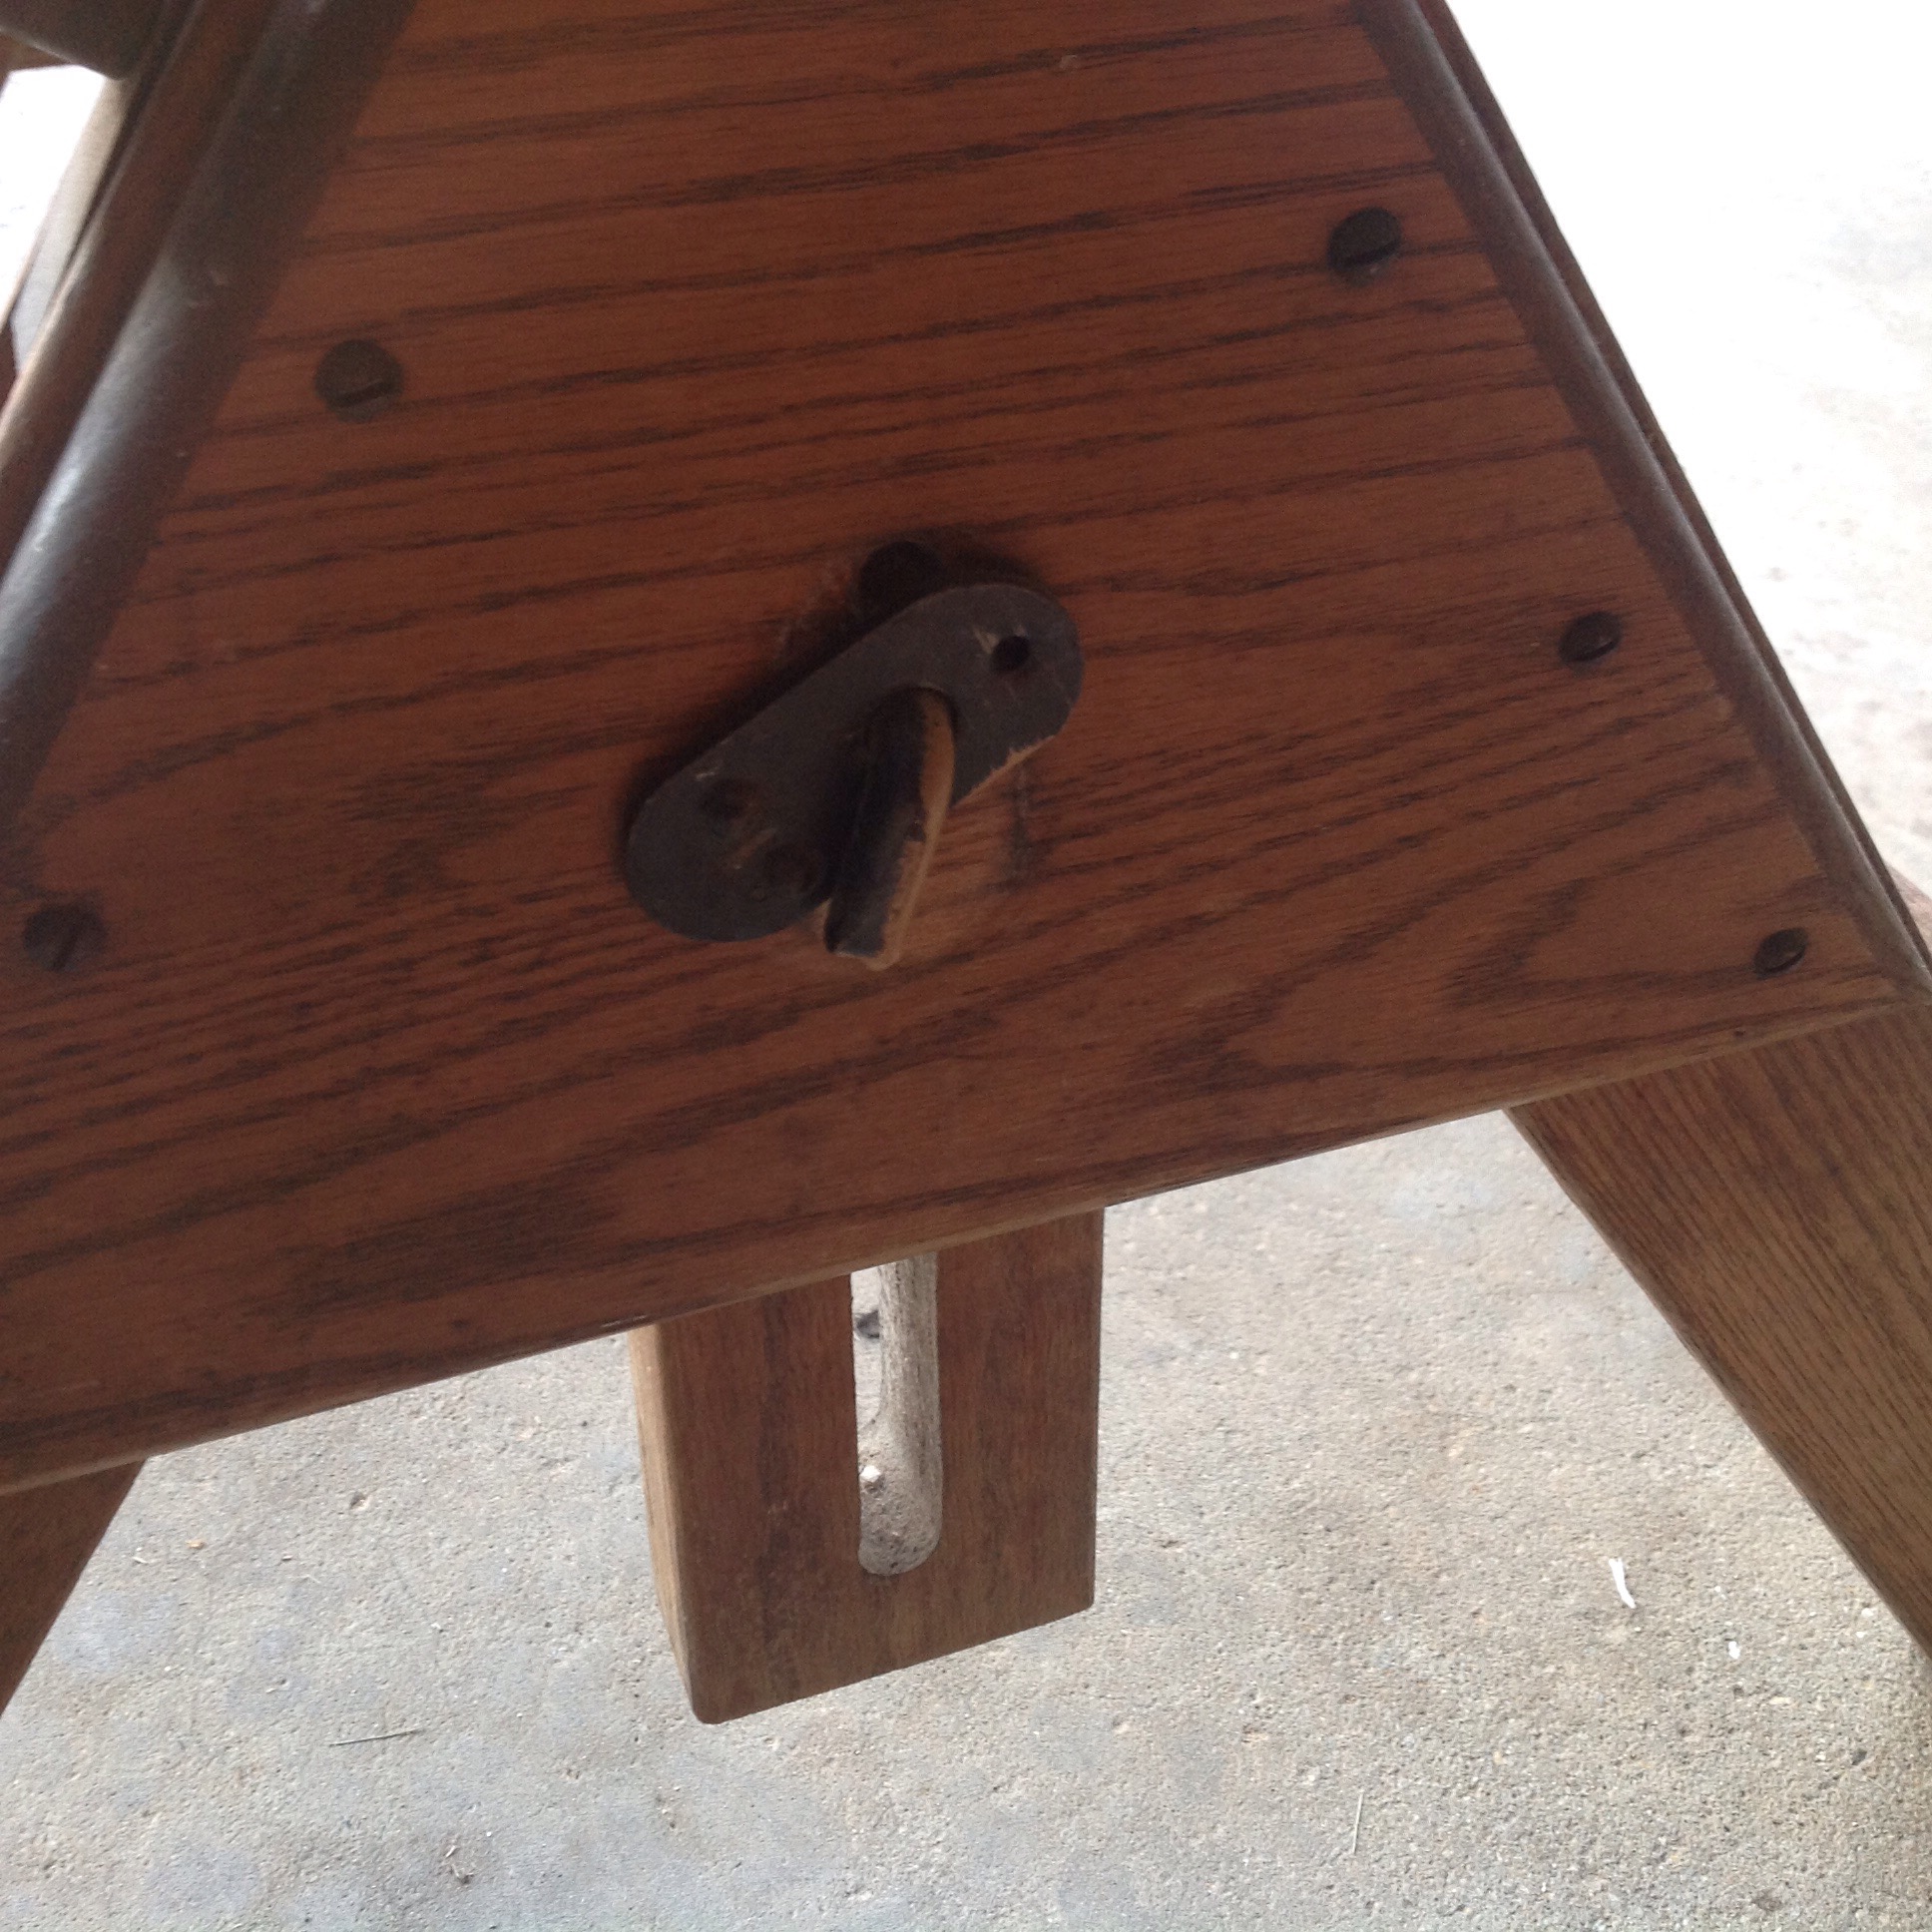
Before cleaning and refinishing the drafting table base it is worth a post to share the adjustment mechanism for the table. Each of you will have an appreciation for the simplicity of the design.
The table top can be adjusted to almost any angle using a pair of curved rails. The design is self explanatory except for the threaded rod that is hidden in a slot in the crossmember. This rod forms an L shape at one end which exerts pressure on the curved rail holding the top at the desired angle.The other end is threaded so that a knob can be loosened to make adjustments.


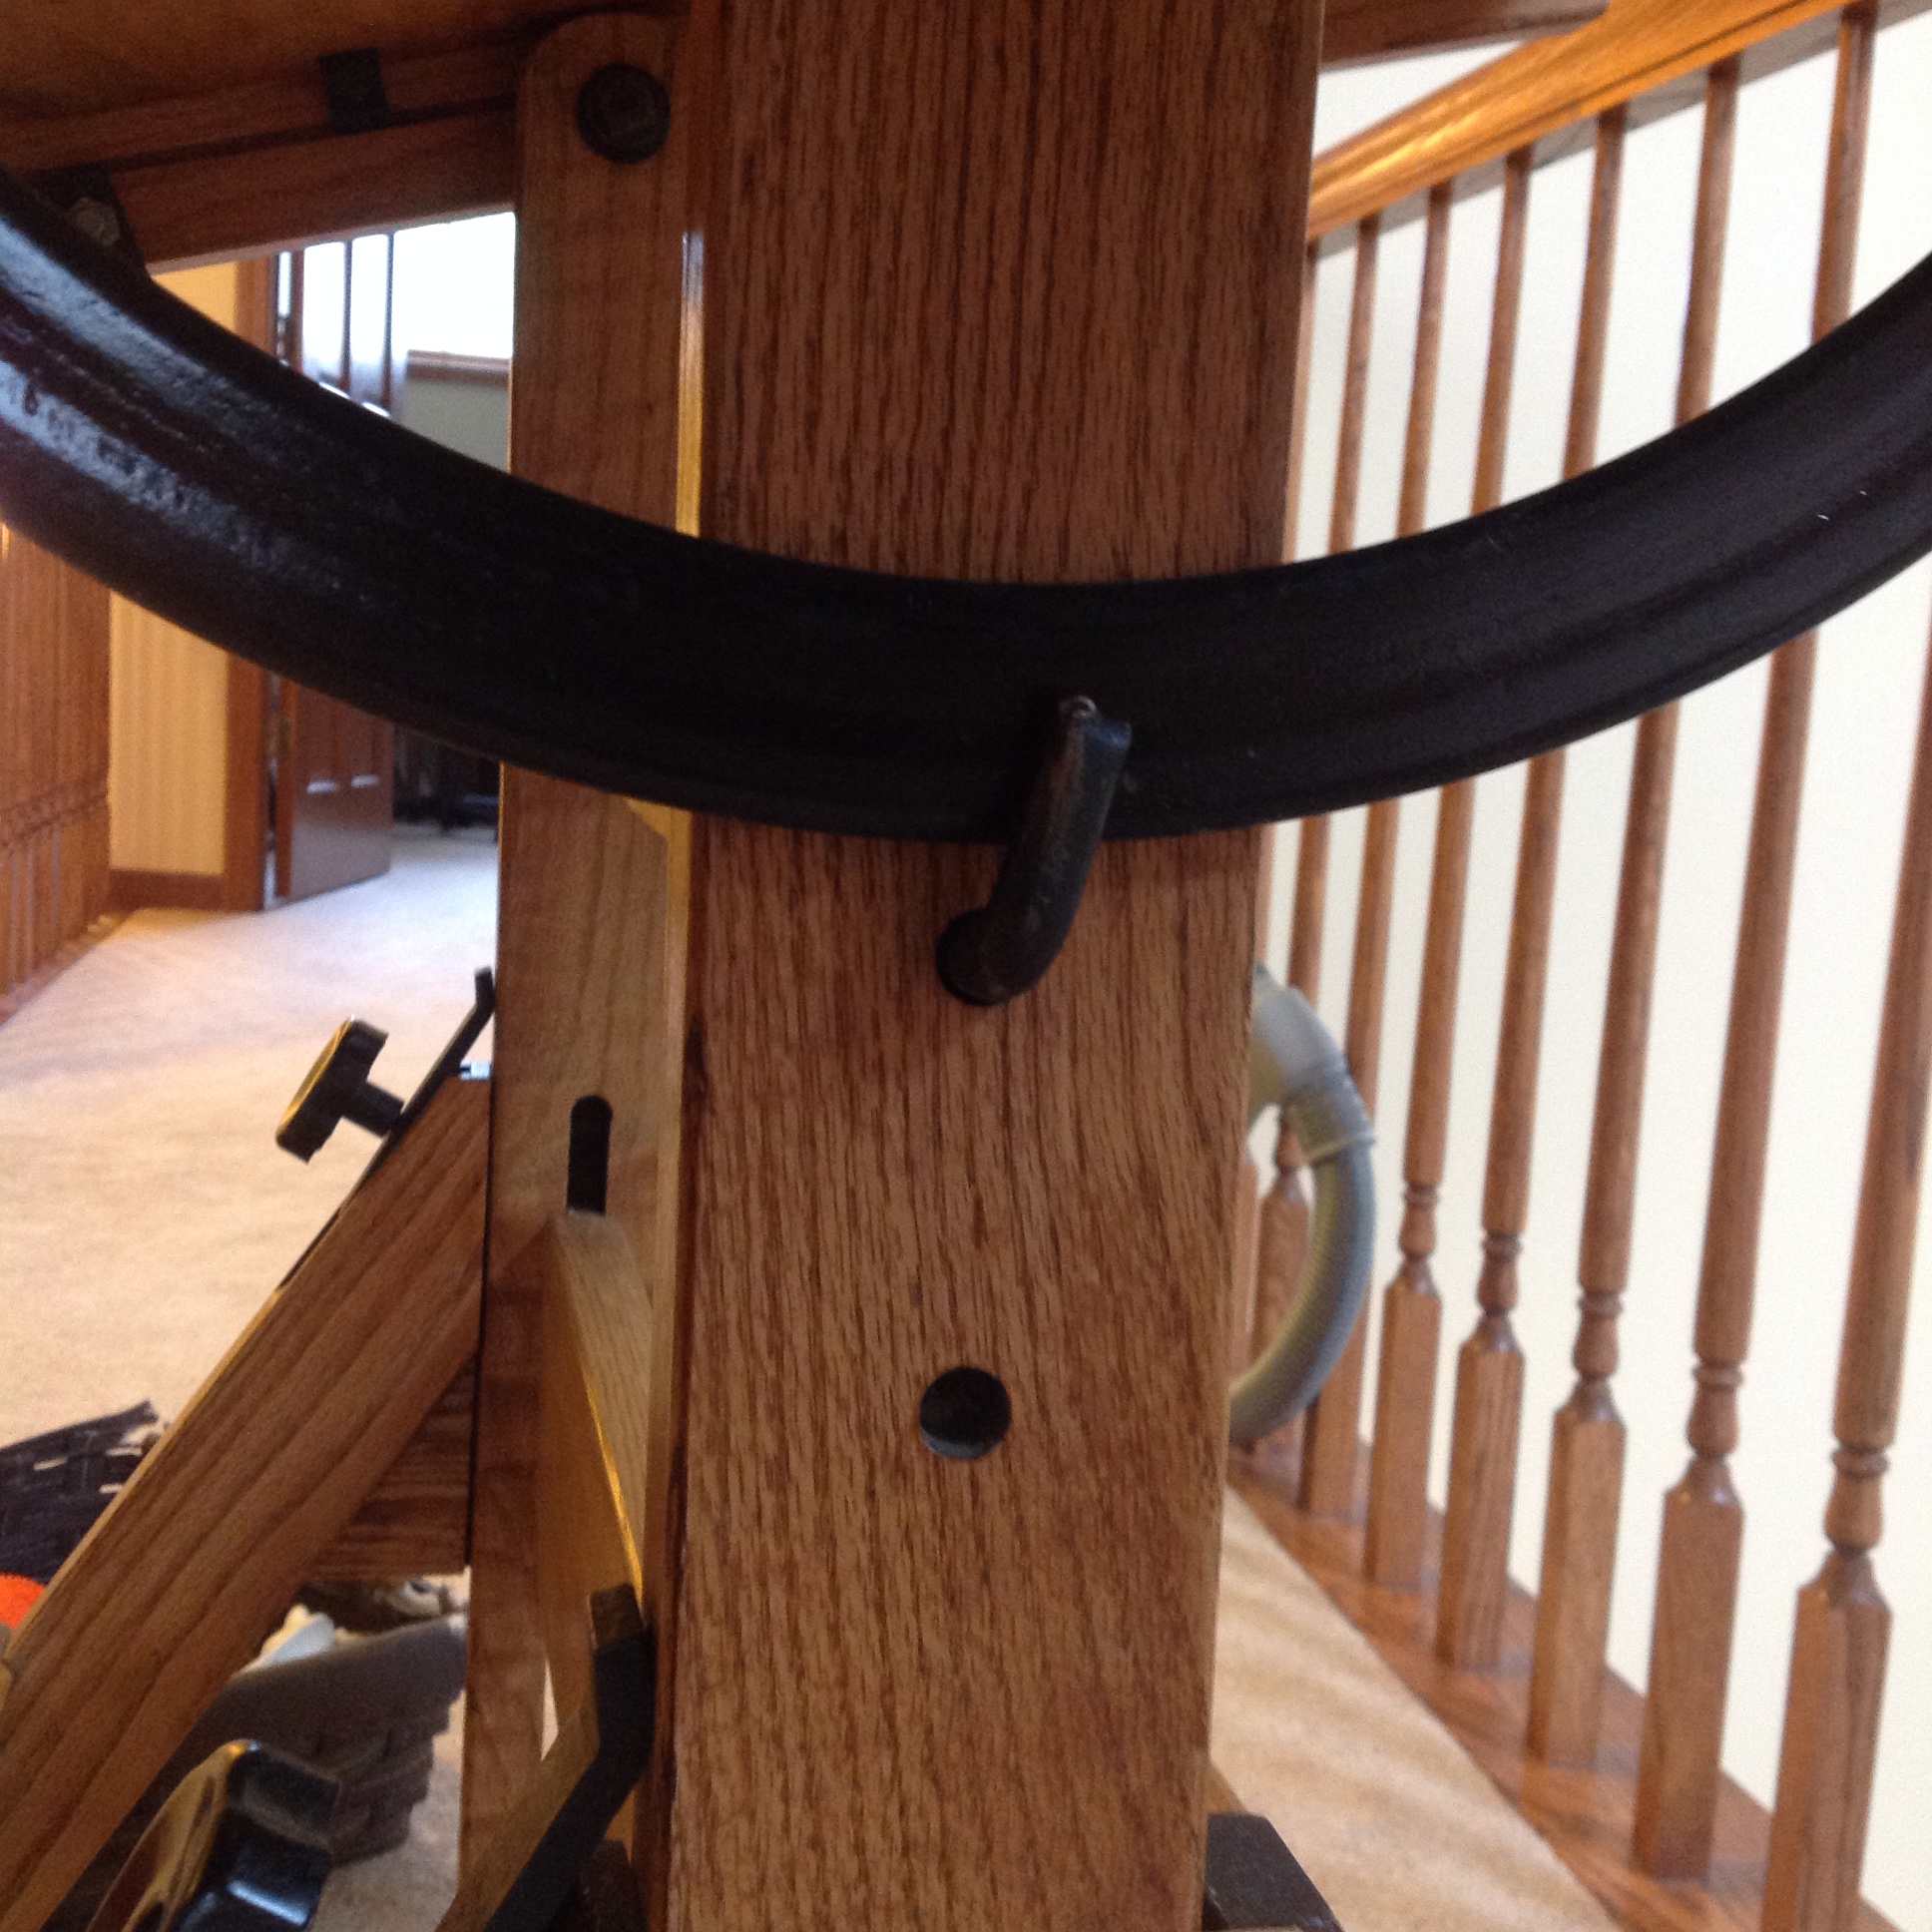

The height of the table is fully adjustable.You raise the top by loosening the handle on the side which is attached to another rod with a j hook. once loose you loosen the knob on the front of each leg which keep pressure on the legs from the front. lift the top to the desired height and tighten everything up.