Archive
Catapults and Chisels
 I started the weekend with the goal to complete the saw vise that I began several weeks ago. It wasn’t long before I was putting the vise aside and learning how to make a crossbow. One of my goals for using hand tools was to make my work area more inviting for my family. The only thing better than listening to my children chatter about their day while sitting on my tool chest is helping them build a project.
It seems to be working……
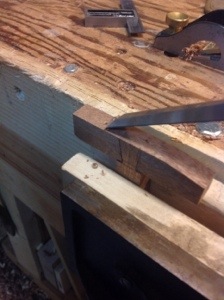
The plan for today was to build and install a trigger system on a homemade crossbow. Interestingly my son had already built the frame from a design he found on the internet. He also had researched a trigger system and had made most of the components. What had him stuck was the need for a through mortise. I took a couple of minutes and explained chisel safety demonstrated how to cut a mortise and watched him chop out a very nice place for the trigger. The hardest part..giving him room to grow.
.
It seems to be working.
Another Chair Repair
A couple of times in the last year I have been able to help friends and neighbors repair damaged furniture. I consider this part of being a good neighbor and expect nothing in return. It’s also fun to have them stare in awe at what you consider to be a quick simple repair. Several weeks ago a friend brought me part of a rocking chair and asked if I could repair it. Finally I managed to get to the part this weekend and spent an hour making a new piece.
I milled the piece to size and drilled the holes for the bolts. Then chiseled out the slot. Nothing very difficult about the process with the exception that the bolt holes did not line up, the mortise was slightly askew and the edges not square (and that was on the original and thus had to be done on the replacement..


A Stranger in the Dark
Docklands to Canary Warf, take the Picadilly line to Tower Hill, wander around and blend into the crowd at the Tower of London, exit the main gate and return to the underground, make systematic changes across the city. Once you arrive above ground, walk to a nearby square, wait in the north corner adjacent to the bike parking. A man will hand you a package.
Or as my daughter said, ” you’re going to meet a stranger, a man you met over the internet, in a foreign city, in a park”!! At least I know she is receiving my fatherly advice…..and reflecting it upon me in my own quest for a couple of saws.
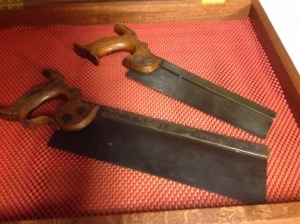
A couple of months ago I realized that I would be in London for a few days. I saw this as the perfect opportunity to look for hand saws. Scrolling through eBay, websites, “car boot sales”, I began looking for a dovetail and tenon saw. I soon realized that to make this work, I would need to find someone that had already been to the estate sales and was reselling the tools, I came across a site called Hackney Tools. A couple of months ago, I purchased two R. Groves and sons saws and Gary held on to them until I arrived in London.
Gary of Hackney Tools met me in the park saws in hand, with a happy smile on his face. We talked briefly and with a shake of hands, I pushed the saws into my backpack, Gary strolled back to work, forgetting that a picture would be great on each of our blogs. I headed back to the underground wondering how airport security would look upon a couple a saws….
Mortise Gauge
 I’ve been thinking about another mortise gauge since I completed the coffee table a few months ago. There is convenience and accuracy in being able to set a gauge to a specific setting and maintain that setting through several steps of a project. There is a certain inconvenience to this as well. You can’t use the gauge for anything else! Fortunately a box appeared on my doorstep the other day and there were several items inside.
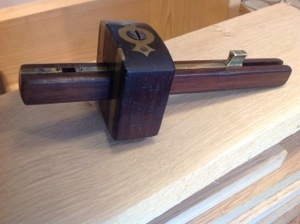
The first was this wonderful mortise gauge. I already have two marking gauges, the first is a Veritas wheel marking gauge. Obviously since it only has one marking cutter it is not designed for mortises (although you can use it that way with a loss of accuracy). I like the Veritas gauge ,it holds its setting and works well. However it is not a mortise gauge. The second is a mortise gauge from Crown Tools. Say what you want about the quality of crown tools…but this gauge has worked well for me and the only real complaint I have is it’s comfort in the hand. The corners are square and dig into your hand.
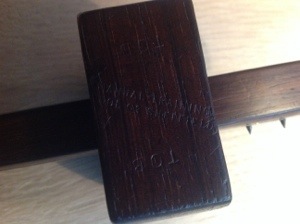
 A closer look at this gauge and you can see that it is stamped with the words ” Manual Training Tool Co Sheffield”. There is also a stamp of TOB which i assume is an owners stamp. I dug around and discovered that the Manual Training Tool Co Sheffield may be the same as found in Sheffield England around 1890-1910. You can read a little about it yourself on the internet.
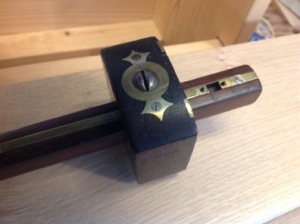
More importantly to me is the feel of the tool. The edges are slightly rounded and it fits firmly in my hand with no awkward corners. The gauge moves with precision, the brass is practical, but gives it a classical look. This is what a mortise gauge should look and feel like and I am honored to give it a new home and put it to work. In this post I also wanted to make my English teacher (I’m sure she’ll never see this blog) proud by correctly using the term gauge not gage, two very distinct words!
Spring Comeback
Between very cold weather, and a nasty cold/virus/plague there has been almost no woodworking for a few weeks. However, I have been plotting and planning a comeback.
Saw Vise Planning Underway
Learning to sharpen saws last year has been a tremendous advantage. It was almost an epiphany when a freshly sharpened saw was placed into my hand by Paul Seller’s. The accuracy and speed of cut was only surpassed by the feeling of excitement when I finally understood the joy of sawing with sharp teeth. I have successfully sharpened my saws many times since; however over this winter, in a garage without natural light my sharpening accuracy has dulled. My vise until this point has been two scraps of wood holding the saw plate in the vise.
This has worked well and I encourage anyone to work this way, however I have decided that bringing the saw closer to my eyes and the light, should improve my sharpening accuracy. Currently I am considering two vise plans; The first a saw vise that was picked up by Paul Sellers and shown in his image below. The second is a vise I first saw on Peter Follansbee’s blog. The links should take you to the pages where I saw the vise images.
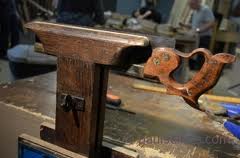 I like the simplicity of the Vise shown by Paul and it looks like a fun project that includes some mortise and tenon joints and cutting a hinge. I imagine I will end up building both.
Shop Stool
Placing a couple of stools in my shop has become a priority. I am content to sit on my saw bench, however I enjoy the chatter when my wife or children join me in the shop and want to make it more welcoming. Several weeks ago I began milling lumber for the stools using the plans in Woodworking Masterclasses. When the weather breaks this will be project number 2.
Curved Plane

I noticed on Joe McGlynn’s blog a few weeks ago that Flair woodworks was having a stool build and was looking forward to participating. Watching the weather it became clear that spending a day in my garage wasn’t going to happen. I have two small heaters that do a decent job of warming my work area, however I can only raise the temperature 20-25 degrees, since it’s been hovering around zero for the last few weeks I have made a few short forays into the garage but have not settled into a project. The last report shows that I may have a couple more weeks to wait.
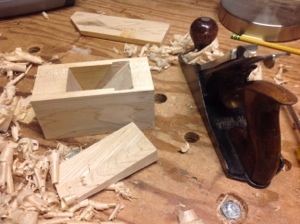
My next project will be a shop stool and I have milled a few pieces of lumber in anticipation. Most of my time has been spent making a curved plane for smoothing the seat. A couple of scrap pieces of maple make up the body.

Small Tool Chest – Goes to Work
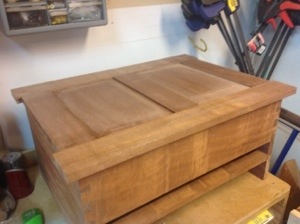
Here it is! A completed Paul Sellers’s design tool chest!


A quick run down of the chest’s features and joinery.

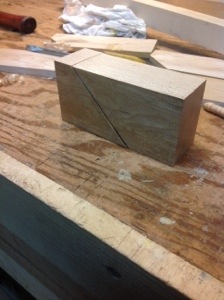
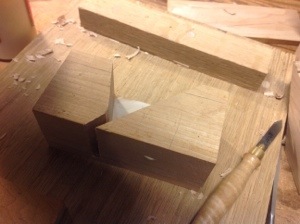
 The carcass of the tool chest is made from 7/8″ Sapele as a single box, then separated with a hand saw to produce the lid. The rail between the two drawers has a mortised dovetail that adds additional strength and a little character that is missed unless you look carefully. This portion of the project provides great opportunity to practice not only joinery skills, but hand planing skills. When the lid and box are separated it takes some time to get the required fit. The ever changing grain of the Sapele added to the challenge.
Hand cut mortise and tenon joints are used to produce the top and bottom frames. The top panels were raised by hand using a #4 stanley plane and the grooves with a veritas plow plane.


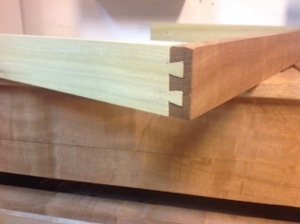
Building the drawers required half blind dovetail joints, a housing dado with wedged through tenons and drawer pulls.

Finally the chest was finished with two coats of shellac and two coats of polyurethane followed with wax. A very satisfying project with many enjoyable techniques. This is a project from Paul Seller’s Masterclass Series. As tools begin to fill the drawers, my mind wanders to future projects; stools, desks, chests and other great challenges.
Small Tool Chest – Installing Hinges
Installing hinges has never been a difficult task as long as they are marked carefully and care is taken to chisel to the gauge lines, corners are cleaned well and the bottom is level. installing the screws is where my problems begin.


I used an awl to mark the center of the holes. drilled carefully, added soap to ease the screws in and installed 11 of twelve with no problem.However I must have shortchanged the brass gods; therefore the requisite broken screw AAAGGGHHHHHH!.

Minor Bench Top Repair
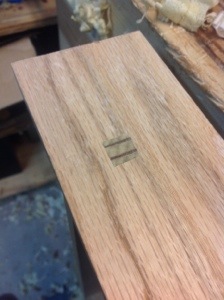
As the blog for the Small Tool Chest Handles came together I noticed in one of the pictures an indent in my bench top. Going out to take a look, I realize that the plywood top must have a cavity and it was caving in one spot. After briefly considering building a new bench, I decided a quick fix was in order.

Cutting away the area surrounding the cavity with a chisel was simple. I found a scrap of poplar in the bin and cut it to rough size then placed it over the cavity and marked the edges with a knife. Cutting along the marks I fitted the replacement piece and glued it into place.
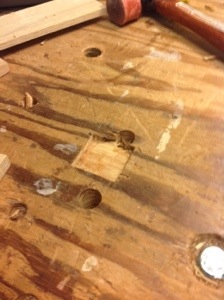

A minute with a plane and it’s ready to go. Now on to a new project!

Making a Drawer Pull
 Purchasing drawer knobs and pulls in a store always leaves me with a sense of impending doom. A regular maintenance item around the house seems to be the pull from a cabinet, knob from a drawer or door knob falling off. It isn’t the knob or pull that is at fault but the method that is used to fasten it to the door or drawer.
I laugh when my mind pictures the look on my children’s faces as a knob comes off in their hand. It is a look of puzzlement and amazement. Puzzlement because the drawer did not open, and amazement that they have a super human strength that can separate a knob from a drawer.

Fresh from reattaching a kitchen drawer pull, a smile appeared on my face when Paul Sellers’s posted a video on woodworking masterclasses that demonstrated how to make and install a drawer pull for the small tool chest. Covering my bench with tools, shavings and glue I managed to take a two hour process and turn it into an all day project……
The drawer pull begins with four pieces of wood, carefully milled flat and square. The top and bottom of the pull are made from 3/16″ material . The pieces are curved along the length and the edges rounded over. I made the curve using a chisel and #4 plane, smoothing the curve with a rasp. The edges are rounded over with a mill file and the piece is sanded smooth.
Next I take on of the two pieces of 1q/2″ x 5/8″ and cut the tail of a dovetail, then I cut the tail in half so that I can create a half lap joint in the center of the other piece.


Once the pieces are glued together I used a chisel and rasp to cure the piece to match the curve on the other two pieces. Then I glue all of the pieces together and use my clamp to hold them in place until the glue dries.

When the glue is dry a little sanding and the pull is complete. Repeating the process produces a second pull for the other drawer.
These pulls are made from scraps of Sapele from the chest, but I can see possibilities of using different colors of wood to produce different effects. imagine the look a this pull with the center piece made of walnut or blood wood. It’s been a great day and I am very satisfied with the results. Now I have to wait for the hinges, install the pulls and do a little final fit and finish.


