Archive
The BIG Glue Up
Glue-ups can be stressful! Many hours of work cutting and planing boards, making and fitting joints come down a final glue up. Almost everything up top this point can be adjusted planed or replaced. Once the glue up begins it is almost a one way street.
I have been thinking about the coffee table glue-up for a couple of weeks. Realizing that it was going to be time consuming and complex I determined that I could glue up a couple of sub assemblies to make things easier.
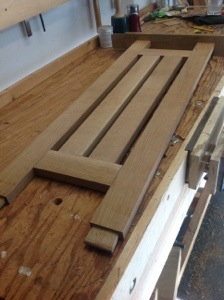 The center section of the undershelf was the first part that I glued together. I test fitted it, made several adjustments to the joints, tested again and then clamped it together. Once cleaned up and planed I was able to glue the two rails onto the outside with little problems.
Gluing sub-assemblies certainly relieves the stress at the end of a project and gives plenty of time for small adjustments. After this was complete I began looking at the coffee table as a whole and considering methods to glue up the rest. Questions such as what comes first the ends or the sides, where will I place the clamps. Do I need help or can I do this alone, danced through my head.
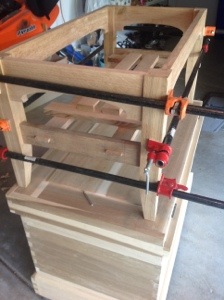
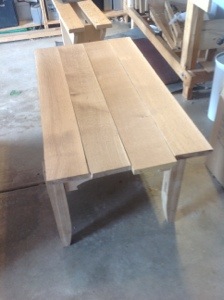
After lots of muttering and mumbling I decided I could not plan anymore and began laying out everything I need to glue the pieces together. I dampened a couple of paper towels, laid out all of the clamps opened to the approximate size and got my son to help. The actual glue up took about 1/2 an hour and was fairly eventful. With 4 eyes looking we were able to avoid many mistakes and slowly get all of the pieces glued and in place. Clamps fit well and I checked across the diagonal to make sure everything was square. We then checked each joint, cleaned up any squeeze out and stepped back to look at our work.

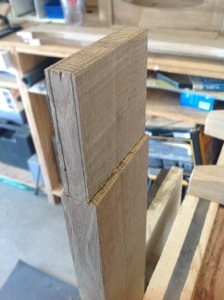
Looking good I left the table to dry overnight glad to have this step behind me and looking forward to scraping the table top. This morning I removed the clamps and as I took off the last one I heard a crack. looking around I did not see anything amiss until I looked on the other side of the table and realized one of the joints had opened up.
Good time to step back and think. First, the joint was not glued with a gap – good thing, there appeared to be no wood damage- good thing, The gap was small and I didn’t see how to get glue into it – bad thing.

I realized that if anything could be done I needed to open the gap so I could get glue into it. I placed a clamp on the bottom of the legs and tightened it enough to open the gap on this leg without affecting anything else. Then I carefully forced glue down into the joint and clamped it back together.
Not sure how strong it will be, but it was my only option. If this does not work I will need to consider pinning the joints. I’m sure that would work, but then it follows with: do I pin all of them to have the same look on each leg? We’ll see how this first attempt works before I go too far down that route.
Thinking about why the joint opened up, the only answer I have is that I did not get enough glue onto the tenon. I did have one joint that was looser than the others and this may be it. Not to worry about it now. We’ll figure it out.
Over-all it was a relatively smooth glue up with little problems. Planning makes a big difference.

Pre-fit and adjust
There are many joints in this project and with that many opportunities for mistakes and misfit parts. Before I begin glueing up I want to closely look at each tenon and the fit with it’s mortise. Next I want to assemble the coffee table and clamp it together to look at how the piece as a whole fits together. Joints that fit well individually, may not fit when they are pieced together with other parts. It is also a perfect time to sand all of the pieces and plane the aris of each piece.
I quickly realize that there are a couple of through mortises that I have forgotten to trim the edges. I clamp them in the vice and then taking a chisel pop the corners off to refine the look. I notice a couple of joints are not closing up tightly and upon inspection remove a small amount of material from the tenon. Any pencil marks that remain are removed with and eraser. Next I hand sand each piece with 220 grit paper. This should be all of the sanding that is required. This process requires me to clamp and un-clamp the parts several times as I make the adjustments.

Dubuque Clamp Company
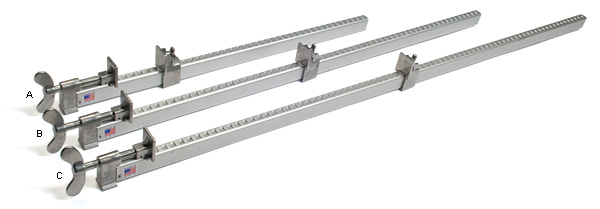
Many of you that read my blog regularly know that I have spent a week at Paul Sellers’ Foundations Class, I also am a member of his Woodworking Masterclass. Many of his lessons and techniques are excellent. He is also a fascinating person, extremely passionate about his craft and most importantly, helping people grow and develop as woodworkers. If you watch many of his videos you will notice one interesting thing that occurs repeatedly, the clamps he uses fail. The frame bends, the mechanism sticks, the adjustment breaks off, the entire end cracks. I’m chuckling as I write this, thinking of the many clamps in the classroom that kept piling up in the corner as they failed. Paul had added wood to the clamp as a stiffener to prevent the bending and it works. If I had the time, I would go back through the videos and note the number of times a clamp breaks. It would almost be like the old college drinking game where each time a clamp fails you have to drink a beer.
All of that being said I know that I will not be purchasing clamps from Harbor Freight. They may be cheap but they are frail, I have used them and I have watched them fail. The other clamp that was being tested in Paul’s shop was manufactured in the US by Dubuque Clamp Company. It can be found on Amazon and at Lee Valley Tools. Yes the clamps cost more than the clamps at Harbor Freight but I expect to be handing these down to my grandchildren.
With the Glue up of the coffee table on the immediate horizon I began counting up my clamps and thinking about the glue up and realized I did not have enough clamps. I have managed for many years with what I have, but the final glue of of this project brings together so many individual parts that I can not find a way around purchasing some new clamps. Fortunately I just had an email from Lee Valley and shipping is free. Timing is everything…….
Listen While You Work
Carefully moving aside the spider webs, I peered through the dusty window of the shed. The noise that had attracted my attention continued and I strained through the dirt and grime to see the source. The shadow of a man moved back and forth in front of what appeared to be a table. It was like no table I had ever seen before, the legs were massive, the top looked as if some had chopped and hacked into it. Not the start of a new novel but, like many woodworkers I spend quite a bit of time by myself and I’ve found that my constant companion is more and more podcasts. Thought I would share the ones I listen to most in hopes that you will share the ones I am missing.
 If you have spent any time on the web looking for woodworking blogs or podcasts you will have crossed paths with these three woodworkers. Marc Spagnuola of the Wood Whisperer, Matt of Matt’s Basement Workshop and Shannon Rogers from the Renaissance Woodworker and The Hand Tool School. The blogs of each of these woodworkers is worth a visit and adding to your favorites.
The best of these three is found on the WoodTalk Podcast which now comes in every week. Discussions of what’s on their benches, the latest woodworking news and answering listeners questions is a great addition to my shop. THey will answer your questions and in great detail. The humerous discussions, ribbing of the co-hosts all adds to a fun and enjoyable show.
![]()
Under-shelf Complete
Time has slipped away quickly and the coffee table sits in the garage partially assembled. A week of extremely hot weather, a busy work schedule and some work around the house and I’ve not finished the coffee table yet.
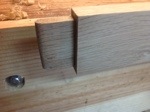
Today I’ve set out to compete the Under-shelf. Nothing particularly about it except some care to get the measurements correct and a series of mortise and tenon joints. Initially laying out the joints in pencil gave me the opportunity to view the layout prior to any permanent marks. I then marked the mortises with a knife and chopped them out with a chisel. Each one took a out 10 minutes. The tenons are 3/4 inch long and I marked them using a mortise gage. Funny thing but I found out one of them was significantly less than 7/8 inch and I had to cut a new piece. Where that piece of stock came from I have no idea!.


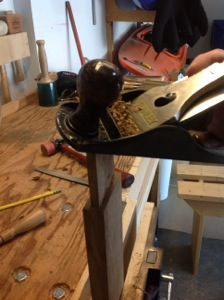
Fitting the tenons required some quick work with a chisel and router plane. The great thing about the router plane is the ability to trim equal amounts from each side maintaining the tenon in the center of the piece. I had a little trouble fitting one of the pieces until I realized that it was not quite square. A little work with a plane and everything fits.
I’m begining to think about the glue up of this piece and it’s looking to be very complex. The under shelf is made up of this component and two rails on the sides. It appears that I need to glue up this component before I complete the mortises in the rails. That should insure a good fit and one less part to glue up at the end.
Coffee Table Undershelf
 Grabbing my measurement and marking tools I began laying out the mortises for the undershelf. after all what good is a coffee table if you have no where to stash the games and magazines when the neighbors come over.
The plans call for through mortises on the sides of the shelf although as I look at it I think I may not cut them through. Seems that it may be too much joinery and instead of adding to the piece draw the eye away for the whole. All of the final pieces are placed on the shelf long rails and I sat and stared contemplating the effect of the exposed joints.
While I was day dreaming (contemplating) my design adviser stopped by and affirmed that the piece did not require any more through joints. Why i even contemplated it I will never know the answer was so clear!

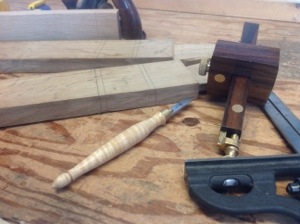
Rounding the Tenons

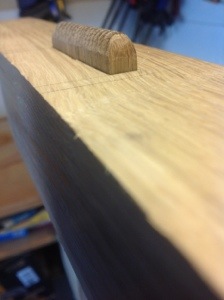
Until 3 months ago I had no idea about making through tenons, let alone that rounding them could be done with a hand plane, chisel and if needed a file.
Coffee Table Rails
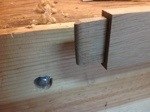
Through Tenons are a new joint for me. I have made a total of two and now I’m looking ahead to making 8 more. Using a saw to cut the tenons I stayed away from the marks and used a router plane to close in on the correct thickness.

 Using my router plane was very relaxing and provided a lot of control as I trimmed the Tenons. I managed to get the first four Tenons looking fairly good and it is clear that as my confidence grows I can cut closer to the lines. I’ll shape the exposed mortises tomorrow and then on to the under shelf.

Aprons Finished
It seems like the last few weeks have disappeared quickly. Between a busy work schedule and some family commitments the coffee table sat quietly on the bench. After completing the arches on the sides of the chest I realized that using a flat rather than curved spokeshave would increase my control. Searching eBay and local sources I came up empty and turned to Lee Valley Tools for a new Veritas spoke shave. Returning to my bench the new tool made a world of difference. It handle the curves better and with the flat face it did not have the tendency to chatter.


If you have never read woodworksbyjohn.com go over and give the site a look. John asked me a question about my method for making the arches with a chisel. His method would be a coping saw. I tried this on one of the arches and apart from my poor sawing skills it worked well. Although I think I prefer the chisel method.
With the arches complete I took a few minutes to sort the stock for the table top. After swapping boards around multiple times I finally came up with the layout milled the rest of the lumber for the shelf.
Improved Bar Clamps
Yesterday I tackled a project I have meant to do for a couple of years. Glueing small pieces of wood to my clamps, I now have made glue ups a little easier. Every time I have a big glue up with multiple clamps and many pieces of wood used to protect the project surface I think how great it would be to have the wood attached. A stumbled across a piece of quarter inch plywood when cleaning up and before I forgot again, cut pieces to size and glued them to the clamps.

