Archive
Different Plane – Different Shavings
If you haven’t noticed I take a lot of pleasure in watching the shavings curl up from a plane. There is something magical about moving a piece of iron across a board, watching shavings curl up past your hand and seeing a groove or rabbit appear behind. This is something that I missed when I was using power tools exclusively. As I reflect back over the last year I am also realizing that unless you are performing a repetitive task using the hand planes is not much slower. Let me introduce you to a few of the planes in my tool box (soon to be tool chest).

Plow plane – This has to be my favorite specialty plane. I use a Veritas Small Plow Plane available from Lee Valley Tools. A couple of months ago I really extended the usefulness of this plane by adding on the conversion kit which adds on an additional skate and allows you to use wider blades and most importantly cut tongue and groove joints. The second addition to this plane is the fence attached to the side. Veritas manufacturers the plane with holes for this attachment and I strongly urge you to add it soon after purchase. It greatly enhances the planes stability and therefore accuracy.

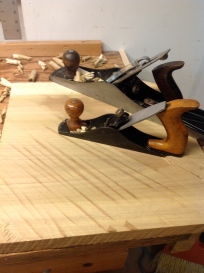
Skew Rabbit Plane – Moving Fillister or Rebate Plane. Lots of different words for this plane and yes they do have meaning. I have two rabbit planes a Stanley #78 and the Veritas Skew Rabbit Plane (pictured). Both of these planes are very capable of producing rabbits of varying widths. I find the Stanley #78 to be finicky and I have trouble maintaining the setting (mostly my fault, not the plane’s). When I first purchased the Veritas skew plane I had difficult leveling the blade for a 90 degree rabbit. I have since fixed this by paying more attention to the set up and adding a fence just like I did on the plow plane. What makes this plane a moving fillister is the addition of the spur which scores the work prior to cutting. This makes for a very clean crosscut. The skew blade pulls the plane tight against the face and cuts easily through the wood and the shavings are super cool…..
I have a fairly complete arsenal of planes, the vast majority of them used Stanley’s and I would have it no other way. Bringing a plane manufactured in the late 1800’s back to life and producing the same shavings as was made by a proud owner 200 plus years ago is a special feeling. I found that when buying used planes on Ebay or at tool meets, the standard planes are reasonably priced and readily available it easy to tell the condition of the planes and parts are available. The planes above were tougher to find and priced much higher (if you are on the East Coast you may have better luck). When putting together the Stanley #78 I had to go to two separate places for the fence and cutter. When you add in the shipping and parts there was not a lot of difference in price. The planes above are obviously new and were purchased after looking for their equivalent used counterparts. I decided that due to the complexity of these planes, difficulty in determining condition of the used planes and availability of parts that I would buy new. That was my personal decision and If you are looking for used planes there are many sources on the web, a great one is Hperkitten.com. If you haven’t found Patricks Blood and Gore you need to look. The other source is my father in law who does an excellent job of finding gems, but I’m not sharing that contact.
Tool Chest – Lid Panel
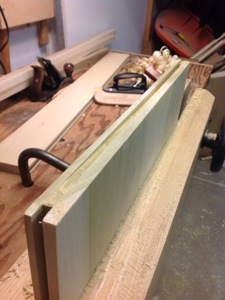
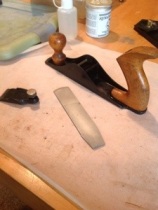
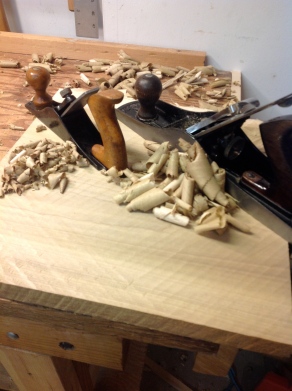
Completing the Tool Chest lid requires preparing the panel to be inserted into the frame and adding the dust seal. I cut the panel to size and using my #4 plane smoothed the edges including the end grain. I remembered to work the end grain from the edge in to the center from each end to prevent tear out. Next is a groove around the panel to insert into the groove in the panel. Another excuse to use my plow plane. This is quickly becoming one of my essential go to planes. Couldn’t miss the chance to show a different type of shaving.
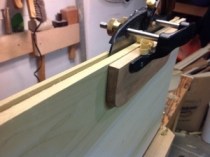

I used the same set up to tackle the end grain with the exception that I needed to be very careful not to tear out the end of the goove. By stopping short of the end the skate forced the plow plane upward at each pass leaving the groove in the first photo. Since the groove was not in the exact middle of the board I cut both end sections before adjusting the plane to reverse direction and clean up the rest of the groove in each end. The plane worked beautifully.

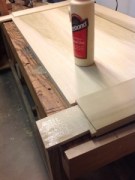
Next step was just glueing and clamping the panel. I had to take it inside after gluing so that there was enough warmth for the glue to set properly. Tomorrow the dust seal.

Scrub Plane vs Fore Plane
It’s cold today with fresh snow on the ground making it brighter and more cheerful outside. I’m struggling with a cold of my own so instead of heading out to the garage I have been sharpening and cleaning tools. I have been using a Stanley #6 for rough work. It is hefty and feels good in my hands and it quickly brings a delinquent board under control. The blade is cambered to an 8″ radius and it does not get sharpened very often, but today the blade sparkles with a new edge.
 I cleaned and sharpened one of the planes that my Father in Law dropped off, a Stanley #40. It is in great shape and I particularly like the beech handles, the color stands out boldly against the black Japanning.
I was surprised when he handed me the plane because it is quite small and quite the opposite of the hefty #6. The blade has a camber that must be closer to 3″ and is in excellent condition. I sharpened both it and my fore plane because I wanted to understand where each tool would fit into my work and the best way I know to do that is to put them to work.
Digging through my scrap box I came a cross a piece of poplar that would serve my purpose and dogged it down on the bench. The scrub plane took bold cuts diagonally across the board leaving gouges that are typical of the heavily cambered blade. I worked about 1/3 of the way across the board and into an area that I new was cupped. The plane kept moving material across the board with no hesitation. Next picking up the fore plane I finished taking cuts across the board. It wasn’t long until I noticed that the cup in the middle of the board was deep enough for the longer plane to bridge across and only shave the two edges of the board.
If you look in the picture below you can see the change in color of the wood where I stopped using the scrub plane and switched to the fore plane. So I sat down on the old 5 gallon bucket to think. If you have read my blog you’ll notice that I use the bucket quite a bit, one day when I find the right plans I will be sitting down on a stool, but for now the 5 gallon bucket will have to do. The planes have done exactly what you would expect. The longer bed of the fore plane allows it to bridge across the undulations of the wood and work to flatten the entire board. The shorter scrub plane only bridges a very short distance,so in the case of this board it has done a fabulous job of shaving the thickness of the board but as for flattening, i’m not so sure. Adjusting the blade depth would certainly make a difference, as would changing the camber of the blade.
The heavier fore plane is a beast when it comes to “hogging’ waste and once moving it is difficult to stop, exactly what I want when trying to level and thickness a board, but I think for narrower boards and smaller work the scrub plane has a place. I’ll keep trying it in different situations and refining its place in my tool box. In the mean time enjoy the photo of the different shavings and certainly the color of the tote gives it a striking appearance. If you have thoughts on these planes please comment there’s a lot to learn.
Tool Chest Lid – Mortises
Woodworking presents challenges and different techniques on a regular basis. Often it is as simple as planing figured wood or getting a great fit with a dovetail. Today presents an entirely new challenge cutting a through tenon. I have made plenty of mortise and tenon joints, even some that looked great, but I have never made a through Tenon. Follow along and feel free to critique.
 The lid of the tool chest is of frame and panel construction. All of the boards are 7/8 poplar and I spent time ensuring they are square and smooth. Laying them on the chest I marked the lengths with my marking knife around the entire board and then used my paring chisel to prep the edge for a first class saw cut.
After sawing all of the frame boards to length I cut grooves to receive the panel into each side of the frame boards. I really like using my plow plane to cut these groves. There is something calming in the sound of the plane slicing through the wood and feeling it curl up past my finger tips. In about 15 minutes I have plowed grooves in all four boards and am ready to cut the tenons.

I placed the boards on the tool chest again to mark the location of the tenon joints. If you are a 100% hand tool person skip the next sentence. I took each of the frame boards over to the table saw and cut the tenons. After all it was 30 degrees in my shop. Cleaning up each of the tenons with a block plane only took a few minutes and I test fitted in the groove plowed earlier. I’ve been researching making through tenons for the last several days without a Lot of luck. I did stumble across a very neat video from Paul Sellers showing a side view of his method for cutting mortises, this is the method that I intend to use. I also plan on marking the mortise on each edge of the boards and cutting from each side to prevent tear out.
Many of my tools are used and have come from estate sales, yard sales ebay, hand me downs etc. I looked for mortising chisels for quite some time, even through the piles of chisels at the Midwest Tool Collector Association and decided to purchase new. Pricing was not much different so last summer I ordered two new chisels from Lie-Nielsen, the first mortise chisels I have ever owned. This was my chance to put them to use making a very deep tenon.
 The mortise is marked out using my marking gauge and knife being careful to account for any minor differences in the width of the mortise sides. Using my paring chisel I carefully removed material adjacent to the marks then chiseled out the first 1/4 to 1/2 inch. Turning the board over I transferred my marks from the front edge to the back and marked the mortise location in the groove. I could never have done this with a pencil. Taking out my drill I attached a 5/16 auger bit and proceeded to drill out the waste. I drilled within 1/2″ of the mortise on the other side. Next using my mortise chisel and bench chisels I removed the rest of the waste. Well that’s the way it worked in two of the mortises……Fortunately two of them will be covered by the dust seal. I learned several things along the way; starting the mortise 3/8″ in from the side is two close. I split the side on the second mortise and moved the last two in to about an inch. Take your time on the initial cut. I took twice as long to do the third and the fourth and it shows. Practice..Practice.
Next step is the Panel for the lid, dust seal, then glue up. It’s starting to take shape.


Blue Spruce Toolworks – Awesome
Power tools have been the focus of my woodworking until approximately a year ago when I began enjoying the use of hand tools. Watching The Hand Tool School I realized that there was great value in the use of a marking knife over a pencil especially as you move into the use of hand tools. Browsing internet sites I came across Blue Spruce Toolworks frequently and realized that Shannon Rogers and others were using knives from Dave Jeske. After much contemplation I place an order which arrived a few days later. The knife is a work of art. The tiger maple and design of the knife are an inspiration and the knife is used on every project. If you have not made the transition to a marking knife go now. This was before Christopher Schwarz wrote his recent article about the knives.
A week ago I watched this knife roll across my bench and in agonizing slow motion teeter on the edge and dive blade first onto the hard concrete! I could do nothing since I had my saw till in one hand and saw in the other. The knife appeared OK but in use the blade had a slight wiggle. After a fall like that I probably would have broken an ankle. Not to overstate my emotions, but I felt a curtain of darkness drop. That knife was the first step into what has become an awesome journey into hand tool woodworking. I emailed Dave Jeske asking if the knife could be repaired and if he could smooth one side to prevent my stupidity. The next day I mailed it to Oregon and four days later a package arrived containing a box.


Beautifully wrapped was a marking knife and even better it had a flat spot carefully placed on the side. If you own one of these little beauties you will know how I felt. I searched the package and the box for a bill, there was none! Dave thank you for the excellent service, beautiful tool and small custom change. You are awesome! and If you think you will get away without getting paid… There’s a tool order on the way.
My Favorite Marking and Measuring Tools
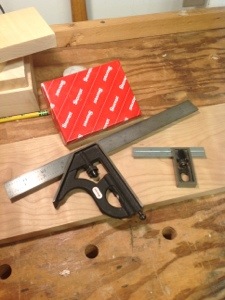
There are four squares in my tool box, two that I use every week, one that is used a few times a year and one that is my neighbor square. One more hangs high on my wall just in reach.
When I was 8 my father presented me with a few tools for Christmas; a hammer, two screw drivers (flat head and Phillips), a six inch adjustable wrench and a square. These tools were purchased from Sears and proudly have the craftsman name on the side. I still have all of these tools in my tool box with the exception of the hammer which remains in his tool box. All of these tools are still used with the exception of one……the square.
There is nothing special about the square it has a red plastic handle and metal edge marked off in inches. I used it until twelve years ago to build book shelves and beds and many other projects around the house. Until I went to a class on table saws at Highland Hardware. In this class they talked about setting up the saw and how to square the blade using a board cut on all sides to check for accuracy. As in most classes they pointed out the tools you could purchase from their store to help you master your craft including several machinists squares made by Groz. I didn’t need any tools since I had a nice craftsman square and besides I had just forked over cash for the class.
In my garage I went through the suggested set up for my saw and to my amazement it was not square. I repeated again and again, same thing. In frustration I sat down on a 5 gallon bucket and stared out my garage door. Three hours later I had a new 6″ Groz machinist’s square and a table saw that was cutting true lines. The old square was relegated to the back of the tool box. My woodworking took a dramatic leap forward as joints fit and I spent less time making adjustments.
I later ended up with a 12″ Stanley combination square that was accurate and could handle wider boards. The Groz was used on my machinery, it’s heavy weight helped it to stand accurately when adjusting blade settings and the Stanley combination square became my marking square . This worked great until we moved, and the Stanley square was misplaced. I replaced it with a similar square and ready to work checked it with the Groz, it was not square. I returned the square assuming it was unique and checked the entire store stock about 8-10 squares. None of them were accurate!
Back to the 5 gallon bucket for some contemplation and after some research a red box showed up at the house with a Starret 12″ square. This was another leap since it operated smoothly was easy to ready and had a definite feel of quality. The Starret squares are not low cost but they are worth every penny. A year later another red box arrived with a 4″ Starret square. It is now my favorite; used for marking joints, checking edges for square and many other tasks. The message in this blog is purchase the most accurate measuring and marking tools you can, they affect every cut you make.
I almost forgot my neighbor square. I am happy to loan tools to my friends that understand their value not only in cost but the joy they give me. I am even happier to go aong and give them a hand. However, I have not loaned out my Starret squares, but I do keep an old combination square for their use. There are some tools that mean that much.
Chamfer the Skirt Boards
 The skirt boards look a little clunky on the chest which I am sure is why they are chamfered in the Anarchist Tool Chest. I don’t have any of the fancy moulding planes to make coves or ogees so I am going to plane a chamfer on the edge of each board. When I placed the dovetails I left plenty of room on the top of the lower skirts and the bottom of the upper. I disassembled the skirts making sure that I carefully labeled each one and their placement and marked the edge I wanted to cut. I did this by setting my round marking gage to approximately 1/2 inch and running a mark down each side. Next I used my combination square to mark a 45 degree angle between these marks.


A couple of comments about my tool selection. I resisted for a long time purchasing a round marking gauge preferring to use the old english style mortise gauge. After reading a lot of blogs I noticed that most people were using the newer style so I purchased one from Veritas. This was a great investment and greatly improved the accuracy of my marks. After a few months I decided to purchase a second gauge, unfortunately I picked it up from a local woodworking store and I was sorely disapointed. It sits in a rack by my wall unused due to its inability to hold a setting. Please buy a round marking gauge, they are awesome, but ensure you buy a top brand. The second tool that I used for doing the chamfers is the the Moxon style vice from Benchcrafted. This alone has changed my woodworking for the better. When I purchased the vice it seemed very expensive and I looked for alternatives, I’m glad I did not find any. I made the vice jaws out of Maple and installed the hardware and not a project has gone by since, that I have not praised its performance. There is 24 1/4 inches between the screws which easily handled the chest sides and anything that I plan to make in the future. I hope to see more of the vices produced by Benchcrafted in the future and maybe install them on a new bench one day.
I started to chamfer the edges using my Stanley #7 but quickly realized that a #5 performed the task well and was much easier to hold. The blade was set aggressively and made short work of the edges. It took approximately 15 minutes to do the upper skirt and another 15 for the lower. After reassembling the skirts I then had to plane off the last corner to get the pieces to mate. The next steps on the project are installation of the skirts, making the lid and then painting. I’ll complete the lid prior to the skirt installation and glue them all up together. It’s getting more and more difficult to man handle the chest inside where it is warm enough for the glue to set so I’ll try to do it in one more trip. There is something very satisfying about making a plane work and I finished the evening very satisfied.


Second Drop is Your Fault
 Somewhere along my life I heard the saying that the first drop of rain that hits you is god’s fault..the second is yours. I can imagine that this was spoken to me in either frustration or amazement while I splashed along in the rain happily getting soaking wet. The saying applies to many of the things we do in life and is similar to the definition of insanity… doing the same thing over and over again expecting a different result. After pinching my fingers between my end vise and the vice handle for the hundredth time I decide to make a change.
I removed the handle and began searching through my drawers for something to eliminate the pinch point. Finding a couple of rubber o rings I placed one on each side of the handle. Hopefully this will keep my fingers out of the pinch point and allow the pipe end cap to seat against the vice without the use of my fingers as cushioning.
I’m not sure if it will eliminate the problem totally, we’ll have to see. Certainly I have no intention of performing a test. Like the saying goes the first drop is god’s fault the 101st is………
Skirt Boards
Adding the skirt boards to the tool chest should be a fun challenge. As I looked at the chest and began to formulate a plan It became clear that I needed to do a little more smoothing. Most of the problems I had with the dovetails on the carcass were caused by inconsistent planing of the boards. Once you begin assembly you have to be more creative when it comes to positioning work pieces.Placing the chest over the end of my bench I was able to clamp it down firmly and plane the sides until I was satisfied. I then had to position the chest so that I could plane the ends. since It would not fit over the end of the bench as it had on its side, I placed it adjacent to the bench and clamped it in place using the tail vice. I carefully planed all the corners square using a block plane and a #4 plane. I then took my number 7 and planed the sides between the corners using a long straight edge to ensure they were not bowed. It took about twenty minutes to complete all four sides.


This is the first time that I have really wished for a much heavier workbench. As I planed the sides the bench moved quite a bit and wobbled slightly. I’ll make some more notes for
 my bench build in the future. I next milled all of the pieces for the skirts leaving them long so that I could fit each one individually. All of this added wood is going to make a very heavy chest, it will have to be weighed later.
I took one of the end skirt boards marked a 90 degree line and cut it careful and then squared up the matching side skirt. Marking and cutting the dovetails for this corner I took the lessons that I had learned from the chest carcass and took extra time to clean between the tails and the pins and had some very nice dovetails. Carefully working my way around the chest I reached the final board. Getting this one to fit correctly took some very careful measurements. My assistant came out to help me as I clamped the dovetailed boards together and then carefully marked the lengths I needed with a marking knife. An hour later and I had all the dovetails cut and the bottom skirt was completed with the exception of the chamfer.
Moving ahead I gathered my stock for the upper skirt and dust seal. These boards required more prep work since one had a nasty twist, but after about 15 minutes I had it true enough to use. The upper skirt only required one dovetail which made it a very quick process.
