Archive
The World of Woodworking is closer than you expect!
One of the best parts of my blog is the group of followers that read and comment. They provide laughter, criticism, advice and links to projects yet to be built. I have a group of bloggers that I interact with regularly, and may others that stop in occasionally. I’m not sure how many followers I have, but I am much more aware of the many countries they come from. Finally after a year of watching I have reached South America with someone from Chile and Columbia reading. As I look at the countries around the world I often wonder about the wood that these readers are using, the different styles they encounter and tools and techniques they use. Sadly many of the readers from countries outside of the United States have not “Followed my Blog” so I am unable to see if they have a blog of their own.
A couple of days ago an email notified me of a new follower to my blog. Looking at the email I could see they had a blog of their own and although it was in German I took a look. Pictures of stacks of lumber, beautiful hand made planes and cabinets danced across my screen. The year of German that I struggled through in school was of no use and I wistfully looked at the page seeking to understand what was written. Then it suddenly dawned on me that I could grab the words and using Google Translate read what the blogger had written. A few clicks and suddenly German became English and I was thrilled. I immediately showed the blog to my 12 year old daughter and how Google Translate worked. She smiled pointed to her Ipad and said “yeah, works great, I’ve had it for a while.”
Here’s to my latest follower slowwood.wordpress.com. Volker has a great blog with wonderful pictures and a great writing style. I hope you will take the time to follow along.
For myself and all of the other woodworking bloggers, if you are reading a blog and have one of your own, please Follow or send a Like. I would love to see what is going on in woodworking around the world, and if it’s not in English don’t worry, I’ll take the time to read it in Google Translate.
Small Tool Chest – Drawers
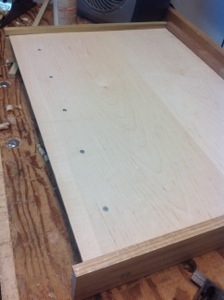
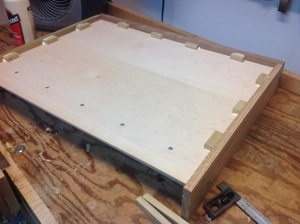
 With the pinned housing joints complete, only a couple of steps left to complete the drawer. Mahogany plywood was cut to fit into the grooves and slid into place. I carefully drilled holes for 5 screws that will hold it. I then cut several 1.5″ pieces of wood and glued them into the edges of the drawer and bottom of the plywood. When the glue dries it will tighten the drawer bottom and prevent any banging of the plywood in the groove. You’re saying to yourself – what about expansion…….hopefully with plywood there will be very little.
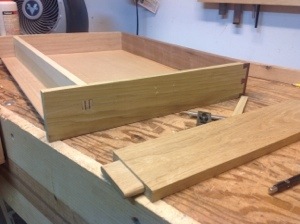
Another design aspect that you may not have picked up, the back of the drawer is 2.5 inches in from the end of the sides. When the drawer is open the back can align with the case without the drawer falling out of its slot. If you are like me, anything buried in the last few inches gets lost anyway.
Next? I have to install hinges (in the mail somewhere), make drawer pulls (they’re a great design), and smooth the case….Have a Great Christmas!
Small Tool Chest – Pinned Housing Joints
 Now that I have the drawer front and sides complete, I need to cut the mortises for the bottom. Nothing special about this process. I use my plow plane with a 3/16 blade and cut one in the front and each side. The unique part of these drawers is how the back is mortised and pinned into the sides.
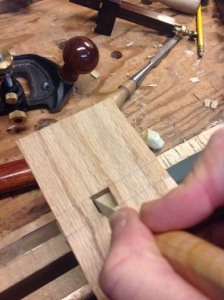
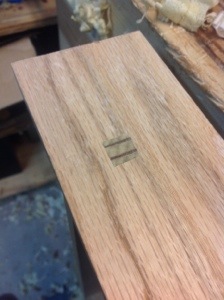
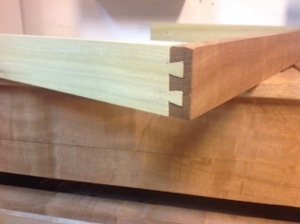
There are several ways to connect the back to the sides, dovetails, mortise and tenons, screws etc. Each of these work in its own way; for this project I was introduced to a method I have not seen before. A mortise is cut at the rear of each side and then a through mortise is cut through the side to house a pin. The pin is then held in place with wedges.
I hope the pictures are self explanatory…This is a great joint, adds character to the drawer and I don’t anticipate any chance of a joint failure in the future.


Small Tool Chest – Half Blind Dovetails
 I have a fair amount of confidence in my through dovetails. Generally they come out well and only occasionally do I have to make a repair or repeat a cut. Half Blind dovetails is a different experience. In fact I have no experience at all and when I have made drawers that required a clean face I have made through dovetails and used a face board.
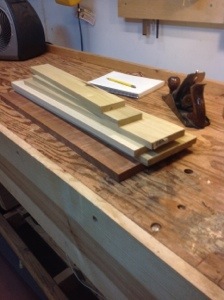
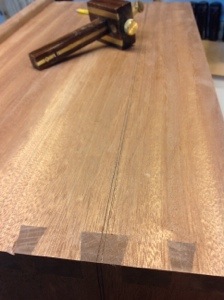
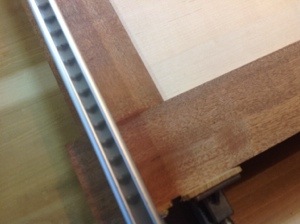
I begin by preparing stock for the two drawers. The front of the drawer is obviously Sapele. The sides and back could be Sapele, but I like the look of contrasting woods so I dig through my offcuts and come up with poplar and Oak. The key to any dovetail is to begin with well prepared stock that has square edges.I carefully plane the sides then take a few minutes to sharpen my blade and smooth the end grain. Two years ago I would have hesitated before planing the ends and left them to the saw cut from a table saw. Now I just sharpen the blade and plane three quarters of the way across from one side, Reverse the board in the vice and finish up the work . There is something particularly satisfying when smoothing end grain. The blade makes a crisp sound and if all is right the grain comes away like flowers of a petal.

The next task is to lay out the dovetails and sides. Experience tells me that the clearer you mark your work the less chance for a mistaken cut. I always take the time to mark each line and then mark the material to be removed with an X. It guides the cuts, ensures I place the saw on the correct side of the line and reveals what the work should look like when completed. In the picture you can see that I am using a backer board for the cut. This board will be used to transfer the cut lines from one side of the drawer to another ensuring a perfect match.
I saw out the tails for both sides of the first drawer and then pause realizing that I need to resharpen my saw. I’ve been sharpening my own saw’s for the past year and have found it a fairly easy task. I tend to wait too long before resharpening saws however, making the task more difficult than it should be. After five minutes I finish off the tails for the second drawer and begin layout of the pins. This is where I am moving into new territory with the half blind pins.
I am following Paul Seller’s method that he demonstrated when I was in his class. I’m certainly glad that I took detailed notes and follow them for this task. There seem to be many ways to cut all manner of dovetails and it is fun to look around the internet and listen to people’s passionate explanations of
 how their method is best. This is the only way I know how to cut half blind dovetails so I have no experience for comparison. It takes me a couple hours to chop out and fit all of the pins and when I am done I am fairly satisfied.
My only regret is not using the red oak for all of the sides. It is much prettier and I am more satisfied with the crisp lines that I leave after chopping away the wood.
A tense moment Small Tool Chest
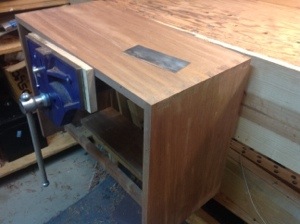
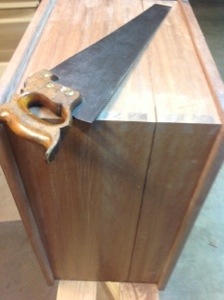
Before I attached the lid of the tool chest I marked the cut line for the lid. I’m now physically prepared to make the cut. Notice I say physically, the chest is positioned, saw is sharp, cut lines marked……mentally however I’m a little concerned.
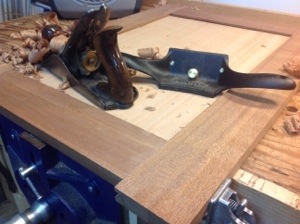
Sawing a straight line all the way around the carcass looks to be a little tricky so I clamp a guide to help me get started. Then using a panel saw I progress one edge at a time around the chest. Changing my hand hold on the saw gave me more control as I attempted to stay between the marks. Finally the cut is complete. I’ll need to take some time with a plane to clean up the edges, find some hinges, then I can begin the drawers.


A Defining Moment – Lid Attached
Attaching the lid is similar to the bottom with the exception that I will not use screws. I don’t want the plugs on the top of the chest and it is not supporting much weight. The challenging part about the lid attachment is the preparation I need to make for the following step, separation of the lid from the carcass.
There is a very slight bend in the front board of the chest and I realize that I can take the bow out when I attach the lid but when I saw it apart the bow will return to the lower portion. To prevent this I measure the upper shelf and cut it to size. After the lid is separated I will be able to squeeze the shelf into place on the lower part and know that it is not bowed. The shelf is made from 1/4″ mahogany plywood. I use a marking knife to ensure there are no splinters.


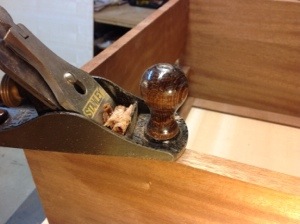
After sharpening my plane, time is spent smoothing the carcass and ensuring the lid fits leaving no gaps. I enjoy the sound of the plane as it slices through the grain and it only takes a few minutes to smooth everything. A sharp blade is a must when doing this work.
When the Dovetails were laid out we left a thicker tail where the lid was to be separated. Using my marking gage I locate the larger tail and mark off the location of the cut. It is 1/8″ wide and I cautiously mark around the entire carcass. I have worried about forgetting this step since to glue the lid on prior to marking would be a major problem. Marking a 1/4 inch around the lid I use my plane to form a round over, then I’m ready for glue up.

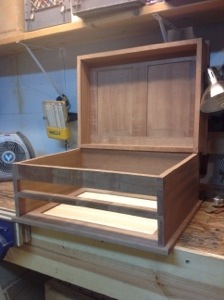
 There is a defining moment in each project when you can see the finished project. Now that I have the carcass, bottom and lid in place I can step back and look at the dimensions and evaluate the chest. I like the way it looks and the simplicity makes the joints stand out. The next stage is to separate the lid and build the drawers. First I carry the chest into the house so that the glue can bond where it is warm!
Attaching the Bottom, Small Tool Chest
Fall is definitely yielding to the incoming winter today. I wandered into the garage this morning and it was a balmy 38 degrees (3 C) and after turning on the heater, wandered off to walk the dog. Hand work is a little tough when it is this cold and giving the heater an hour to take the chill out of the air will make a big difference. Outside the temperature is hovering in the low teens and the ground crunches under my feet from the heavy frost. The cool breeze on my cheek, beautiful blue sky and quiet of the morning make up for the chill.
Back inside I realize that I need to make some progress today and get the top and bottom lids finished and glued up. Hopefully this will put me in position to get the drawers done after Thanksgiving.
Spending quite a bit of time on the carcass I check the fit and finish, look for alignment issues and any gaps. Once the bottom is attached it will become much more difficult to scape away any tear out and any gaps will become a permanent reminder of a rushed morning.
Placing the entire carcass in my vice makes the entire process much easier. When I bought the vise earlier this year I debated on the size I needed . It seemed a little extravagant to purchase one with a 15″ opening at the time but I have not regretted it. As I work the piece with planes and scrapers it is rock solid, at a great height and easy to reposition. My only regret is that I wish I had mounted it a 1/2 inch further out from the bench to allow more room to get my fingers behind a board.

I test fit the bottom and make some more adjustments to remove any gaps and then prepare for the glue up. The bottom will be attached with glue and screws to ensure that it can support the weight of the drawer above. The screws will be counter sunk and I will plug them at some point. Once glued, I placed the box inside to allow the glues to cure at a reasonable temperature.
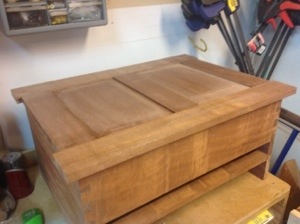
Small Tool Chest Raised Panels
 Until 6 months ago I would have never considered making raised panels with a smoothing plane. Actually, I would not have a plane sharp enough to make raised panels. The bottom panel is a piece of 1/4″ plywood. It will never be seen and the chest is quite heavy without the additional weight of a panel.
Making raised panels is much quicker by hand unless you are making a large number. It took me 15 minutes for each panel for a total of 30 minutes. I don’t think I could find my router bits in that time. The most frustrating part of this process has been trying to flatten the panels. We have been through multiple weather changes since I first cut the panels and I have planed them flat twice and one of the has a vicious cup already.
Once flattened I mark out the desired thickness of the panel edges using a marking gage and then pencil in guide lines for the raised panel on the top. Placing the panel in my vise I plane back and forth at my desired angle careful to maintain a 45 degree cutting angle on the end grains. I repeat this for all of the sides on each panel. Next I flip the panels over and repeat the process until the panels fit neatly into the grooves. Glue up next.

Small Tool Chest Bottom
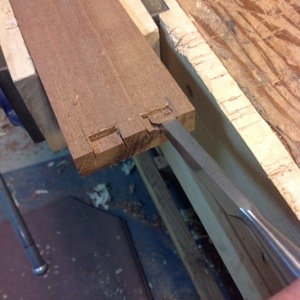
The bottom of this tool chest is a frame like the lid, with a single panel. Looking closely at the grain I took a chance and decided to split the waste from the tenons using a chisel. This is definitely my preferred method to remove the waste and if all goes well, much quicker.
Grain direction is the critical element when using a chisel to remove the waste. After laying out the tenon and sawing along the bottom I look at the grain and try to determine where it will split. If the grain looks like it will split into the tenon I stop, grab my saw and cut the tenons. If the grain looks like it will split parallel to or away from the tenon I place the tenon in my vise and make some test cuts.
 I place my chisel approximately half way into the waste and and on one side and give it a tap. Watching the split I can confirm that the wood will split where I intend. I then move to the other end and a place my chisel half way and make another test tap. If this works I go ahead and remove the waste. Using this method of checking each end of the tenon has been particularly helpful with the Sapele. The grain can change dramatically over a few inches and where I can use a chisel on one end of the tenon I may not on the other.
I saw two of the tenons and split the other two and quickly finish the mortise and Tenon joints. Most of the joints fit well, but I still have a little bit of work to smooth the joints. Rigging up a clamp n my vice I am able to support the bottom while I use a plane and cabinet scraper to smooth all of the parts. Sapele has been fun to work, but I could never have gotten by without my cabinet scraper.


Lid – Small Toolchest
One of several features in this project is the design of the too chest lid. The lid teaches the methods necessary to make a door with mortise and tenon joints and raised panels. Knowing that I need to develop a twist free lid I begin this stage by making a mortise guide. Similar to the guide I made for the table project, I begin with a scrap piece of ash with the grain running vertically and then carefully cut and plane a piece of Oak to 1/4 inch that will be placed as a guide for the chisel. I learned from my first guides that grain direction and wood choice is critical. The vertical grain on the ash will prevent bending and the horizontal grain on the oak will resist wear.


The guide which is a Paul Sellers Design works brilliantly when you need a perfectly straight mortise. With the guide gluing, I turned to the rails and grabbed my plow plane to cut grooves for the panels. It took me approximately 45 minutes to cut all of the grooves for the top and bottom panels. If I had sharpened up when I began, instead of waiting until the last couple of pieces if would have gone much quicker.


With the grooves in place I turn my attention to marking up all of the mortises and tenons. This is definitely an area where I have a high probability to make a mistake, so I slow down, double check my measurements and think carefully through the process. Wild doing the marking I ganged all of the rails together to ensure that the markings are precise from one to another. Also I work from one end only, eliminating errors that may come from slight deviations in length.


With six mortises and tenons completed the chest design begins to come to life. Next, the bottom and raised panels!

