Archive
Coffee Table Rails
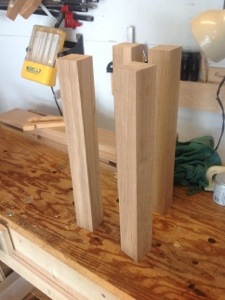
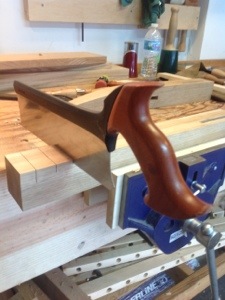
Through Tenons are a new joint for me. I have made a total of two and now I’m looking ahead to making 8 more. Using a saw to cut the tenons I stayed away from the marks and used a router plane to close in on the correct thickness.

 Using my router plane was very relaxing and provided a lot of control as I trimmed the Tenons. I managed to get the first four Tenons looking fairly good and it is clear that as my confidence grows I can cut closer to the lines. I’ll shape the exposed mortises tomorrow and then on to the under shelf.

Aprons Finished
It seems like the last few weeks have disappeared quickly. Between a busy work schedule and some family commitments the coffee table sat quietly on the bench. After completing the arches on the sides of the chest I realized that using a flat rather than curved spokeshave would increase my control. Searching eBay and local sources I came up empty and turned to Lee Valley Tools for a new Veritas spoke shave. Returning to my bench the new tool made a world of difference. It handle the curves better and with the flat face it did not have the tendency to chatter.


If you have never read woodworksbyjohn.com go over and give the site a look. John asked me a question about my method for making the arches with a chisel. His method would be a coping saw. I tried this on one of the arches and apart from my poor sawing skills it worked well. Although I think I prefer the chisel method.
With the arches complete I took a few minutes to sort the stock for the table top. After swapping boards around multiple times I finally came up with the layout milled the rest of the lumber for the shelf.
Improved Bar Clamps
Yesterday I tackled a project I have meant to do for a couple of years. Glueing small pieces of wood to my clamps, I now have made glue ups a little easier. Every time I have a big glue up with multiple clamps and many pieces of wood used to protect the project surface I think how great it would be to have the wood attached. A stumbled across a piece of quarter inch plywood when cleaning up and before I forgot again, cut pieces to size and glued them to the clamps.

Coffee Table Aprons

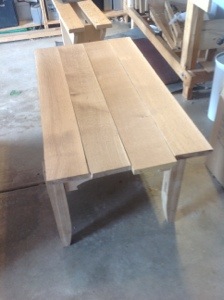
The aprons are all cut and planed smooth and I spent a few hours fitting all of the tenons into their matching mortise. Some minor adjustments and everything fits well. Using a couple of pipe clamps I assembled the legs and apron to take a first peak at the table. Each of the aprons needs to be shaped with a small arch. Like the leg shaping a made a template out of 1/2″ pine and penciled in the shape of the curve.
Using a saw i divided the cuts into smaller sections and then using a chisel chopped along the line. A spokeshave made light work of finishing the curve. I have leaned that this curve is too gentle for my rounded spokeshave and I am contemplating using a flat spokeshave for the remaining three. I think that this will allow me to make a more consistent curve a cut down on the amount of final smoothing that I have to do.


Shaping the Legs
Chopping all of the apron mortises this week gave me plenty of time to contemplate, the heat wave that has been stable over the U.S. There were several blogs that showed fellow woodworkers installing air conditioning. After last Wednesday night it certainly sounded like a great idea, but I waited for the weekend and the temperature has declined.
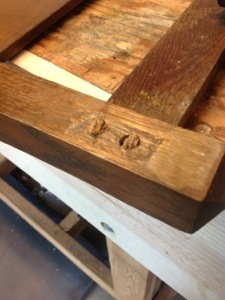
 After completing all of the mortises for the aprons, the through mortises remained. I laid them out on each edge careful to align and mark each side. cutting three of the mortises I realized that I marked them all 1/2″ wider than I intended. Fortunately I have not cut the lumber for the pieces yet and will have to adjust. Hopefully that’s the one mistake for this project. The final mortise completed I again turned to shaping the legs.
Placing them on top of my bench it became clear that shaping the legs would lighten the look of the table so I proceeded as planned. I made a template from some 1/2″ pine and used it to lay out all of the cuts. Making saw cuts to help ease out the pieces I chopped the waste wood away from the lines. Quickly planing the first leg I held It up and studied the slight change in color where I cut across the lamination. It looks OK. I will always know that the joint is there but it is not noticeable to the casual person.

With the temperature lower I hope to push ahead with fitting the tenons and shaping the aprons.

Transition Planes
Several people have spoken about the qualities of wood planes. Until several months ago I had little knowledge of transition planes and even then it was a passing comment about their feel as they glide across a board. A few weeks ago I was handed a box of old planes; I was a little surprised, but many of us have been given tools from friends, relatives and people down the street.

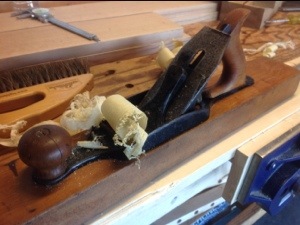
As a struggled to put words onto the computer screen last week my eyes strolled over to the cardboard box that rested on my bench. Reaching in I sorted through the planes until my hand fell upon the metal of this transition plane. The wood was dry, the blade blunt and rusty and the tote loose. Deciding that at the least a little linseed oil was needed, I spent several minutes wiping the dirt and grime from the wood and metal.
The linseed oil soaked into the wood rapidly and several coats later the beauty of the plane began to shine through. I cleaned and added wax to the japanning on the metal and the plane really began to catch my eye. Leaving the plane to dry, I continued working on several other projects intending to place the plane in my tool box to be worked on at another time. It caught my eye several more times and I continued to add Linseed oil until the wood could hold no more.
 After the last coat of oil I began placing the blade into the plane, but at the last minute decided to oil it up to prevent further rust. An hour later I had forced the blade and chip breaker apart (force is a polite term) removed rust and sharpened the blade and begun cleaning the frog. I had not realized that these planes have the adjustment of a stanley plane. This is one of the factors that had prevented me from acquiring wood planes in the past. I like the fine control of the mechanical adjustment. At this point there is a certain excitement about trying a wooden plane with the fine adjustment of a Stanley #4.
I grabbed a scrap piece of poplar and clamped it into my vise. Adjusting the plane I eased it onto the wood and felt the blade bite, a little too deep. I spun the adjustment wheel and placed the plane back on the board. Swisch…..


Back to the begining of the board, I push forward again, Swisch….clearly the plane did not say Swish…there was a definite c in the spelling. The wooden sole glided across the board and the blade sliced through the wood. I began easing the plane back and forth across the board feeling it work and hearing the sound as it removed slice after slice. Wow!!!!!!!
John Patrick, your cardboard box of planes has revealed the soul of a wooden plane and put a smile on a woodworker’s face. What a wonderful gift!!! Keep well my friend and know the planes are in great hands.
Chair Repair
A few weeks ago a co-worker mentioned a chair that he needed to repair and inquired about borrowing some clamps. Happy to lend the clamps I went a step forward and volunteered to glue the joints. Little did I know that I was about to embark on an adventure.

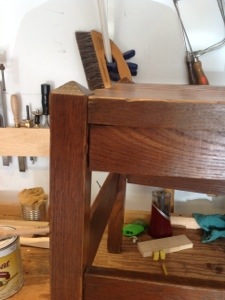
The chair is a beautiful example of mission furniture and I intended to capture its dimensions when I finished, however it slipped my mind. The joints have opened up over time and it should only take a small amount of time to open the joints, clean them up and re-glue.
My first problem occurred when I could only get one side of the leg apart. Mortise and Tenon joints attach the rails at the bottom of the legs which come apart easily. The dowels however are loose but will not come out of the holes. Additionally two are cracked. I ended up drilling out the existing dowels. I then realized that one of them is a custom dowel with the hole on one side bigger than the other. Followed by nails in one of the mortises I can see that the chair was repaired previously. Needless to say what looked like an hour took four. It certainly is a nice chair though.

Leg Conundrum
Hmmmmmmmmmmmmm! It’s highly likely that that sound as echoed through your head and often slipped across your tongue. This morning it has reverberated across the bench. There are four legs in front of me, each has been planed, jointed, and cut to length. Mortises have been marked and chopped and aprons prepared for fitting, but alas the Hmmmmmmmmmm! Sound crosses my lips.
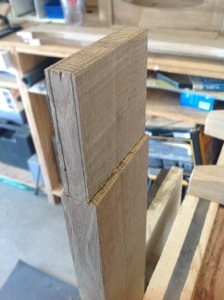
When I purchase the lumber for this project there was not and quarter sawn white oak that was 10/4 thickness. Not exactly true….there was not any quarter sawn white oak that I was willing to pay for in 10/4 thickness. It seemed very extravagant and a rip off to pay $12.75 per board foot for the material for the legs. Please comment if this is typical of pricing for you. Obviously I laminated the legs and cut them to size chopped the mortises and have arrived at this spot where I realize that my plan includes shaping the legs.
The laminations are difficult to spot when the legs are square but, when I shape the legs will the changes in grain become obvious and leave a lingering change for all to comment upon. Stay tuned I think I need a cup of tea.

Mortise Guide

The coffee table has three mortises in each leg and and eight more supporting the shelf. Chopping mortises by hand is like running. The first steps are rife with anticipation, the next come with labored breath, but with training and patience a rhythm is developed that helps clear the mind and ends in an intense focus. It’s probably a little too far out on the limb to describe it has “mortise chopper’s high” but it is a very calming work.
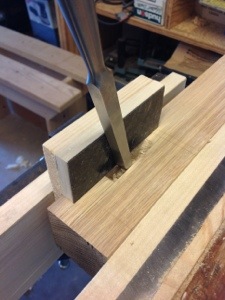
Ensuring crisp edges especially where a through mortise is chopped takes practice. Helping a long the way is this little guide that Paul Sellers introduced me to a month ago. It is simply two pieces of wood and a small piece of counter top that can be used to guide the chisel along one edge. Making two of them one 3/8″ and the other 1/2″, they can be placed adjacent to the mortise and as long as I register the chisel against it, I will maintain a very nice edge.


Coffee Table Legs
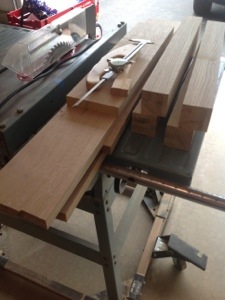 The boards for the legs are glued together and clamps removed. It’s time to cut them to size and ensure that they are square and smooth.