Archive
Mortiser Adjustments
It takes time to learn the tips and tricks of the tools we use and often if everything is operating correctly there is little need to explore manuals. When I acquired the Powermatic Mortiser last year, I spent some time cleaning it and browsing through the manual. The machine has performed well, until I noticed that it was not holding the longitudinal (best description I could come up with) setting and creeping as I made longer mortises.
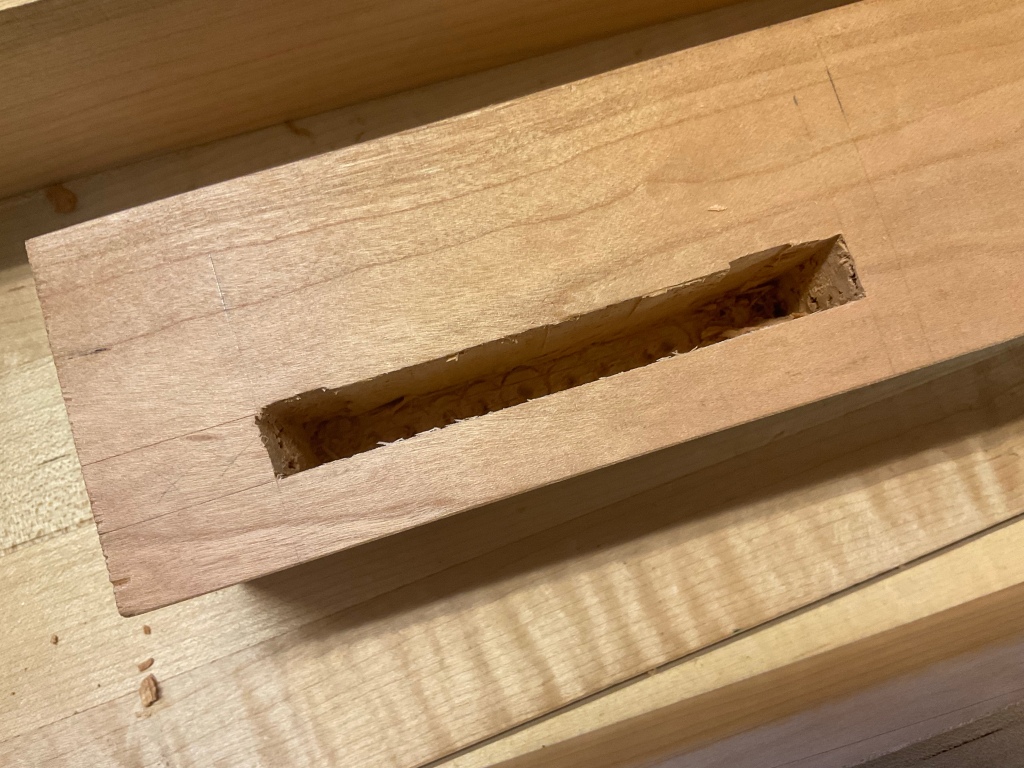
My first instinct was to check the alignment of the drill bit, but it appeared to be correct. Next I compared the movement of both the lateral and longitudinal adjustment wheels and noticed a distinct difference. The longitudinal adjustment turned freely while the lateral was stiff.
It was clear that I needed to find a way of holding the adjustment and looked for a knob on the handle similar to those on table saws…not there. After a little thought, I discovered the gibs on the side of the table and then the wing nut.

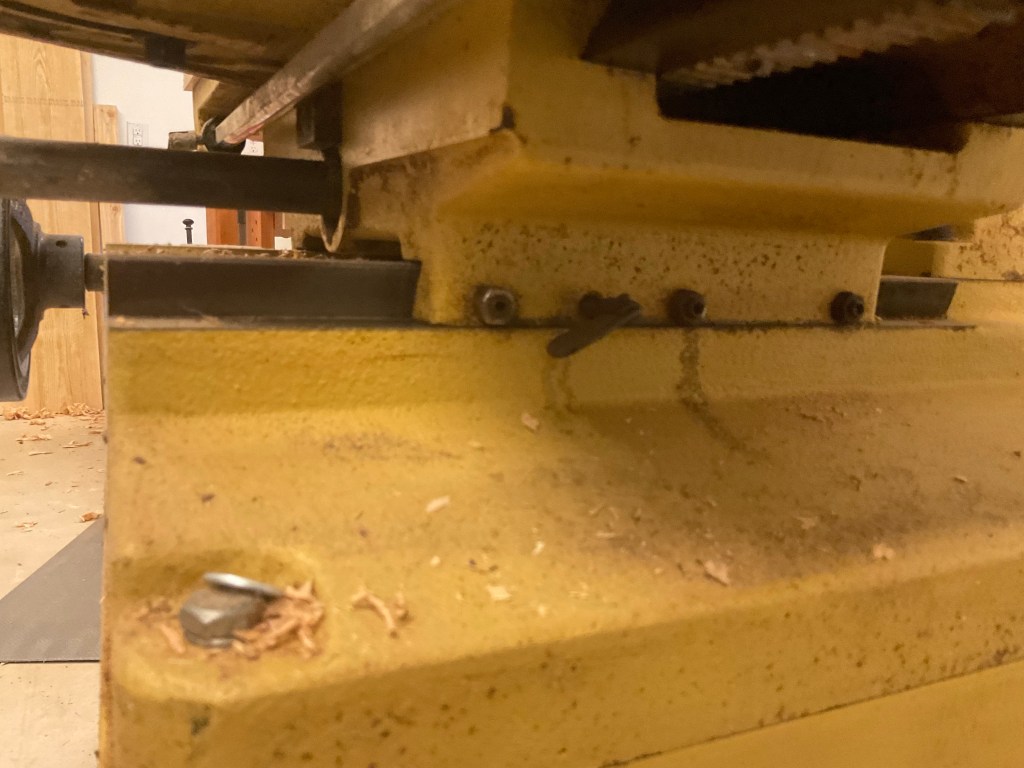
Additionally I went back to the manual to see if there was any advice on how tight to set the gibs. Interestingly there is no mention of these adjustments and the although they are pointed out in the parts diagram and list, the purpose is not obvious.

I started writing this blog to share a little bit of information, however it has really made me come to realize that many of the tools and skills we acquire over time require a certain amount of basic knowledge of mechanics, a willingness to try and fail and access to information. Fortunately the internet can provide a great resource and if you are in luck there may be someone you follow or a neighbor that is willing to answer your questions.
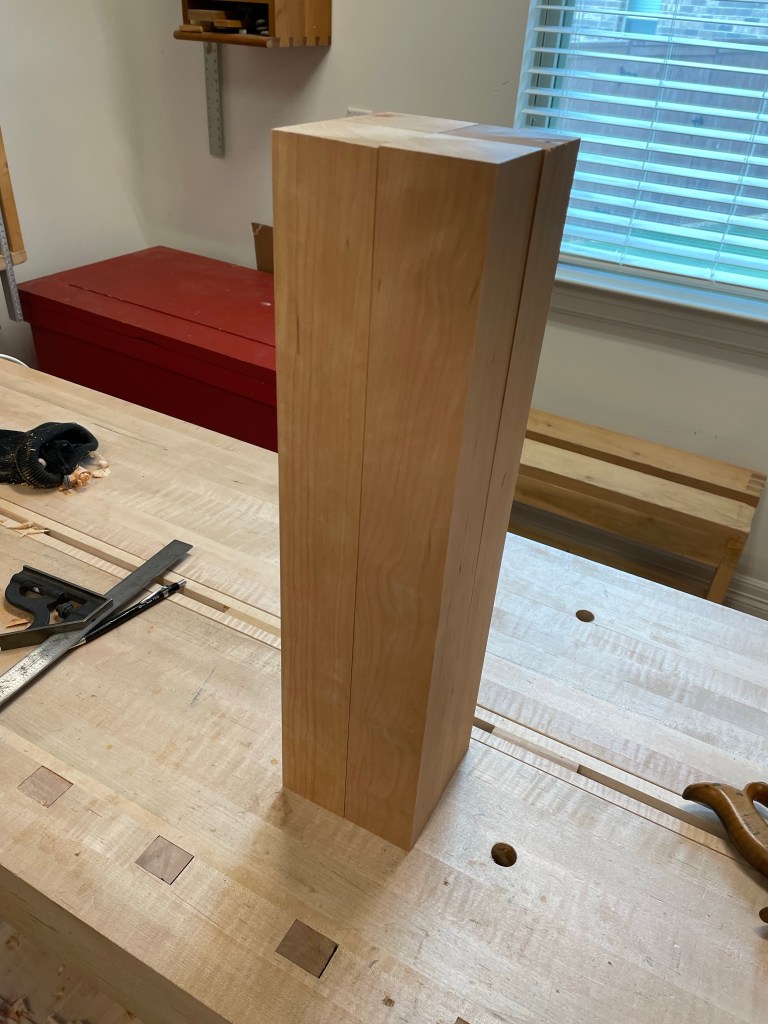
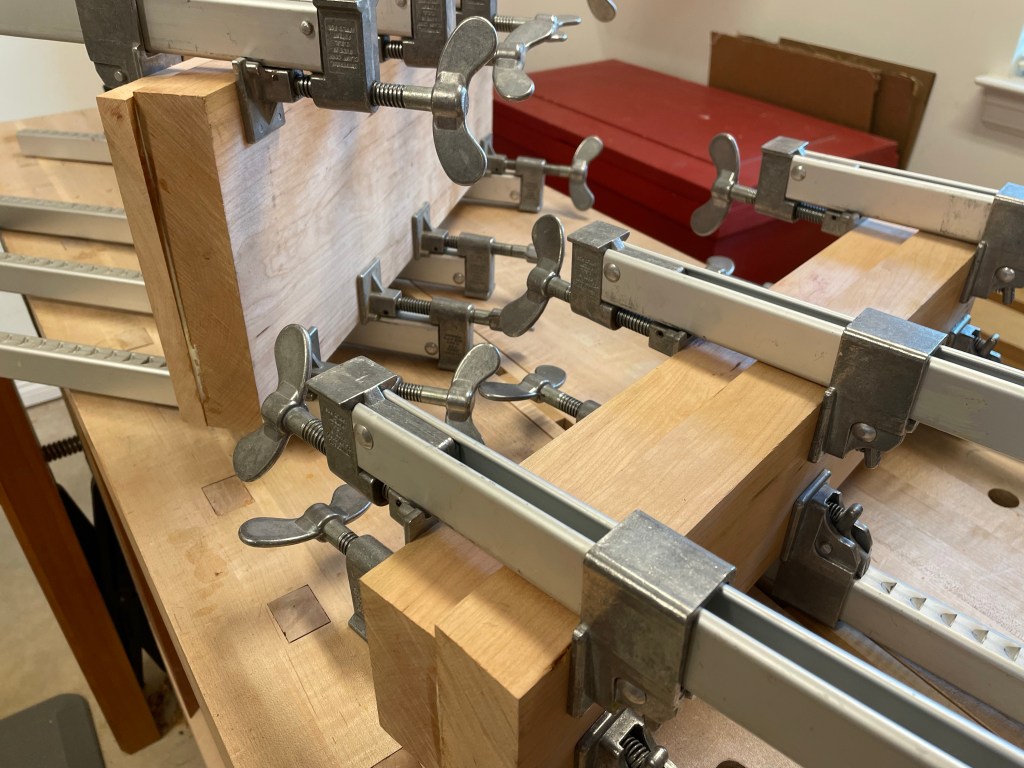
Cherry Coffee Table – Prep
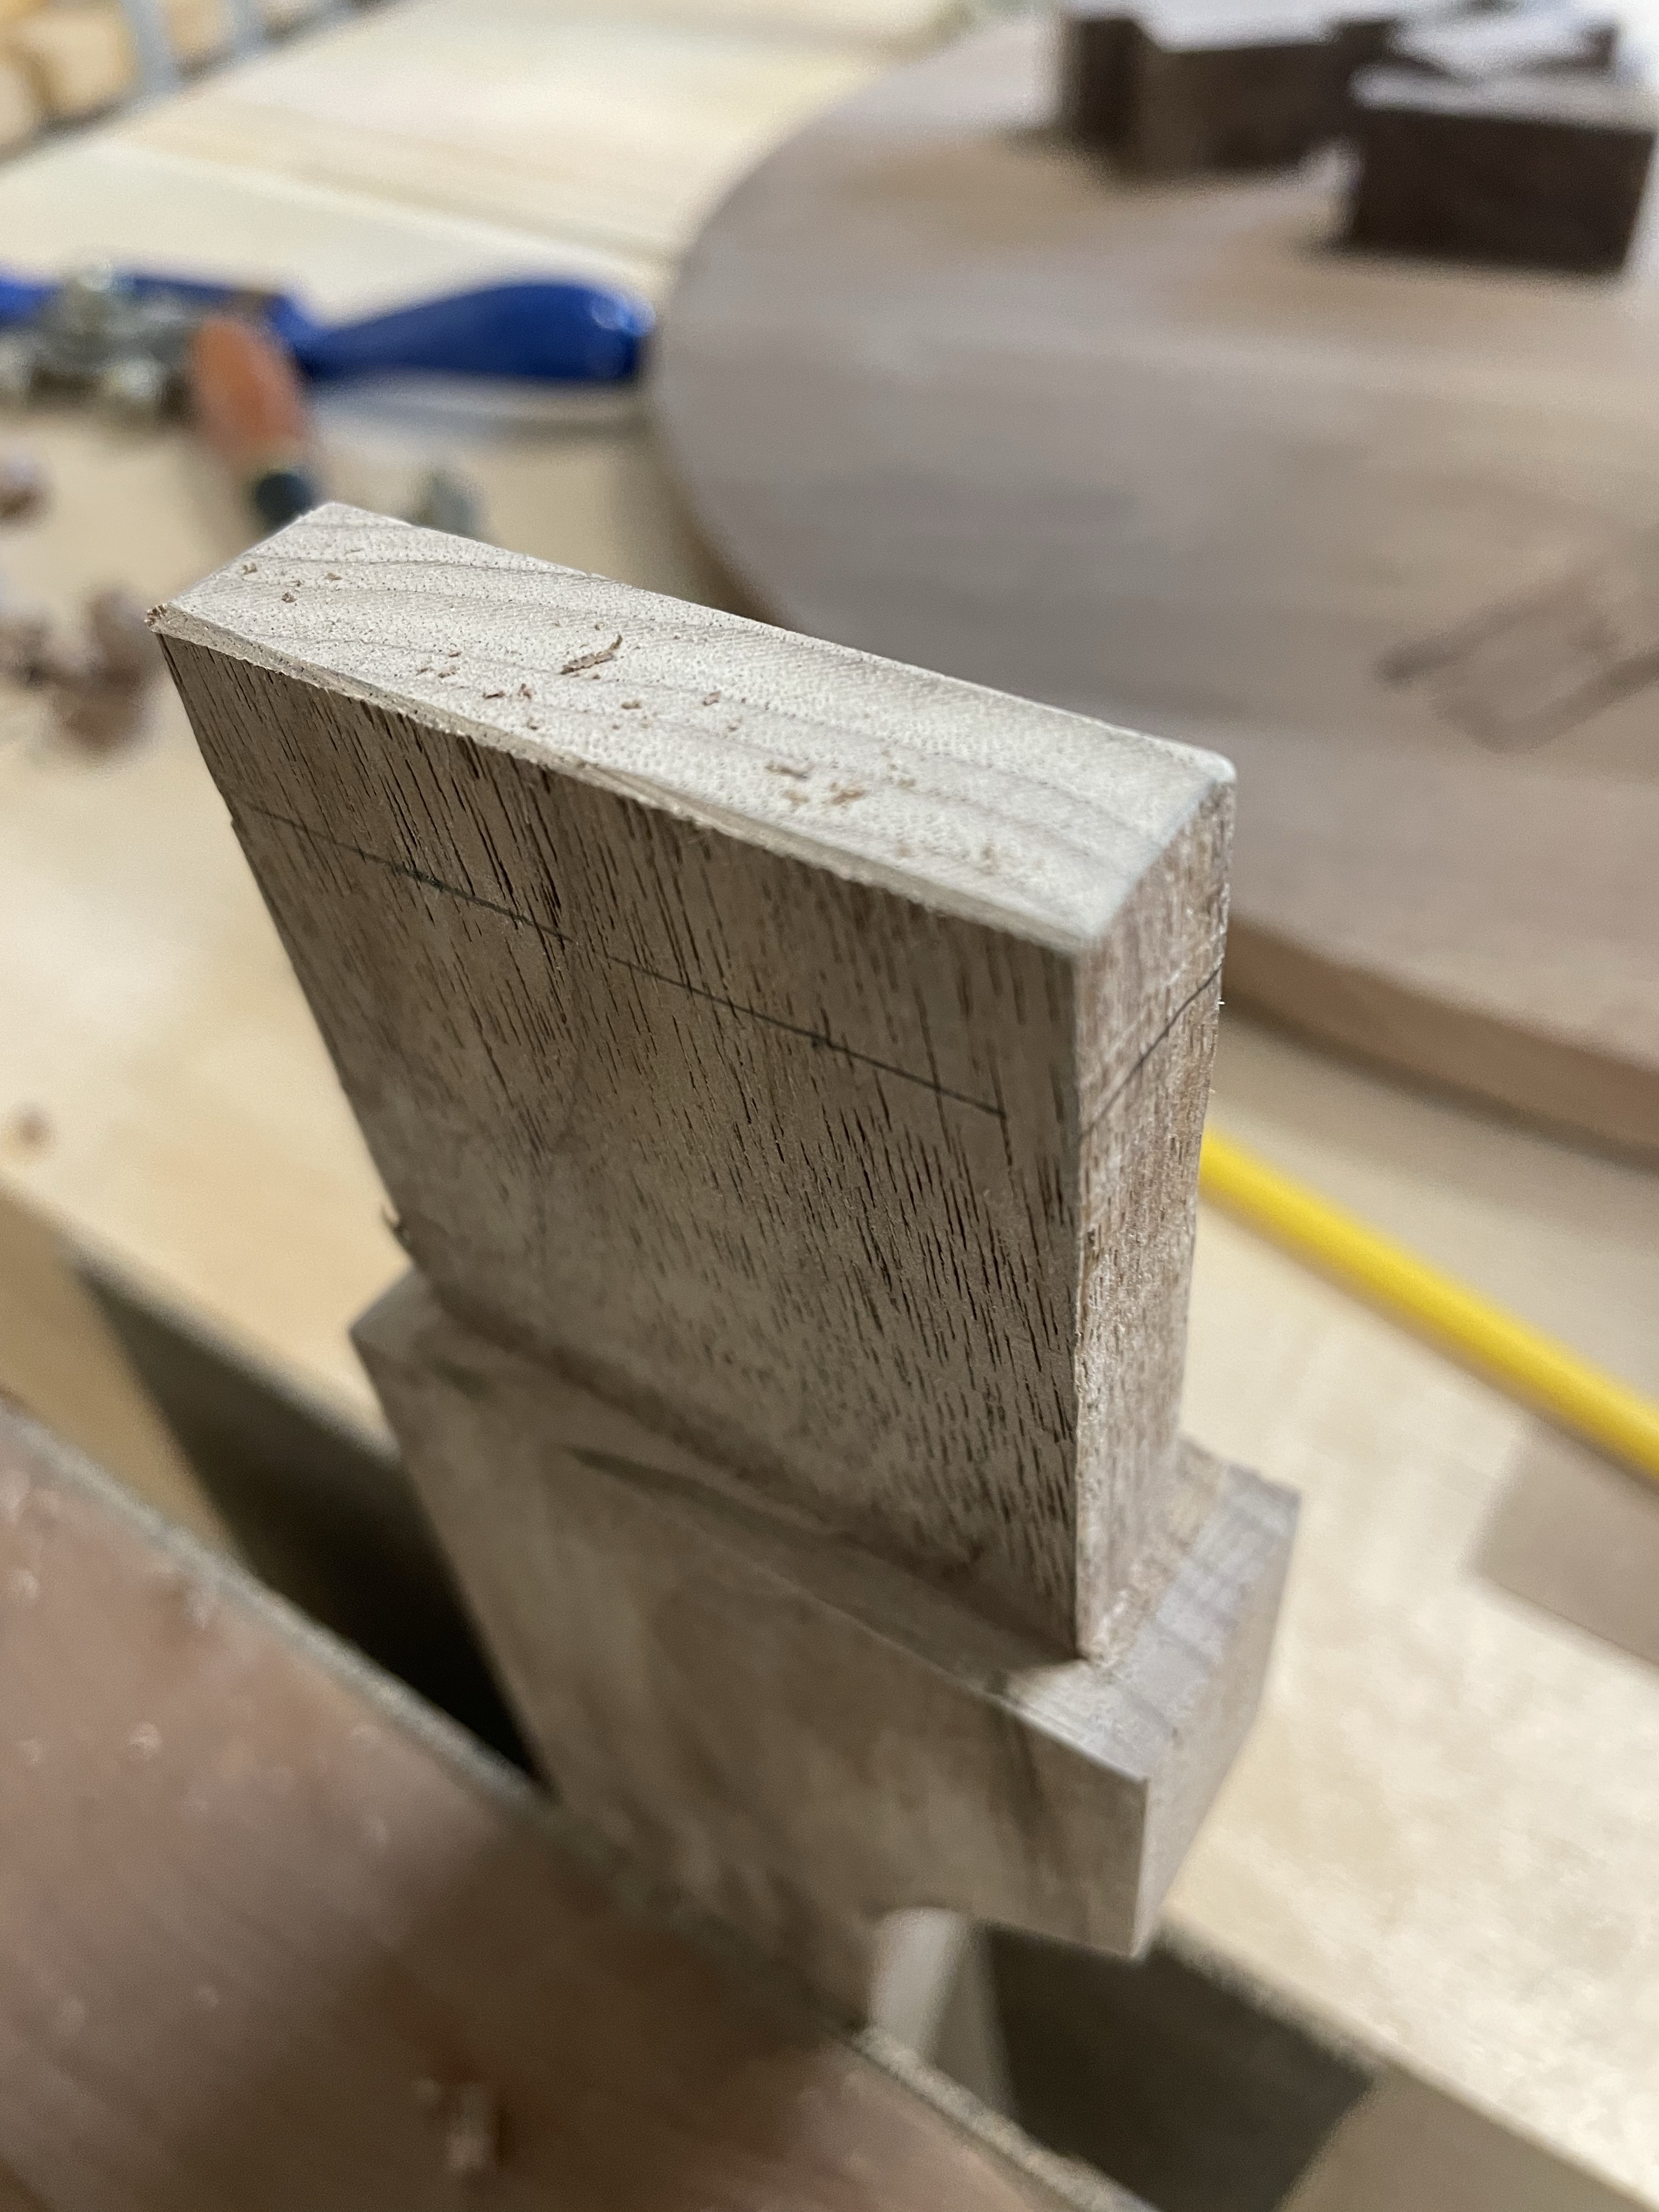
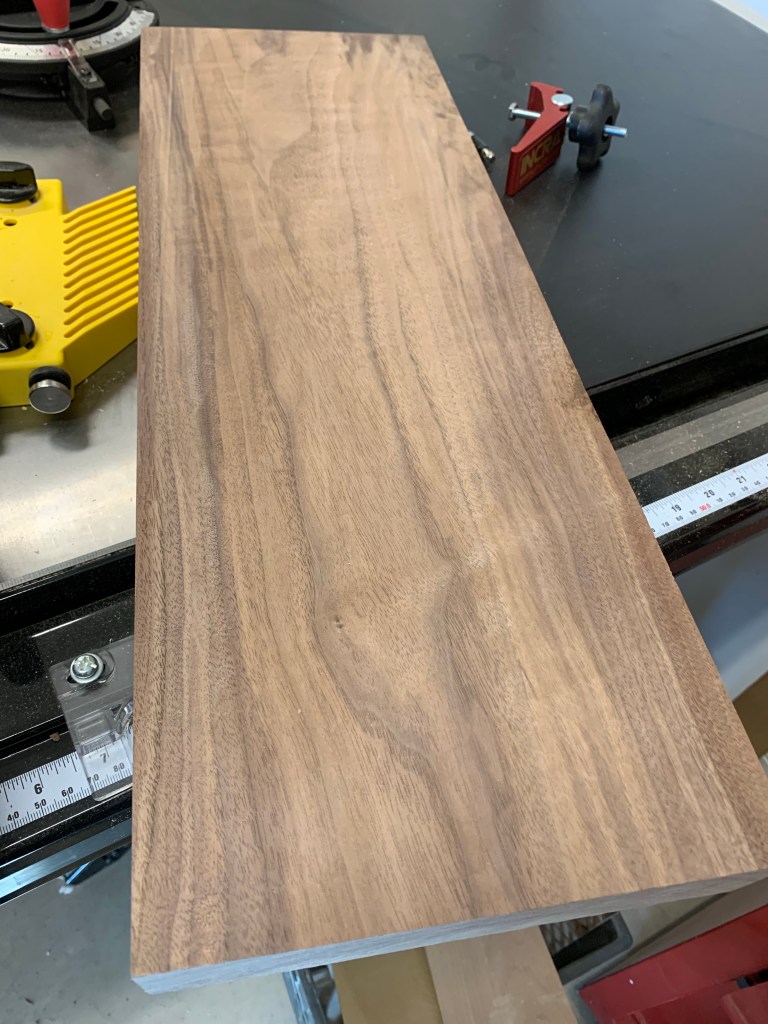
Several months ago while picking up lumber for the Walnut Coffee table, I also purchased lumber for a cherry table. I’m glad I made the purchase at that time since prices have increased dramatically. My vision for the table changed at the last minute when I thought about how much I enjoined the joinery on the Paul Sellers table I made a few years ago. I used a similar shelf on the bar cart as well. I’m just a gluten for mortise and tenon joints.

When I purchased the lumber I had smaller legs in mind so was content with 8/4. Now I’m going to need to stretch it so that I can get 2 1/4 finished legs out of it. Several of you have noticed an increased use of power tools in the last year. I have always used power tools where it makes sense and hand tools where they are most effective or I get more joy. Most projects start with the break down of stock and I always reach for my hand saws. Today I grabbed the Bad Axe D8. It’s pure pleasure to use this saw. As I write this post I went back and realized that I have had this saw for five years and It seems that long enough to truly recommend it.
Since I am using rough lumber, I flattened one edge with my hand planes, in this case a Stanley #7. Then used the planer for the remainder of the dimensioning, I talked about the use of sleds in the planer rather than the jointer in a previous post.
In order to make the legs the correct dimensions I needed to glue a 1/2” strip before cutting the board into individual legs.

Now the hard part, which side faces out…….
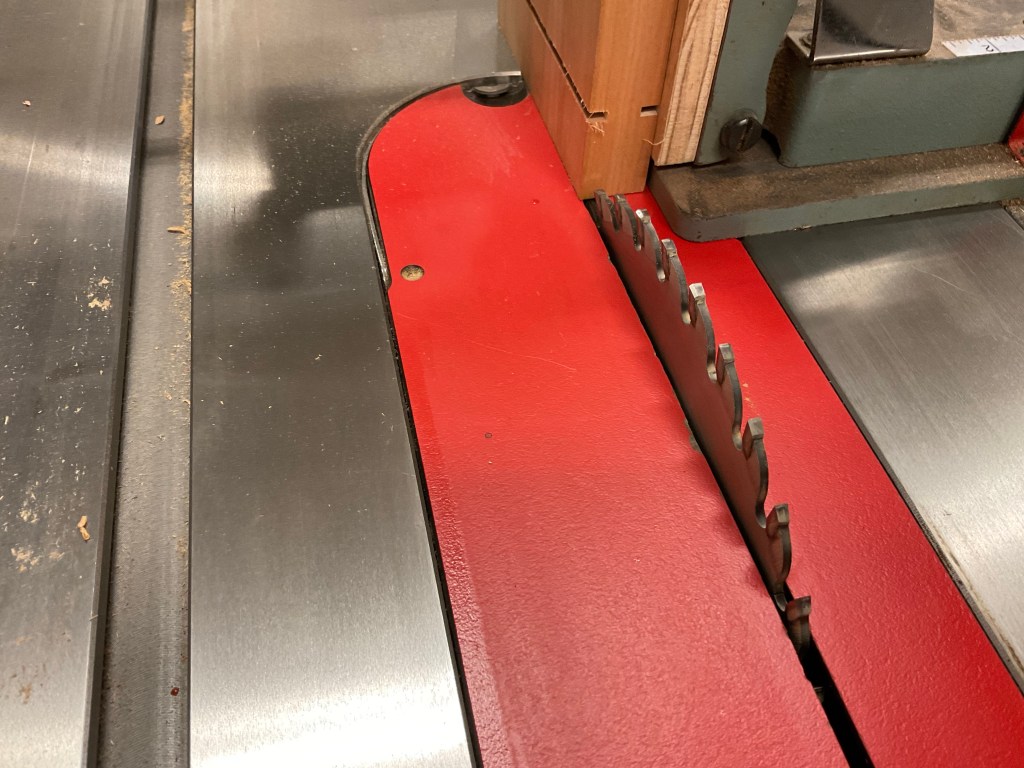
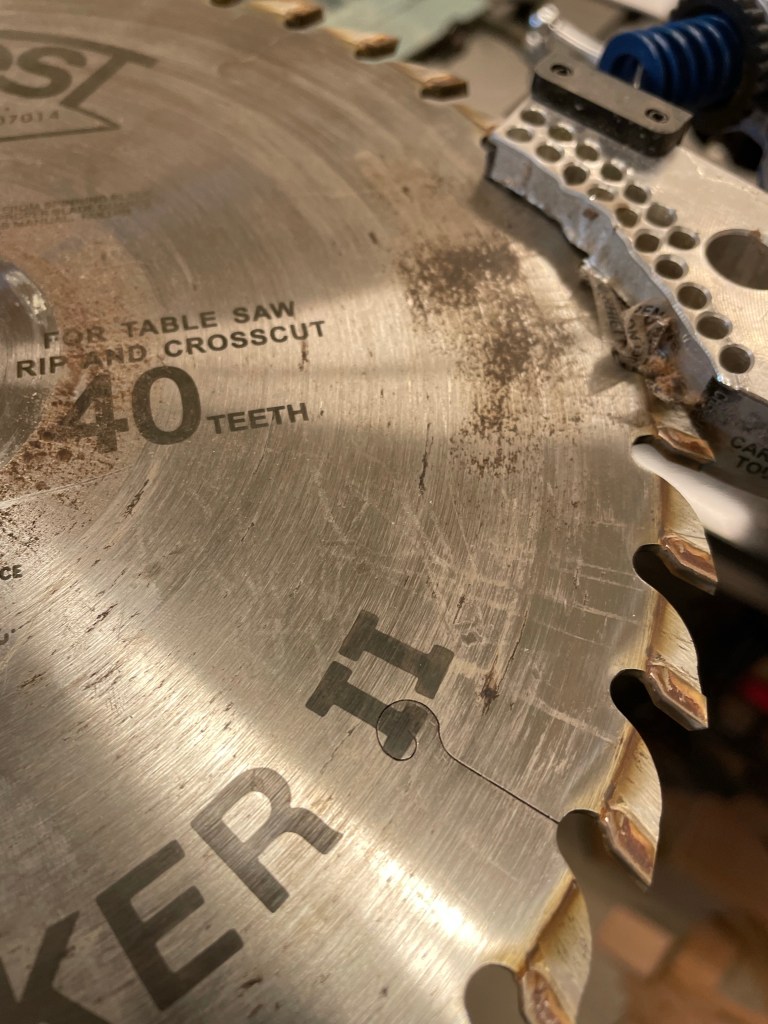
Expensive Milli-second
Often the worst part of a mistake is admitting it and the barrage of questions that follow. I’ve always believed that the only way to get better is to admit your mistakes, share them so others don’t make them and take your punishment. Today I packaged up my Forrest saw blade for repair and resharpening and purchased a new Sawstop cartridge, not due to a possible injury, but because I brought a tenoning jig too close to the blade.
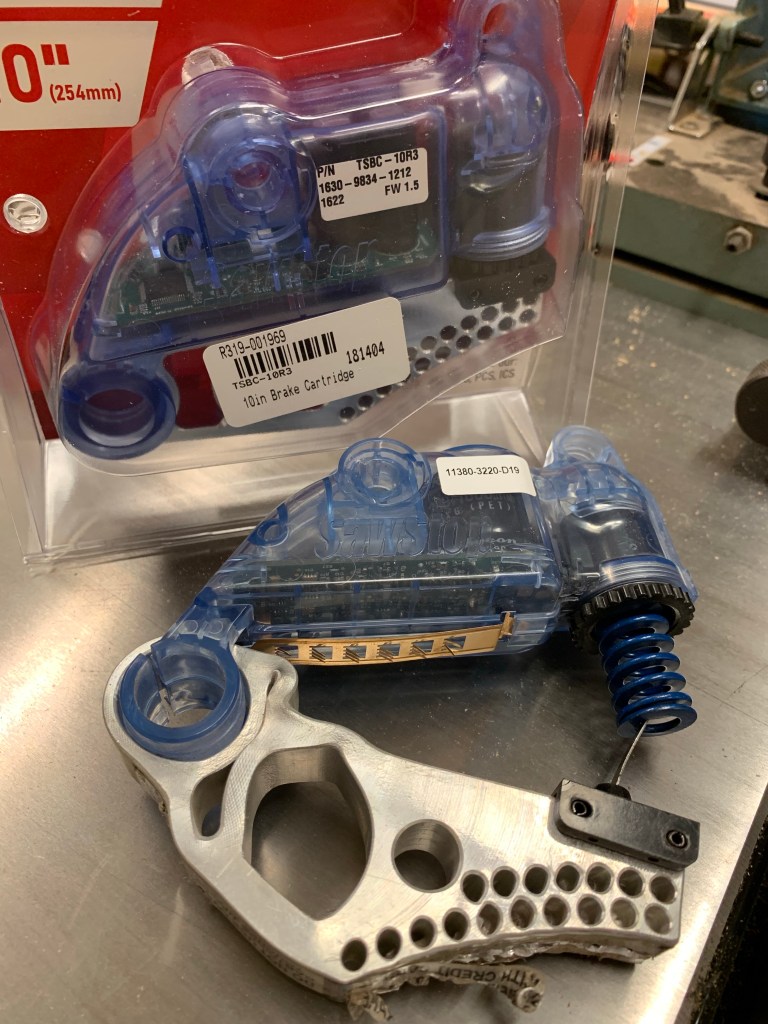
A couple of changes since this event occurred. I have added a piece of plywood to the surface of my tenoning jig to move the cast iron further from the blade, I will in the future be cutting on the outside of the tenon not on the inside.

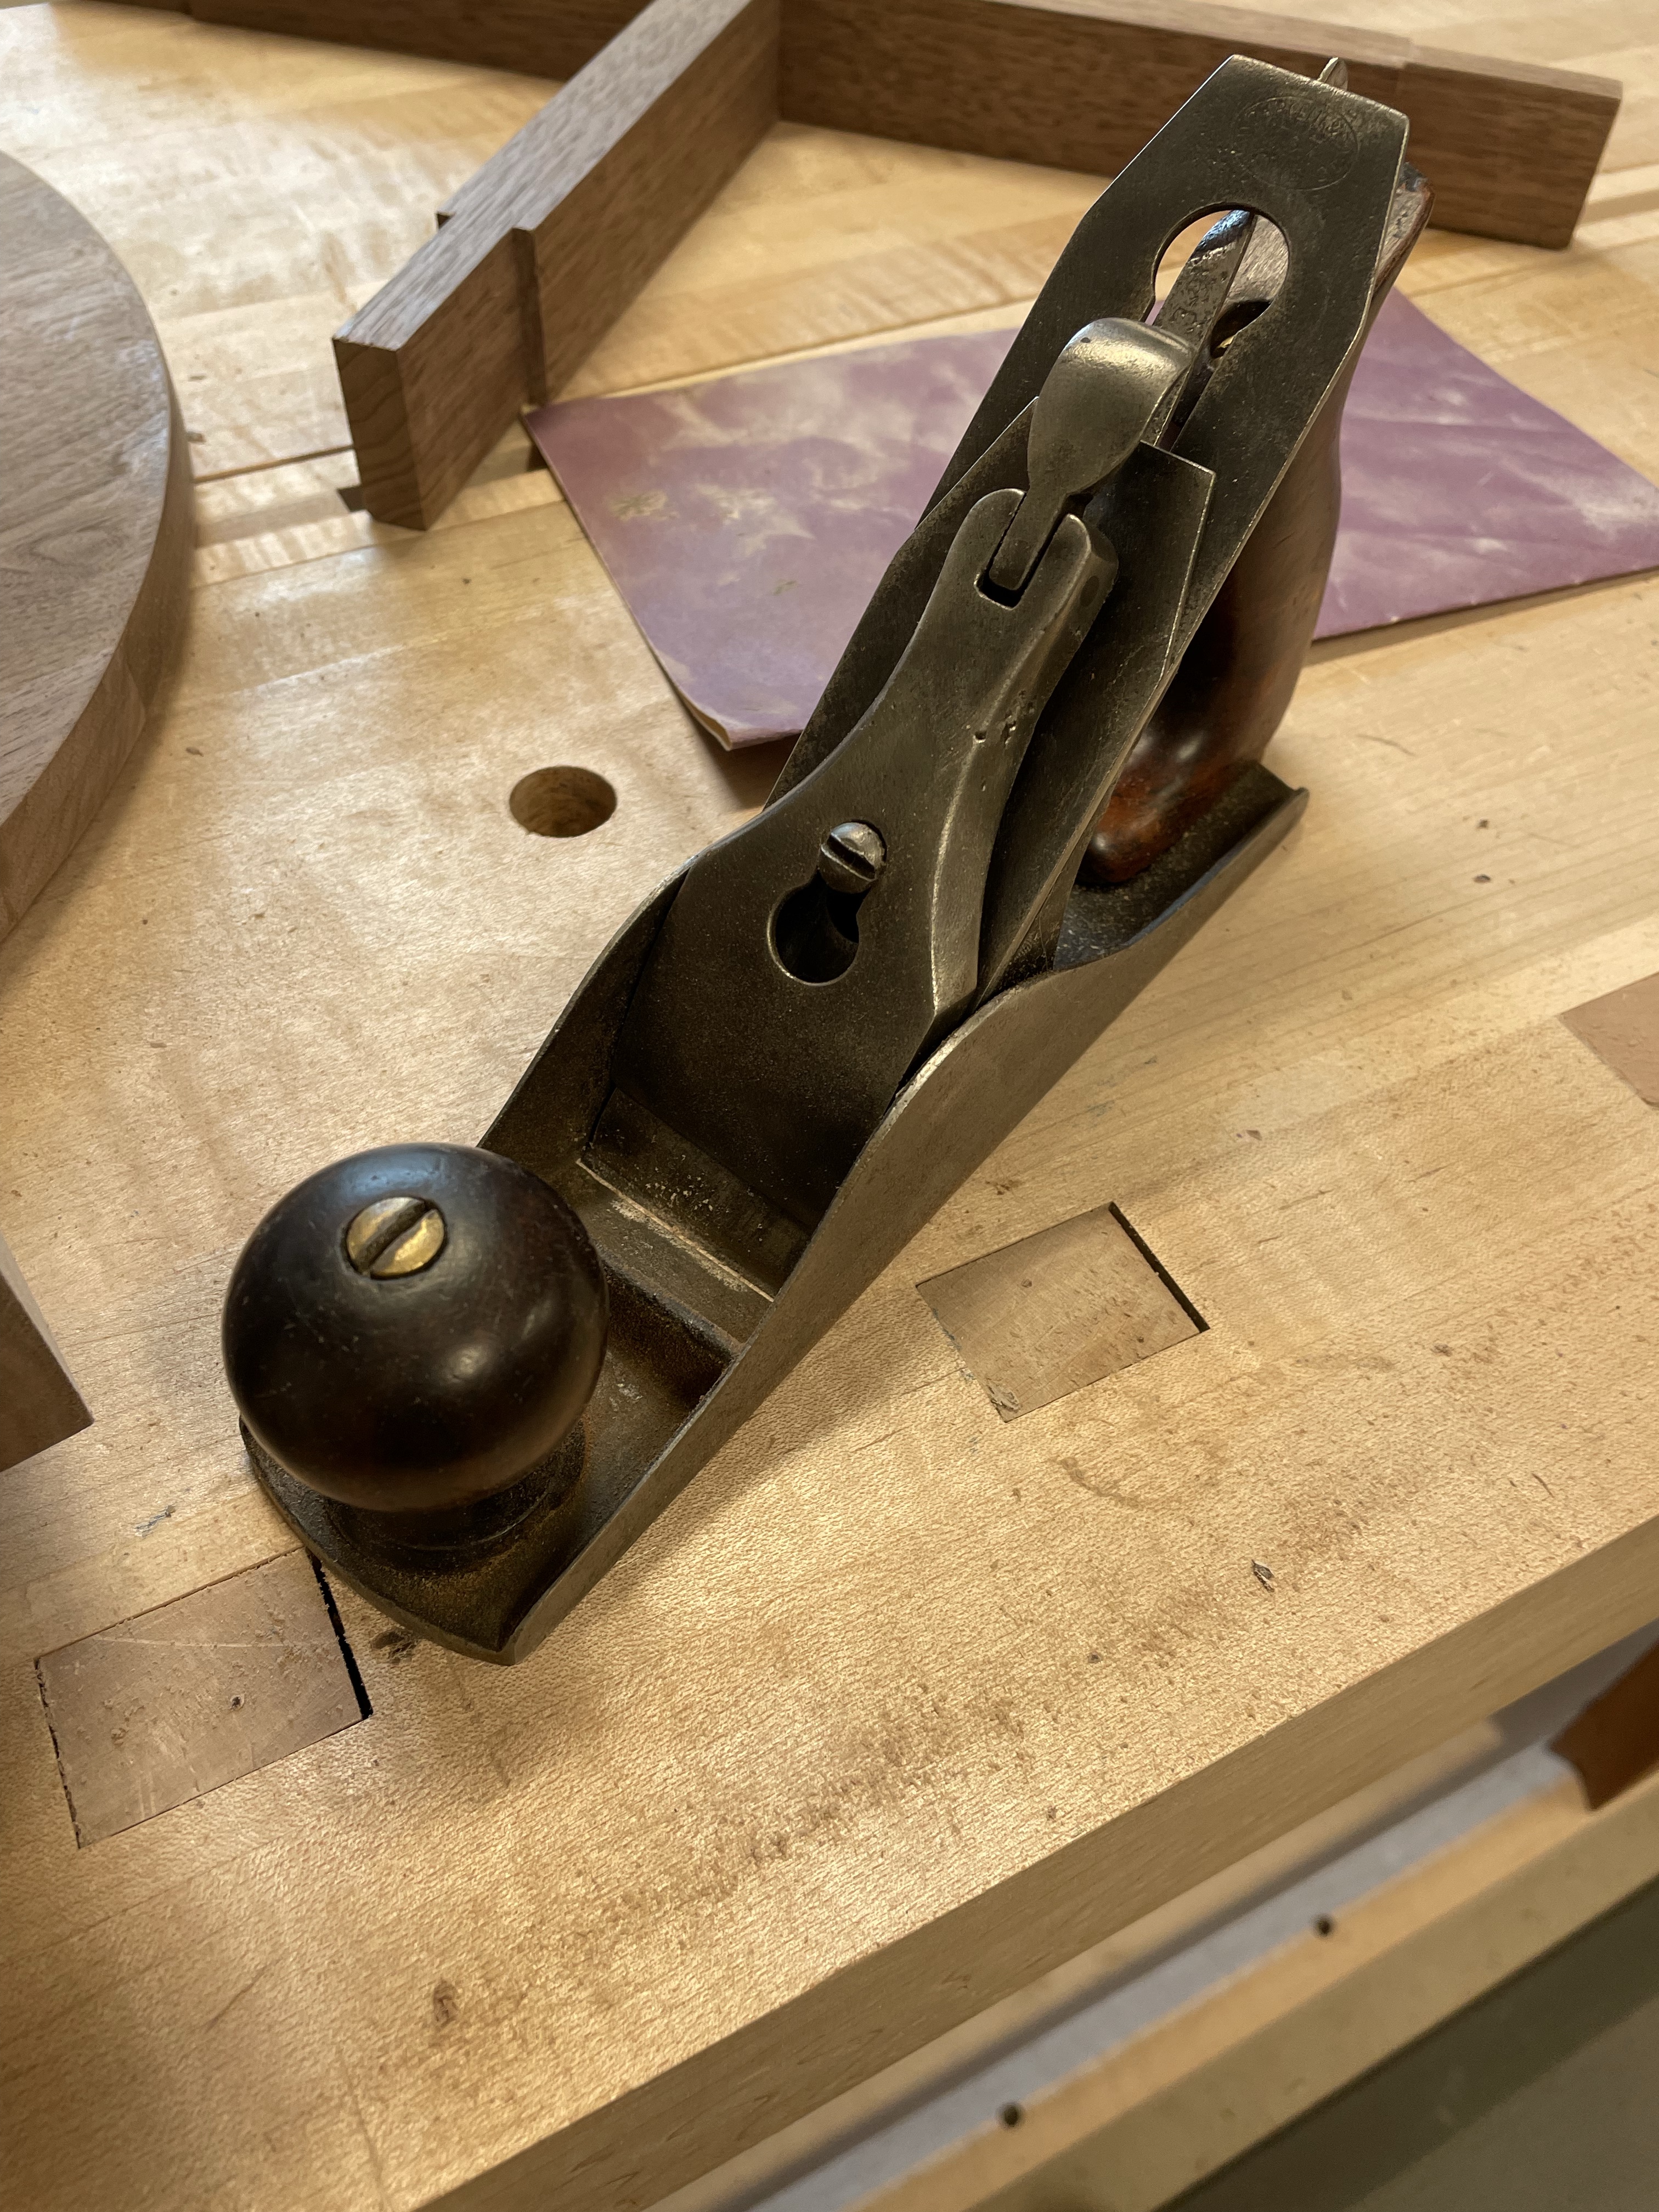
The Planes in my hand
Watching YouTube and reading many blogs, it appears everyone has an opinion on the tools a woodworker should own. I much prefer to see a picture of someone’s bench to see the planes that have actually been used.
In my tool chest and cabinet are all the standard size bench planes with the exception of a number 1. Numbers 2,3,4,5,6,7,8 stand ready for use like chess pieces on a board. Obviously the project you work on often dictates the tool you should use, however there are three bench planes that will most likely find their way into my hand.
Sargent #409 – This plane is used on most projects and although officially a smoother has been used as a shooting plane, jointer, straight edge, and clamping caul. Occasionally if I’m doing a lot of work I’ll also have a Stanley #4 on the bench just to keep moving between sharpening. If you are asking why the Sargent before the Stanley , Ill direct you to another blog, but in reality it just fits differently and I like the look.

Stanley #7
A Stanley #5 is the go to plane for many people and I can’t disagree with the utility of the plane. It can handle most of the jobs of the #4 and many of the jobs of the #7, however I rarely find it on my bench. If I’m reaching for a larger plane it’s generally because I’m working a great length of wood of several feet and the bed length is critical to providing the surface I am looking for. It also has more mass. The #7 does not have the mass of a #8 which makes it easier to use and although I’ve used my #8 a few times I have not come across anything that a #7 can’t handle.

Finally my favorite bench plane is the Stanley#3 or Sargent 407. I may not use it as much as the Sargent 409 but I get a tingle when I reach for it in the cabinet. There is emotional magnetism with this plane that makes me want to use it. The lighter weight and slightly shorter bed makes it ideal for may of the small projects that I tackle.
Many people follow my blog and occasionally I get the question which plane should someone buy. It’s not something that can be easily answered, but I would initially get a #4 and if you are working with longer boards find a #7, I don’t think you would go wrong. If money is a driving factor you could get away with a #5. The other question that I’ve had is about the Lie Nielsen and Veritas versions. They’re great! When I started gathering tools the Stanley planes were widely available, very cheap and easy to repair. Today they are more expensive but still a bargain. It seemed like a low cost way to go and I’ve been very happy with my choice.
Walnut Side Table – Rounded Tenons
Several years ago I had the opportunity to take the 9 day foundations class from Paul Sellers. It was an incredible experience and one that I doubt will be available in the future. Paul has moved onto Woodworking Masterclasses and Common Woodwork as a platform to reach a larger audience. One of the projects in this class involved through tenons and a lesson in the versatility of the hand plane. If you have never tried rounding over end grain, pull out a board, sharpen up your plane and give it a go.
Working end grain requires a sharp blade. A few minutes on the diamond plates and the plane was ready to go. Working across the tenon I take small slices of wood working up and down the tenon until its rounded over. Watch for tear out on the ends although they will later be chamfered with a chisel. When the tenon looks balance a file or sandpaper can be used to smooth out the finished product.
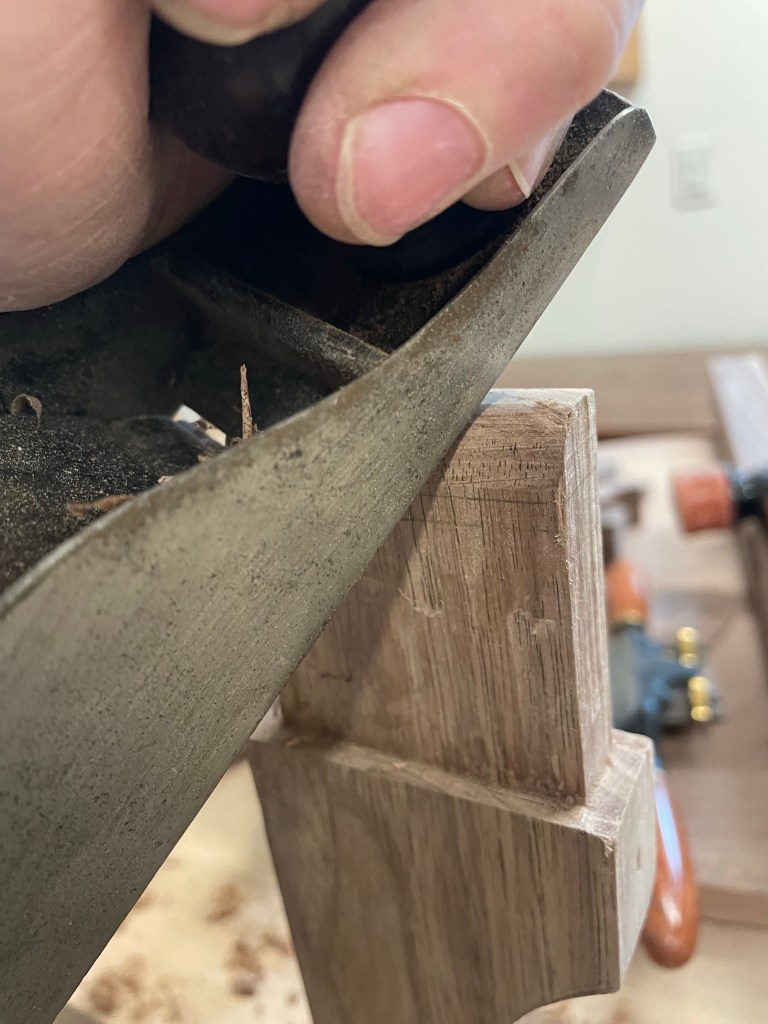

The final act of the rounded tenon is chamfering the ends. This removes any tear out and gives a nice finished look. Using a chisel it only took a couple of hits with a mallet and they are complete. And if you chip out by the tenon a little superglue may just handle the problem.


Shelix Planer
I have typically flattened one side of a board using traditional bench planes and used a Delta 22-560 Planer to flatten the other side. This has sped up my work process and kept me sane when I have limited shop time. I’m guessing the planer was purchased 20 plus years ago and I have been extremely happy. Sometimes I consider a larger planer but in reality the 12 1/2” has worked fine and it is very rare that I use a board that it can not handle. Over several years I have been watching many people install helical cutter heads in their planers and claiming better performance and lower noise.
Over the last couple of years the typical planer blades that I have purchased have disappeared and the blades purchased recently wear quickly. Many years ago Delta was the go to planer but this has quickly been overcome buy the Dewalt Planers. Subsequently knives are harder to find and I think most manufacturers focus on the higher volume sales for the Dewalt Planers. Where does that leave the owners of the Delta tools? Poor knives, new Planer or new cutter head.


Maybe I will look at larger pieces of equipment in the future but for now, I am content with the lunchbox planer. The Dealt planers have a good reputation but why change what I already have for a similar system. I opted to install a new Shelix cutter head and ordered it a few weeks ago.
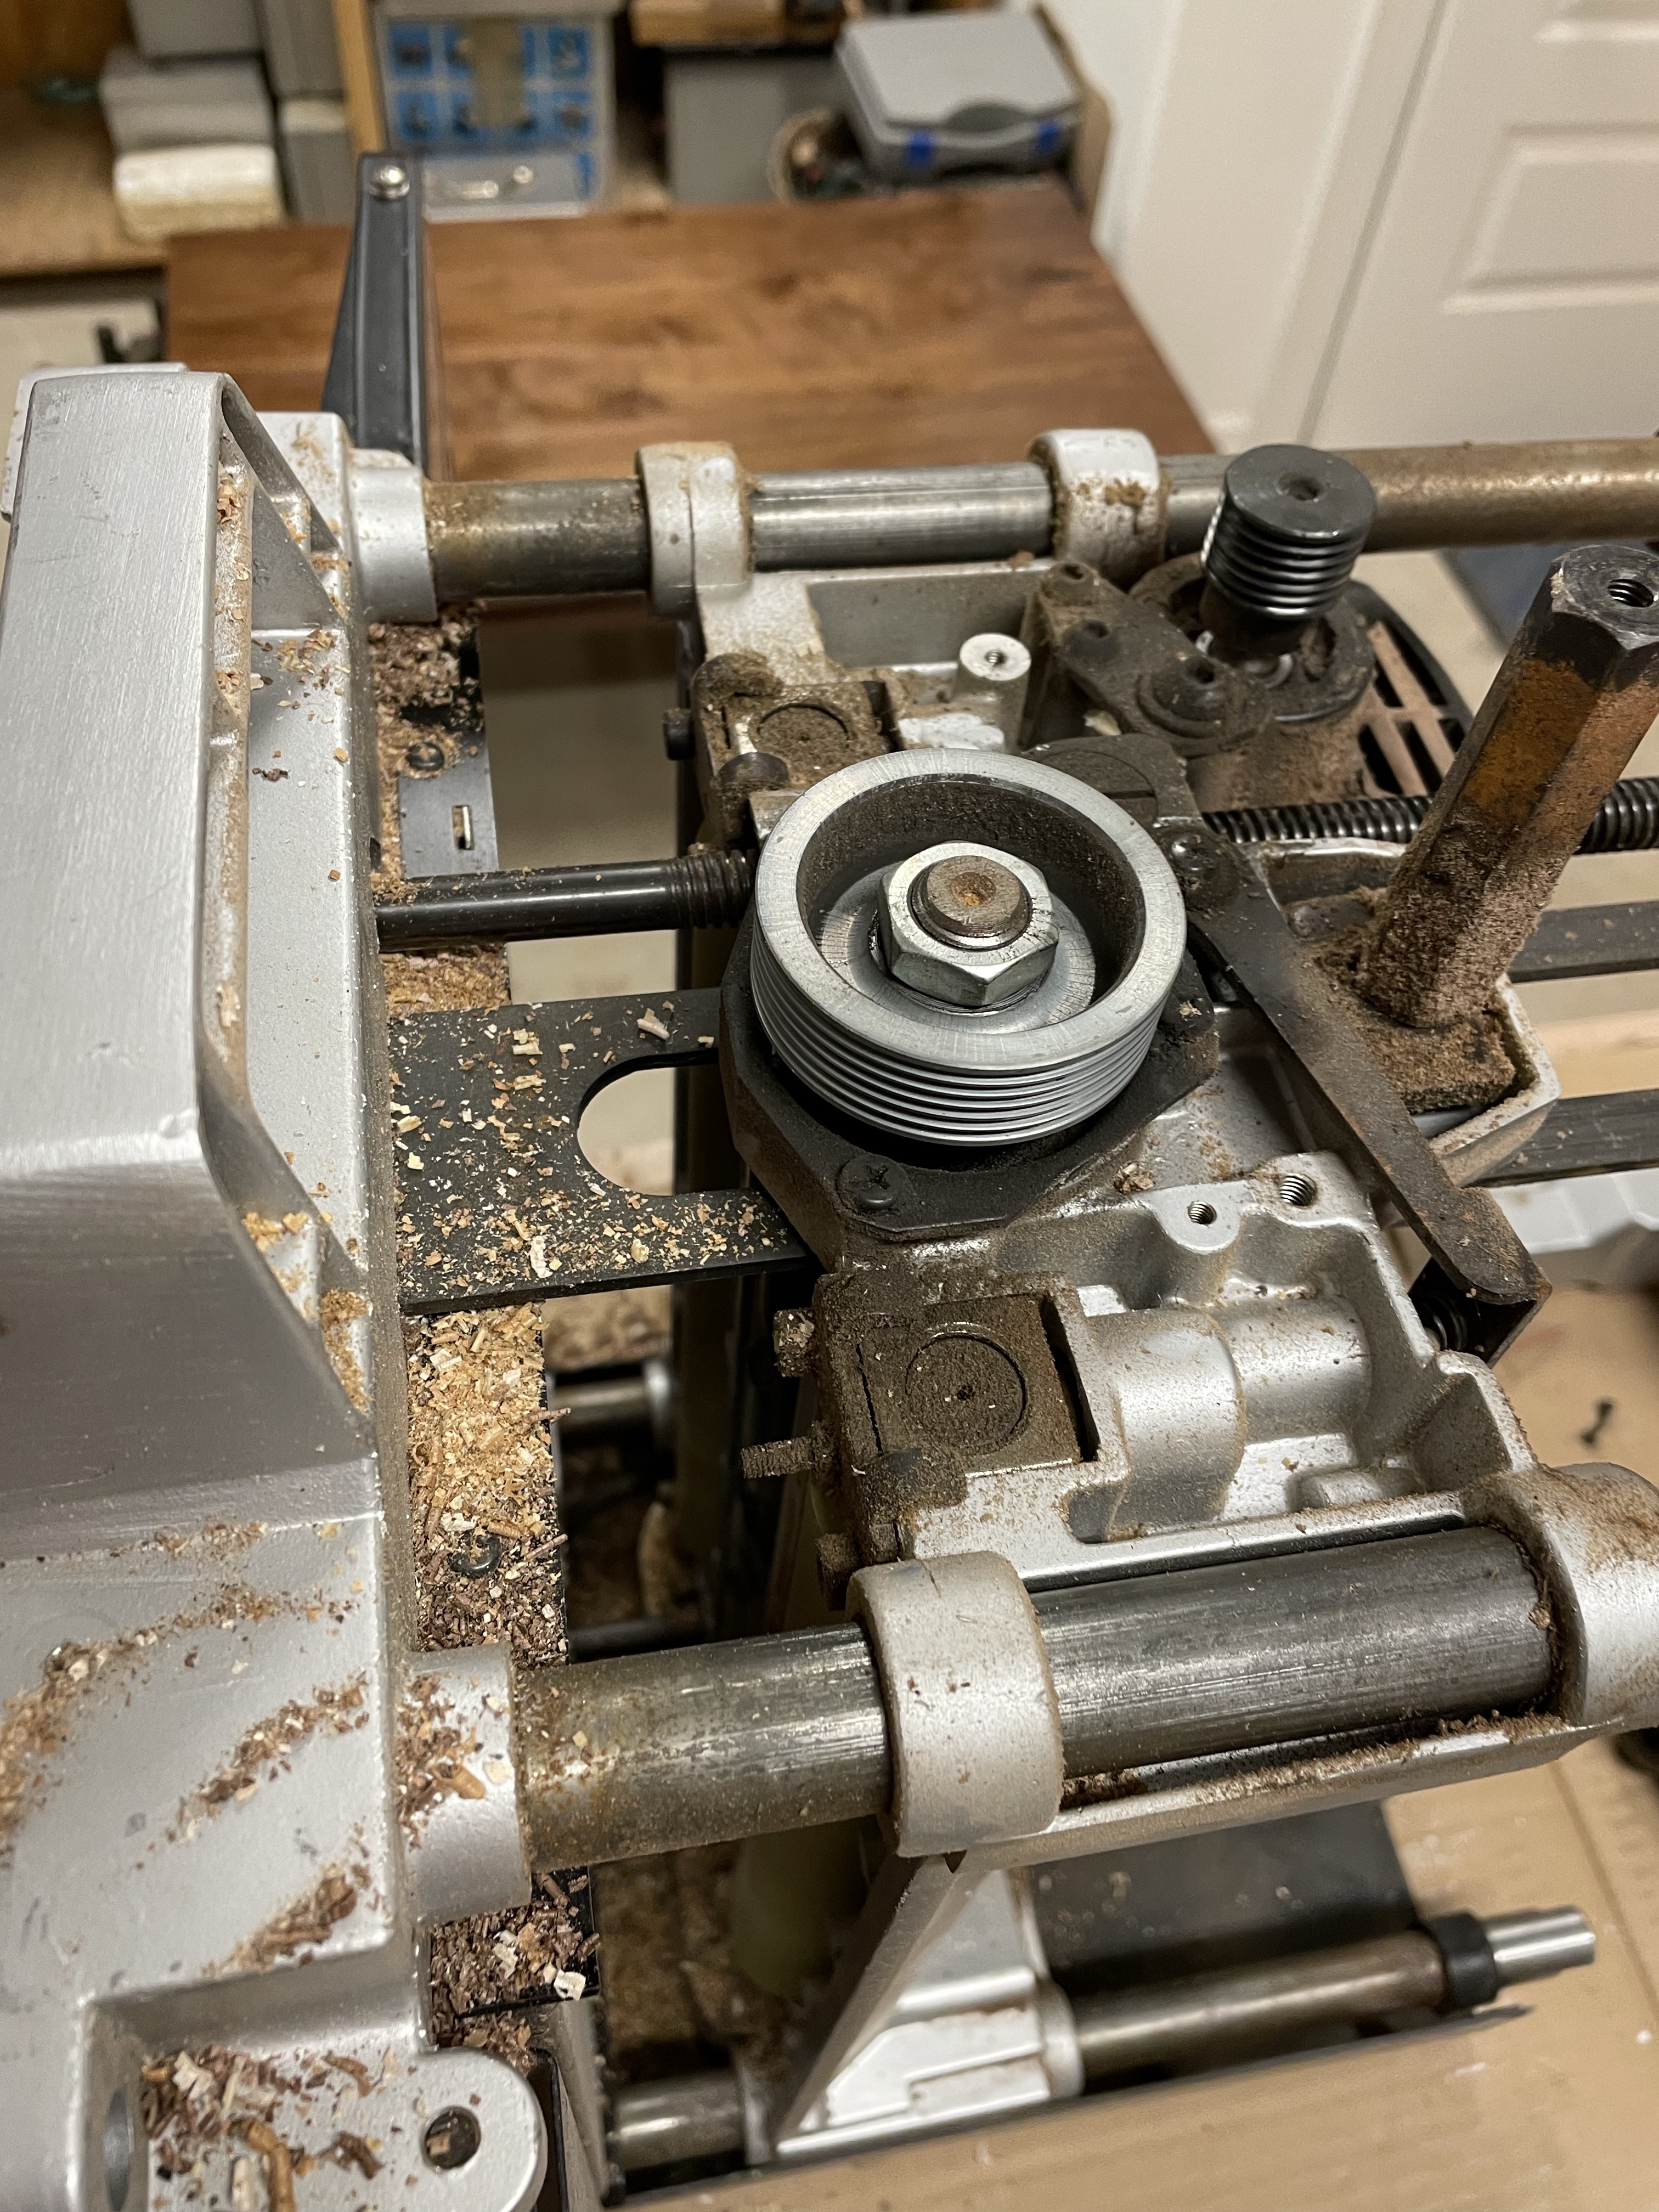
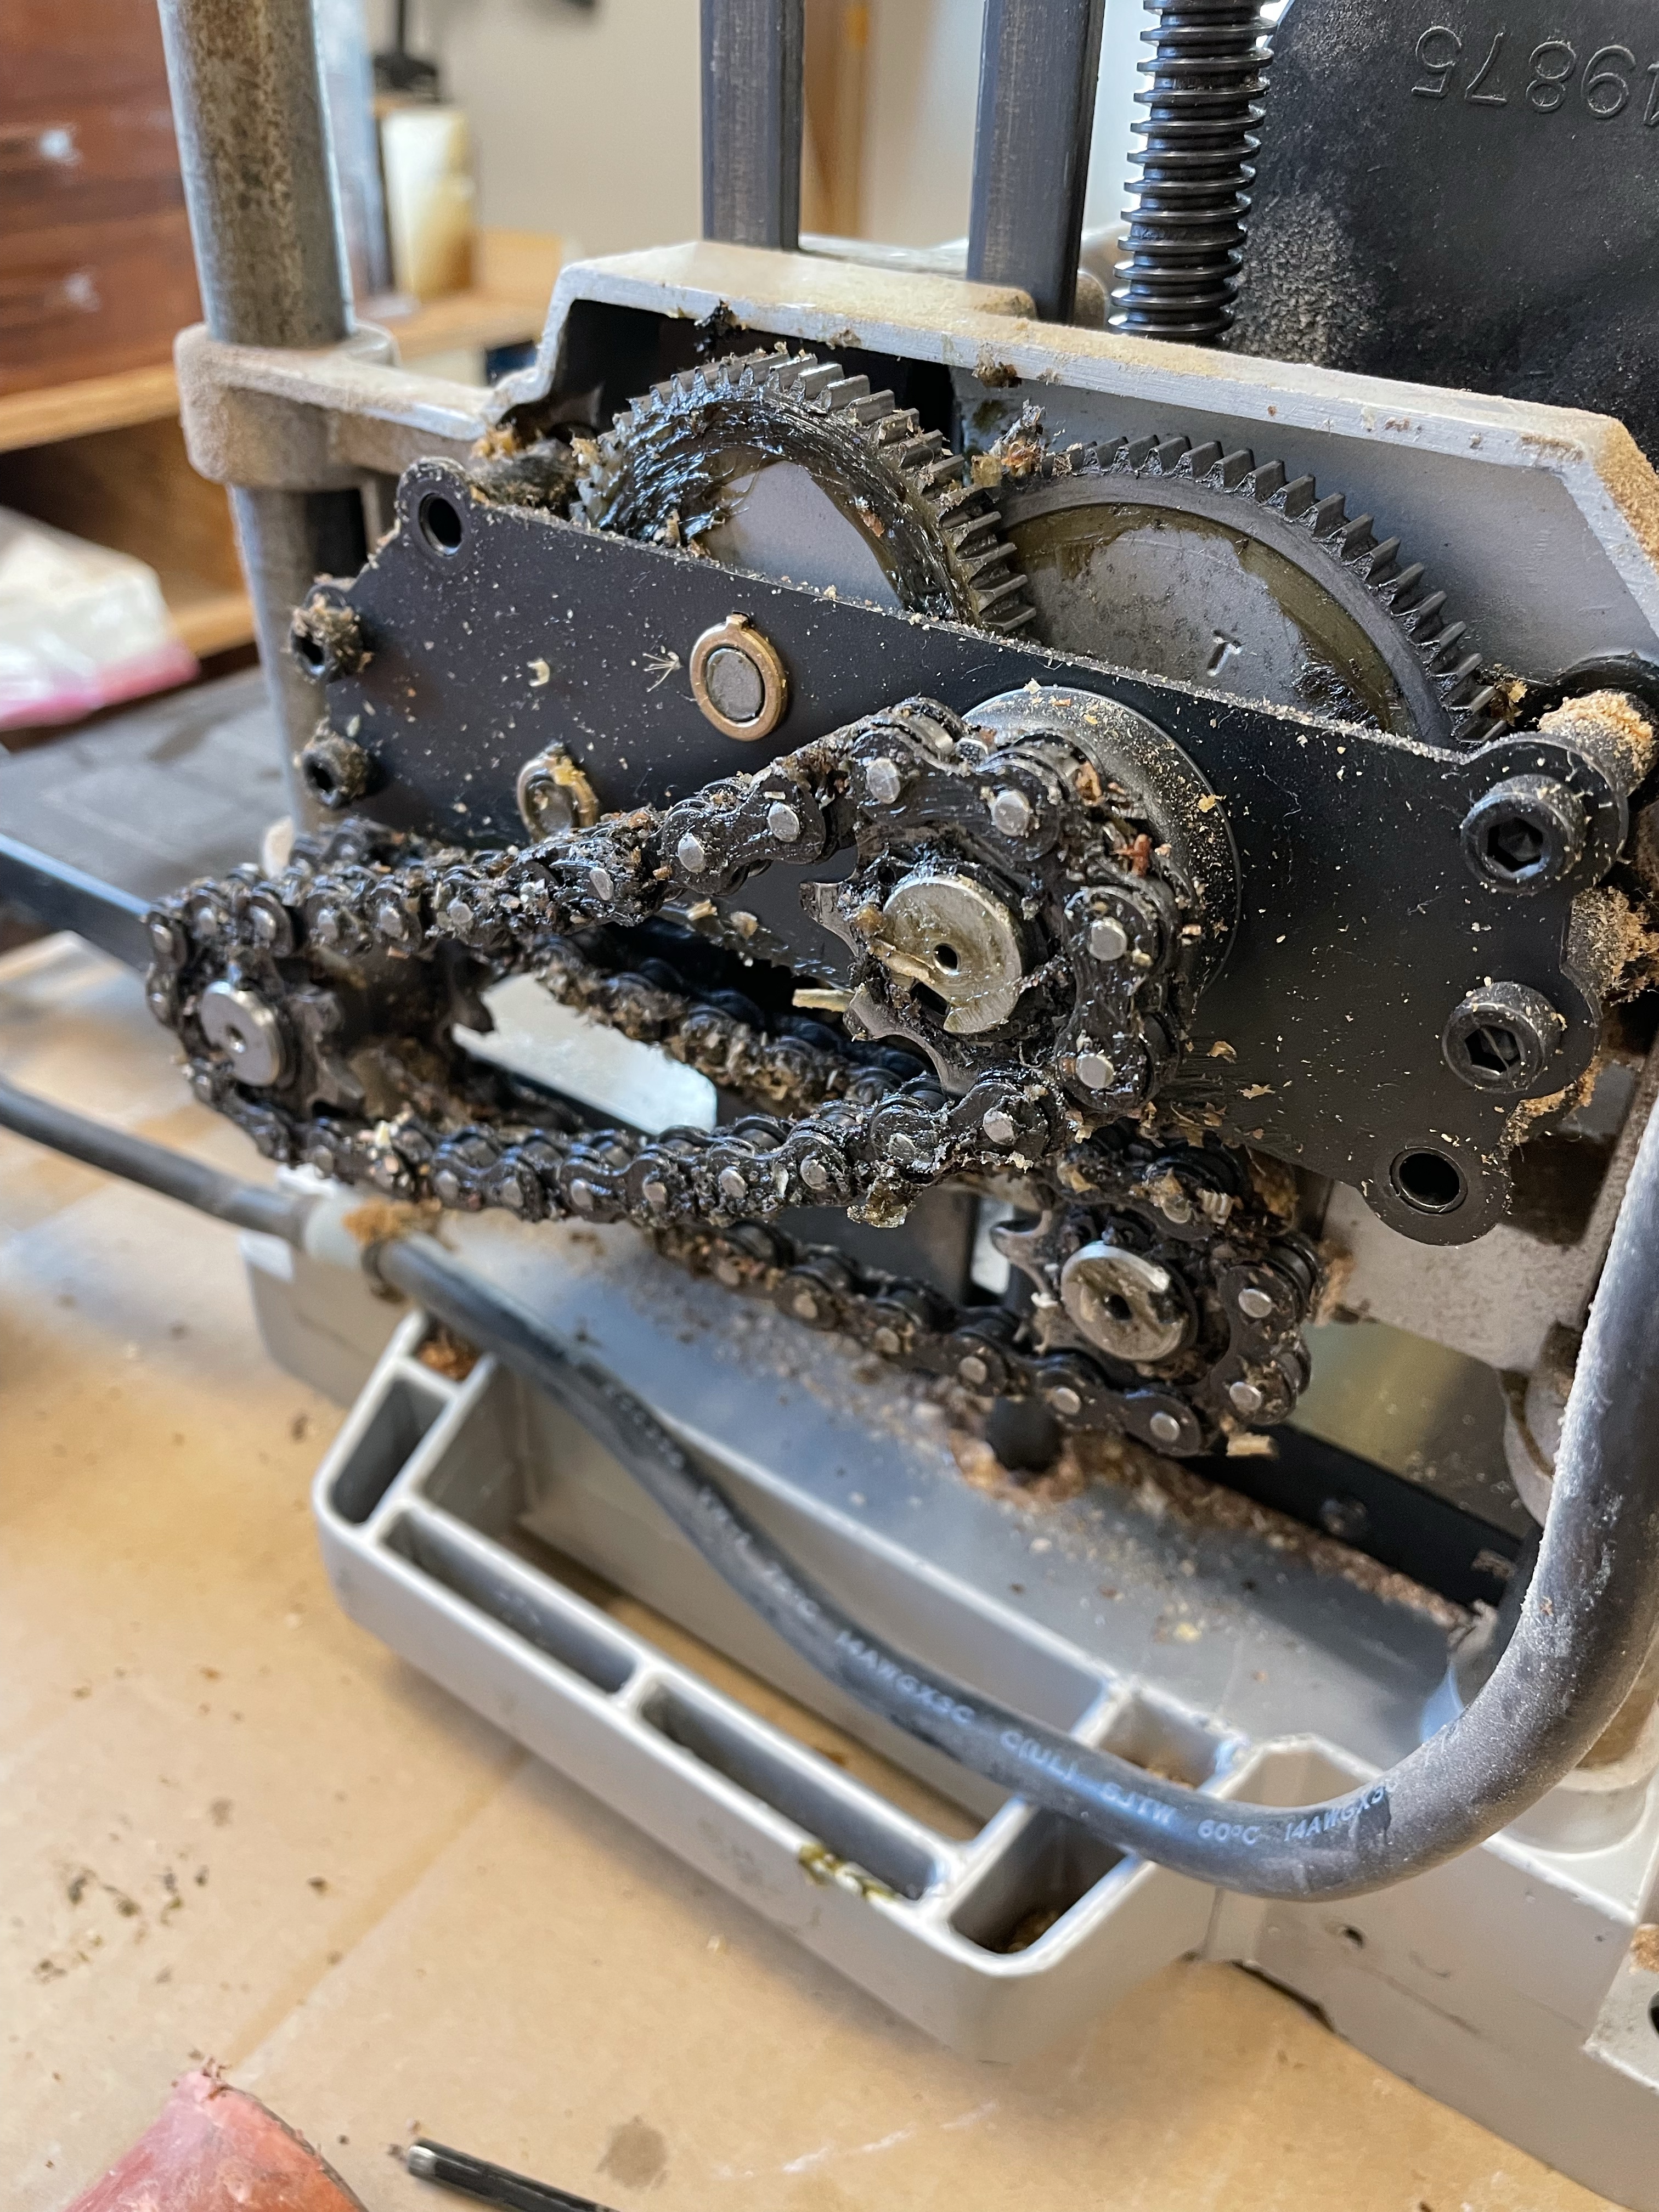
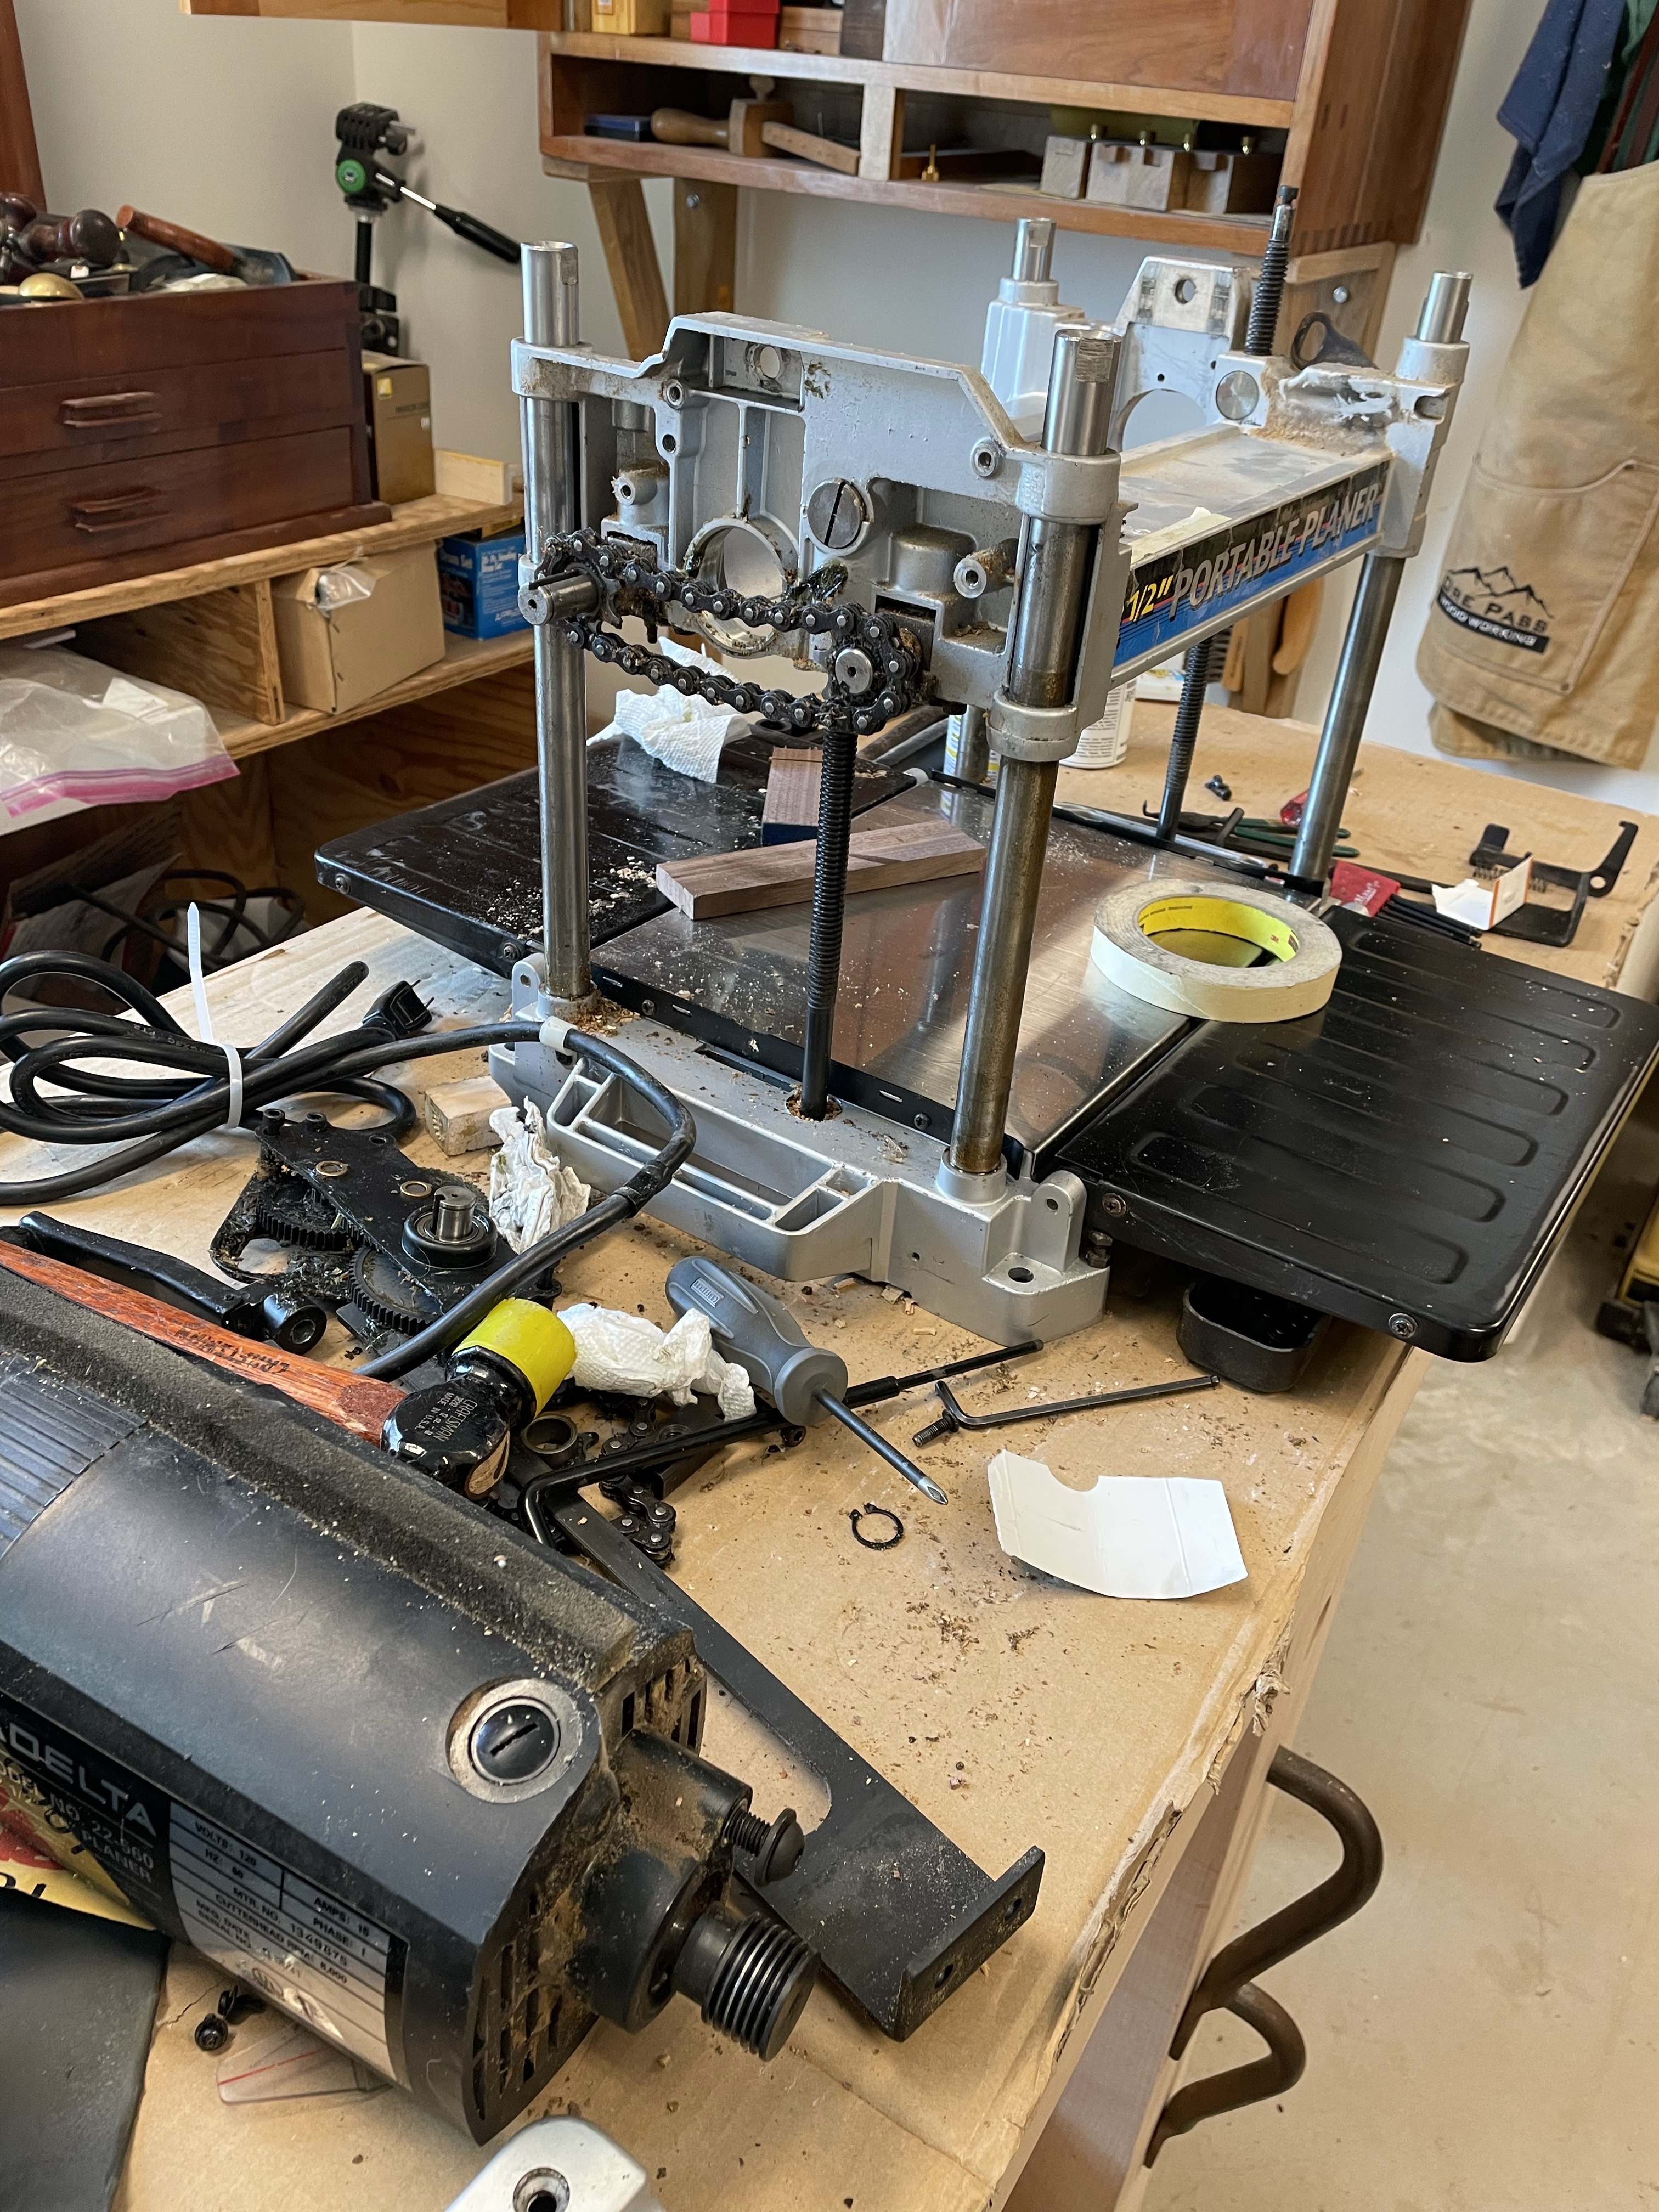
I took about four hours to remove and install the new head and along the way I have a few observations. Tools the average home owner may not have….15/16 wrench, and a bearing puller. Most home wrench and socket sets stop at 7/8”, fortunately I had the larger wrench and more importantly a bearing puller. Why I have that, I don’t recall, but it has sat in the bottom of the tool chest for years. The instructions were a little shaky and there are none for my model, but between instructions for other brands I figured out what needed to be done.
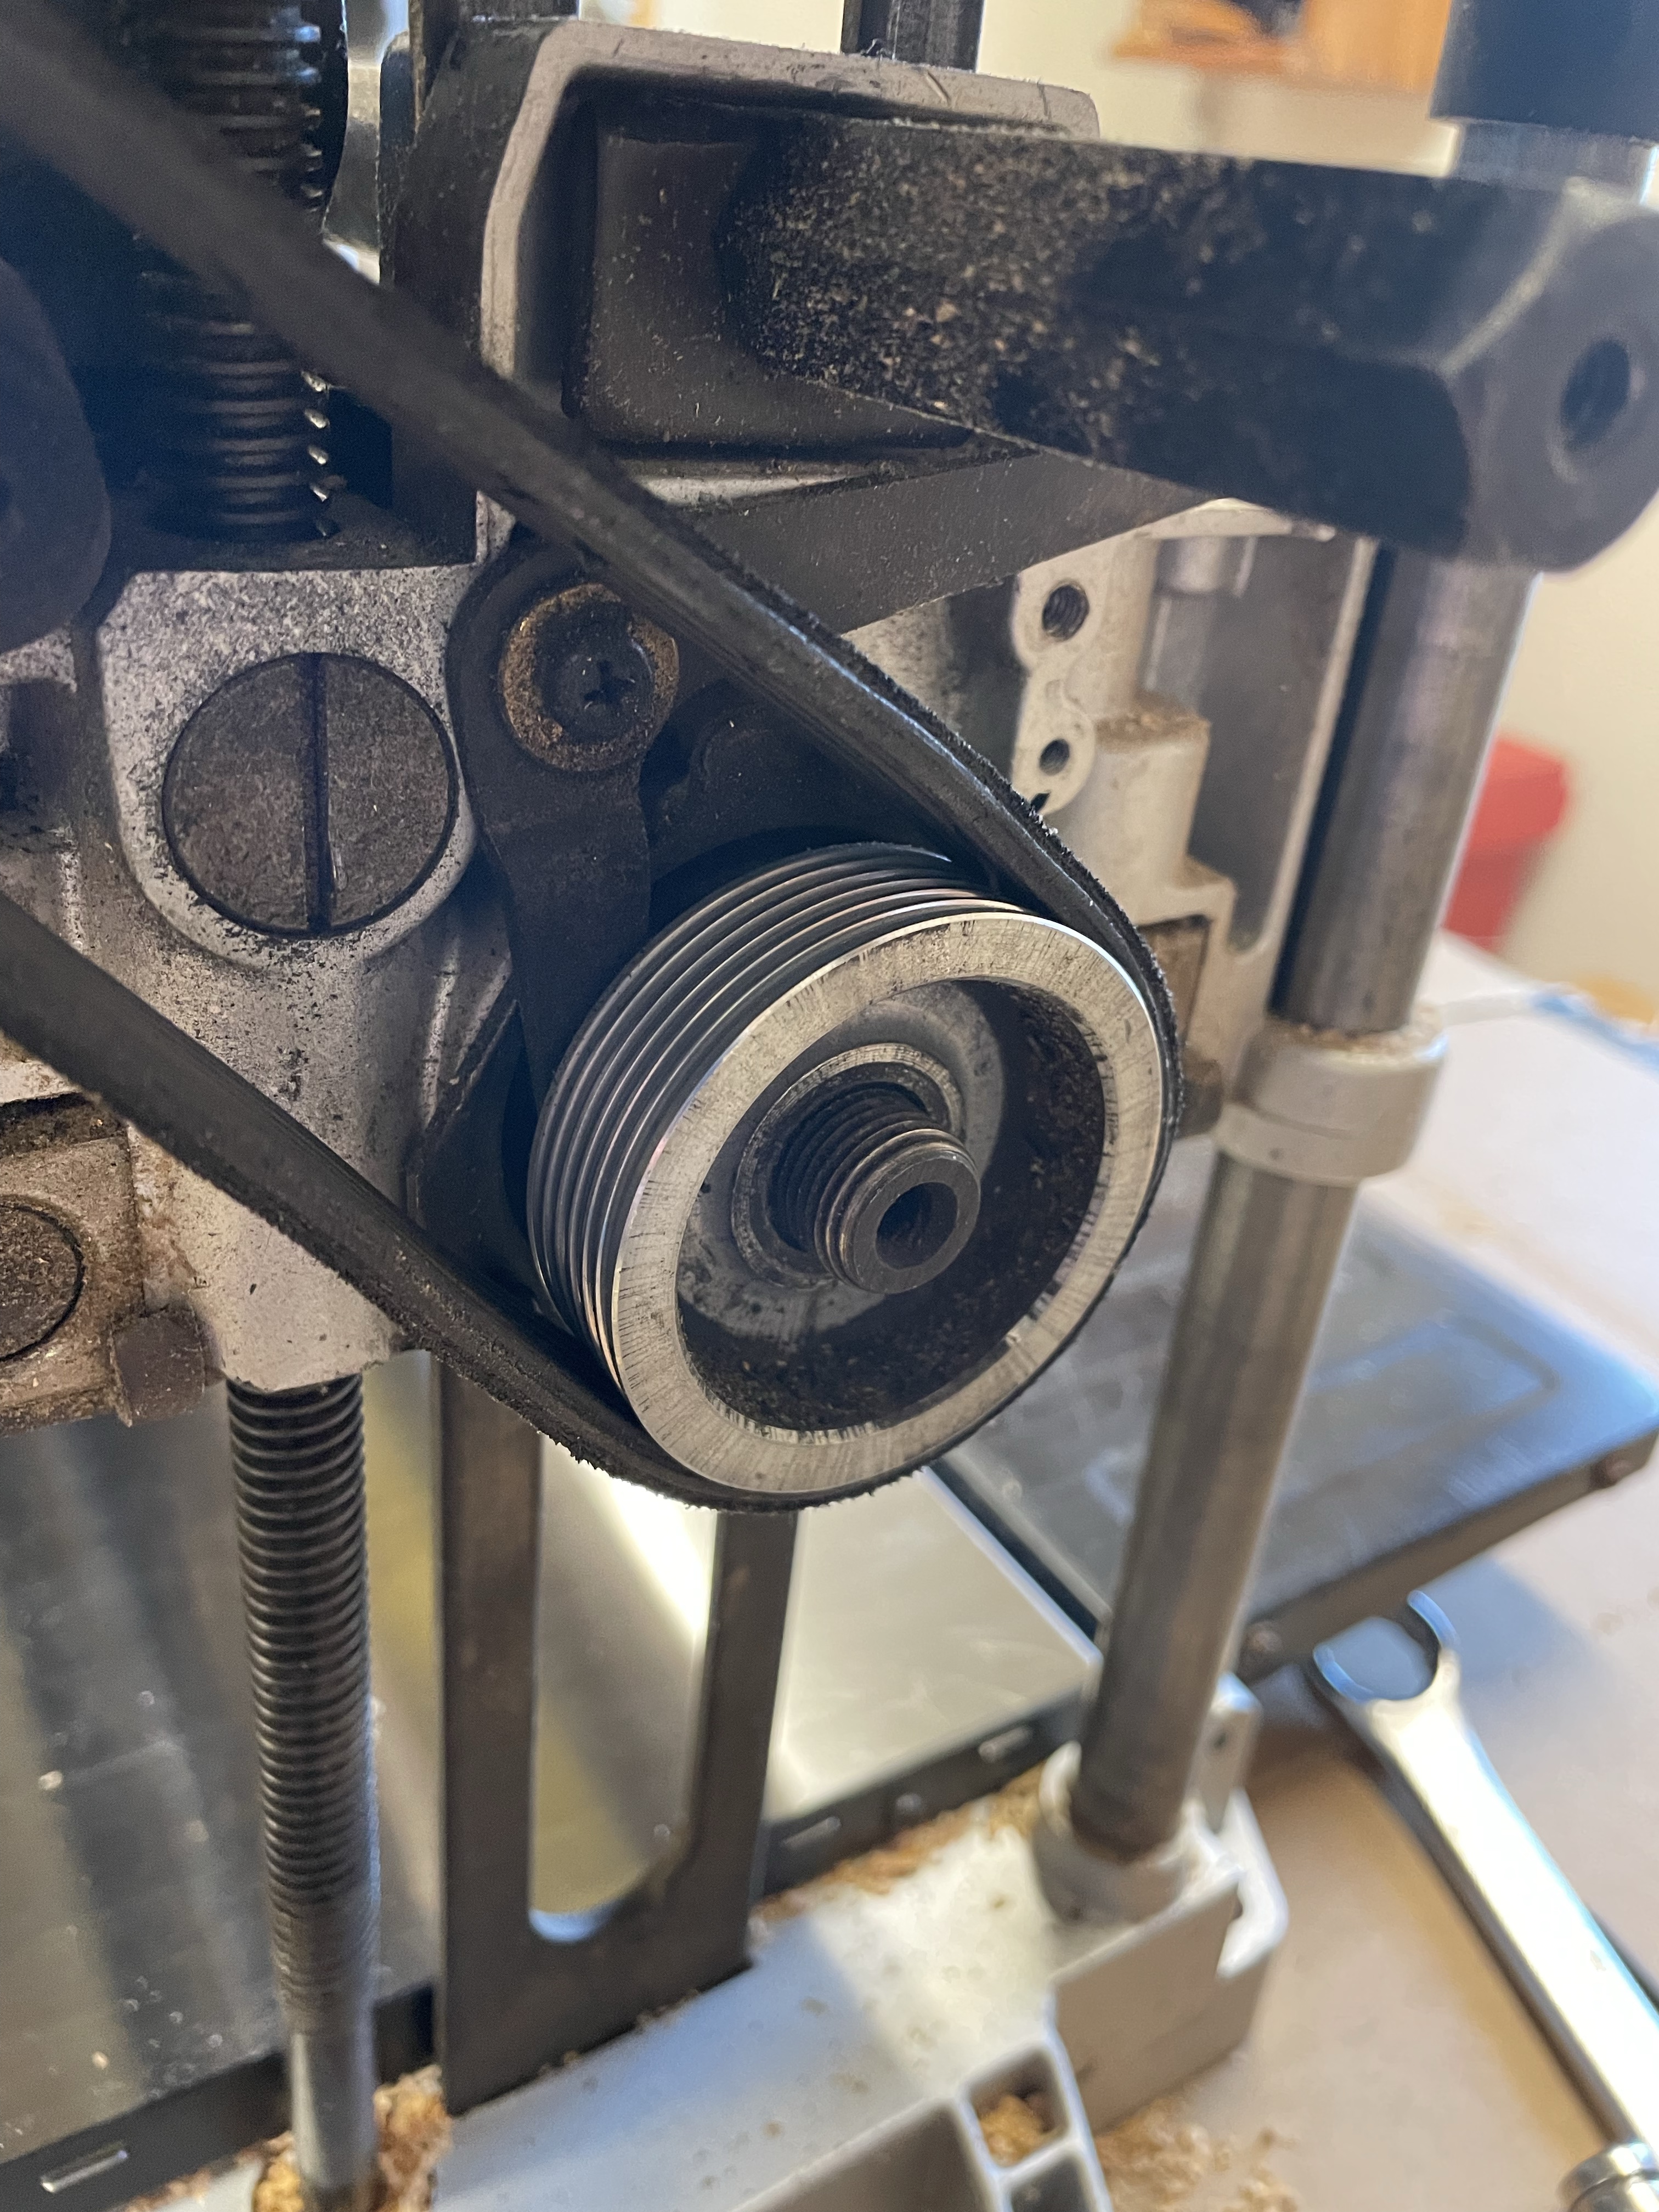
Once complete I took it for a test run immediately smelling burning plastic and managed to locate a couple of pieces of plastic. And a hole in the pulley guard.

Obviously something wasn’t right and after a little search I realized that the nut that came with the nut on the new head was a different thickness and rubbed on the guard. I contemplated looking for a different nut but instead opted to put a couple of shims to push the guard above the nut.

Overall the installation process was ok, but I wouldn’t want to take it on without the right tools and some mechanical knowledge. The instructions definitely leave something to be desired. The cut quality is excellent and for that I’m happy with the product.
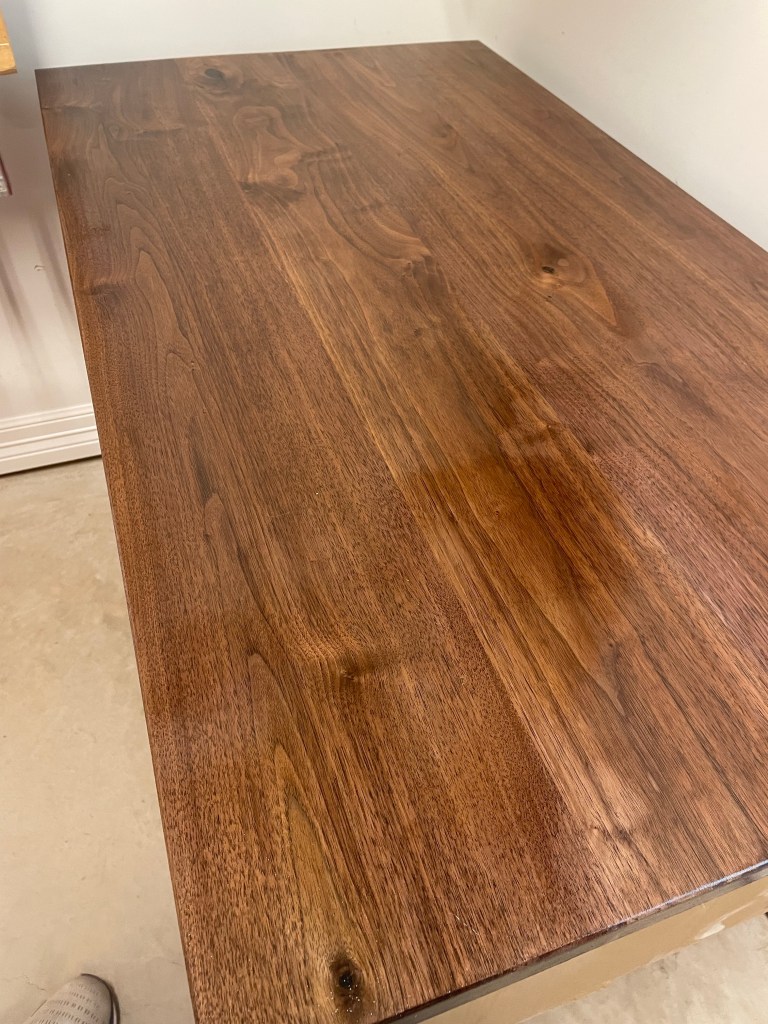
Walnut Coffee Table, Chamfer and Finish
Finishing is certainly not my strong point and not my favorite part of a project, however it’s the final step to seeing it all complete. I have been struggling with chip out on the edges of the table top and finally decided to chamfer them to remove the damage and prevent any more from occurring. Not sure if this is a Walnut normalcy, but I have not had this problem with other lumber.

The finish for the table is shellac, polyurethane and wax. Simple, and allows the wood to speak for itself.
The final step is attaching the tabletop to the base. Fortunately when I was cutting the side rails I remembered to cut slots for the

Filling Knots with Epoxy
Trying a new process is always a great challenge and continues to grow the types of projects I can tackle. The Walnut that I used for the Walnut Coffee Table and Walnut Side table had typical knots, it seems like a great opportunity to try an epoxy fill

Wandering around the local home store I searched for epoxy and the only thing I could find was Gorilla Brand. It may be fine but I also knew that I needed to tint it black.
Perhaps a more professional approach and some research would be helpful. I’ve read many articles and seen you tube videos of the river tables and other uses so I went to my usual source of information and found an article and video clip, #194–Nov/Dec 2007 Issue of Fine Woodworking. I then decided that since I could not find any local epoxy, to go to Lee Valley and order the Epoxy and Tint.
The epoxy came as a kit and the tint was also available at Lee Valley, no, I’m not cleaning it up so you can see the brand just go to the web site and look up tint.

I grabbed all the prep material I needed, cardboard to protect my bench, mixing sticks, paper towel and a board to mix on. Next I cleaned up the knots and removed Andy loose material with mineral spirits.
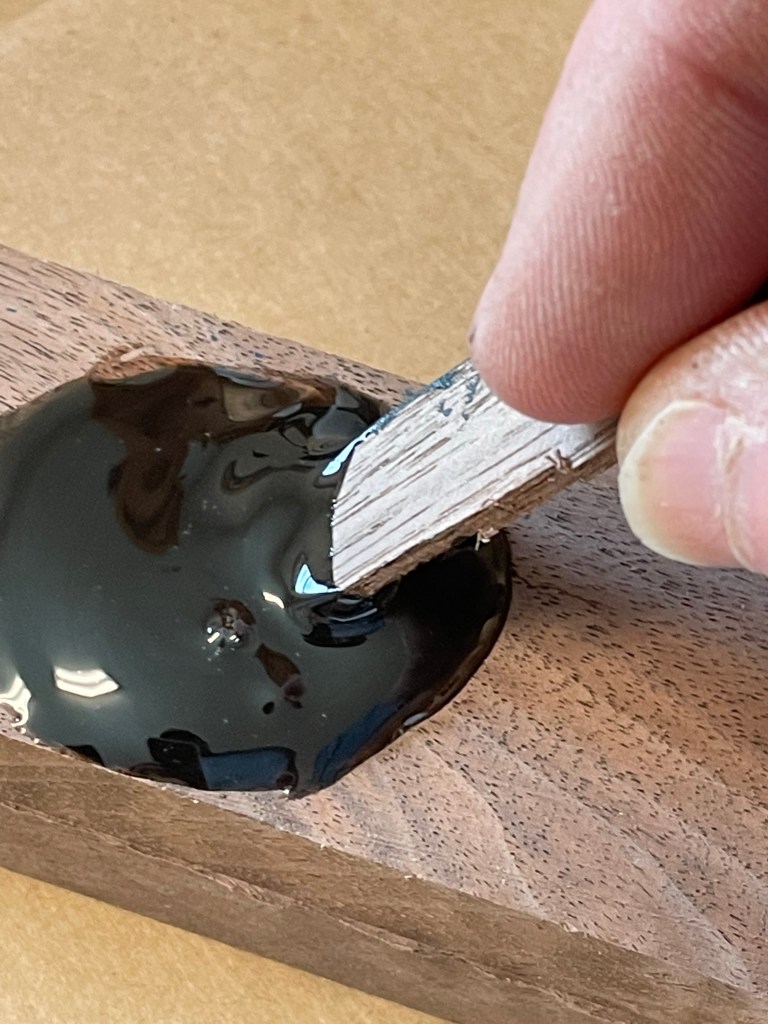

The epoxy mixed easily and it only took a small amount of tint, then I left it over night to harden.

I used both a plane and scrapers to flatten the hardened epoxy. With a little work the knots were filled and I was able to move on with finishing. As the first time using epoxy I have no experience to compare with other products and would love hearing others experience.
Dimensioning without a Jointer
Since moving a couple of years ago I never took the time to reassemble my jointer, perhaps not having the space, but in reality I have not needed it. For the last year I have reached for my Stanley #7 and flattened one side and then used my planer to finish the opposite side.
This month however I tried something totally different that I know several of you have done for wider boards. I built a Planer sled out of 3/4 plywood and a piece of scrap that was about 48” long and 11” wide. The lower board is made out of two pieces of plywood glued together to make it as rigid as possible. The smaller I assembled to handle shorter pieces.
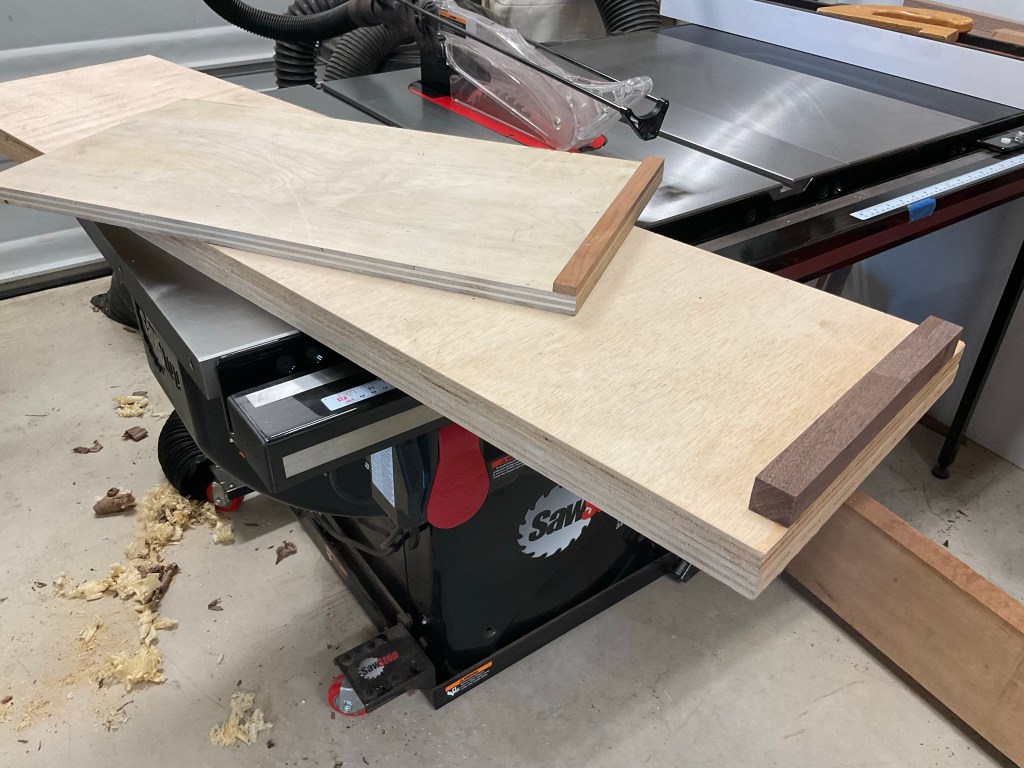
Next I cut several wedges and placed the board I wanted to Joint on the sled and used the wedges to level it. Next I send it through the planer to flatten one side, then flip it over and now I have both sides flat and parallel. Works like a charm!

Dust Collector Switch
Sometimes safety is all about making the right thing easy. Turning on my dust collector seems like an easy thing but when I have to walk around to the other side of my table saw in the middle of a project it often gets overlooked. There are a lot of expensive solutions, some that automatically start when a piece of equipment starts, some that even control ventilation gates. Perhaps the easiest solution is having a remote in your apron pocket that allows you to select what to turn on and at the press of a button you can turn the dust collector off and on.

A remote control and 5 plug in adapters, hopefully this is the cure fro my lazy streak!
